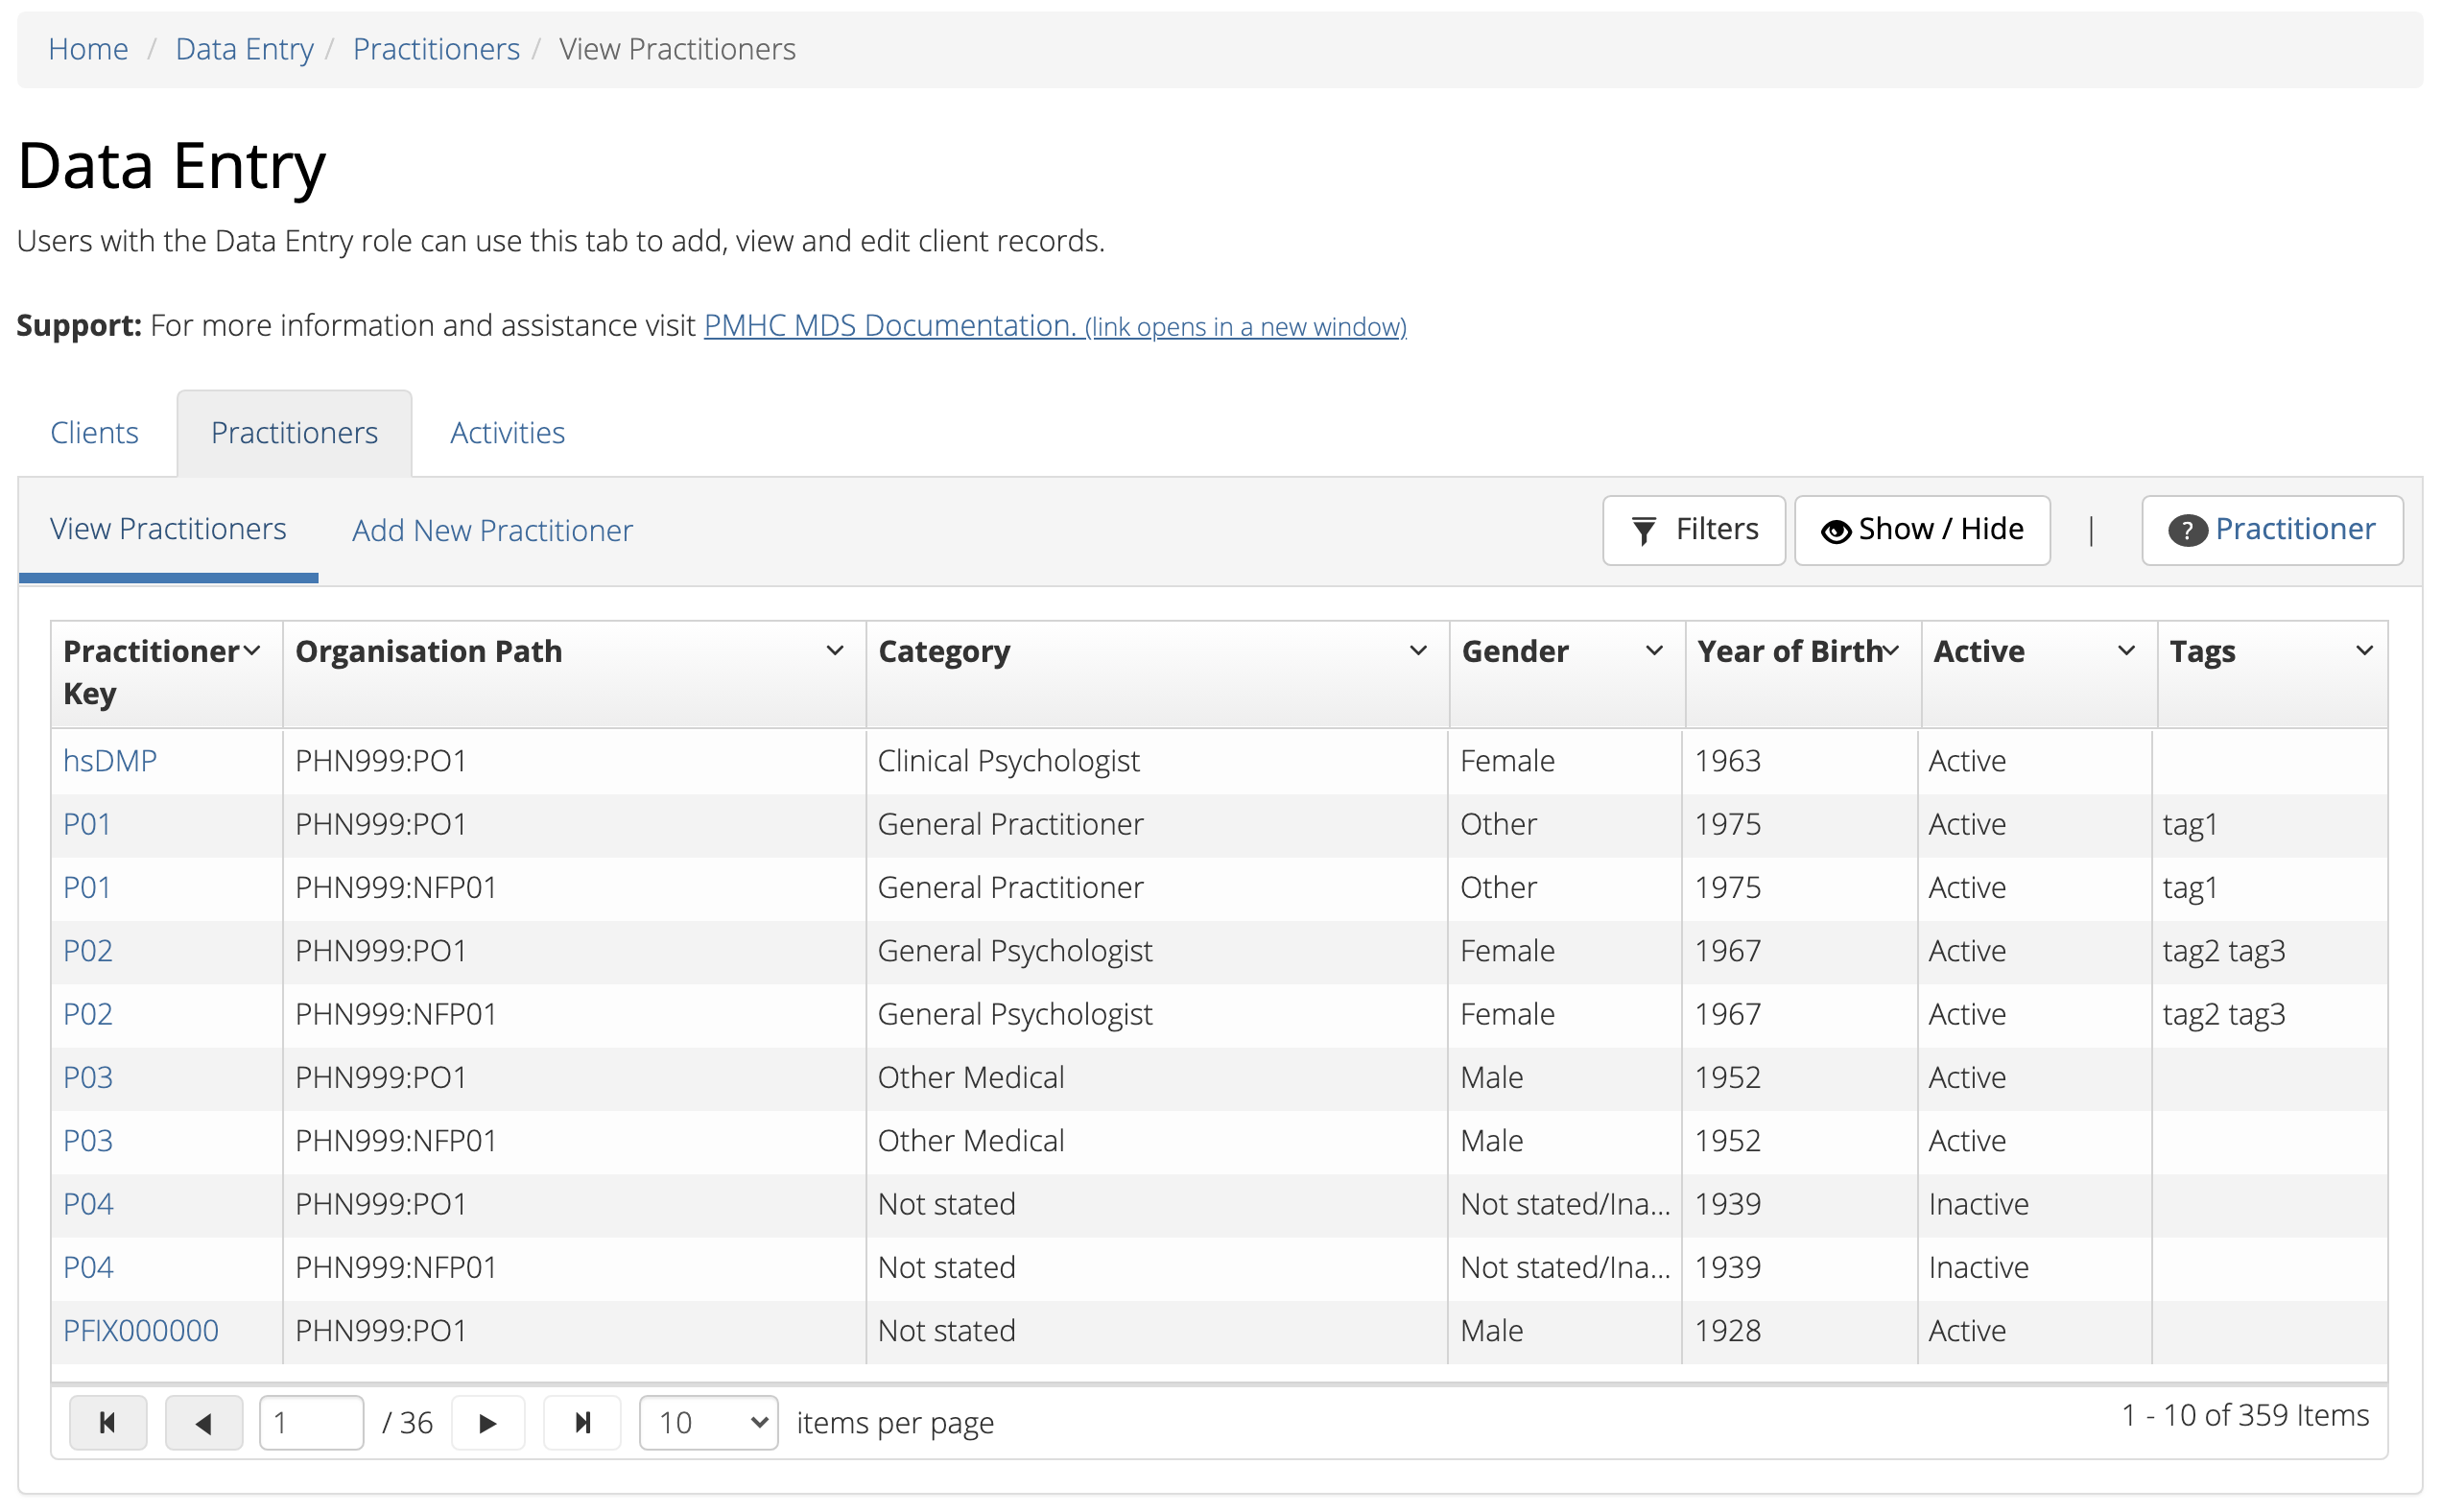
You will only be able to see the Data Entry tab if you have been assigned
the ‘Data Entry’ Users Roles, when logged into the PMHC MDS on https://pmhc-mds.net.
If you don’t have access to the Data Entry tab and you believe you should, please
contact someone in your provider organisation or provider organisation’s PHN
who has the ‘User Management’ role. If you are unsure who has the ‘User Management’
role please email the PMHC Helpdesk at support@pmhc-mds.com.
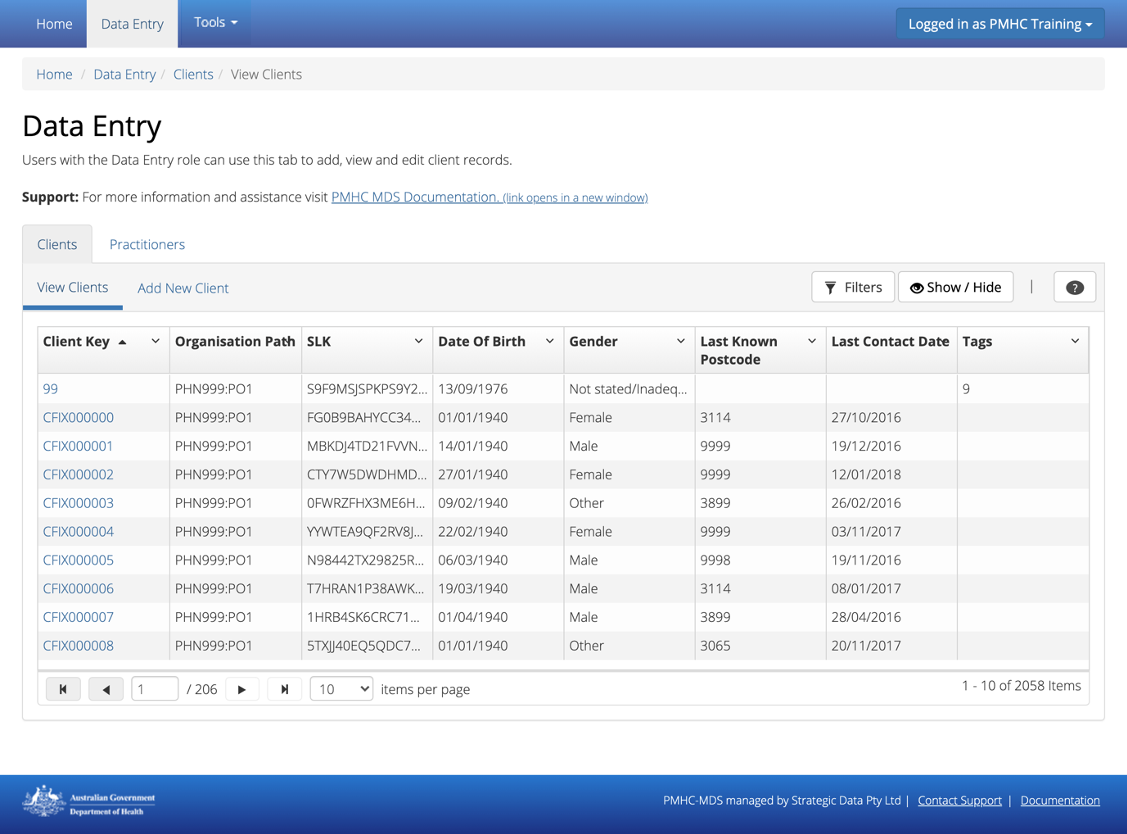
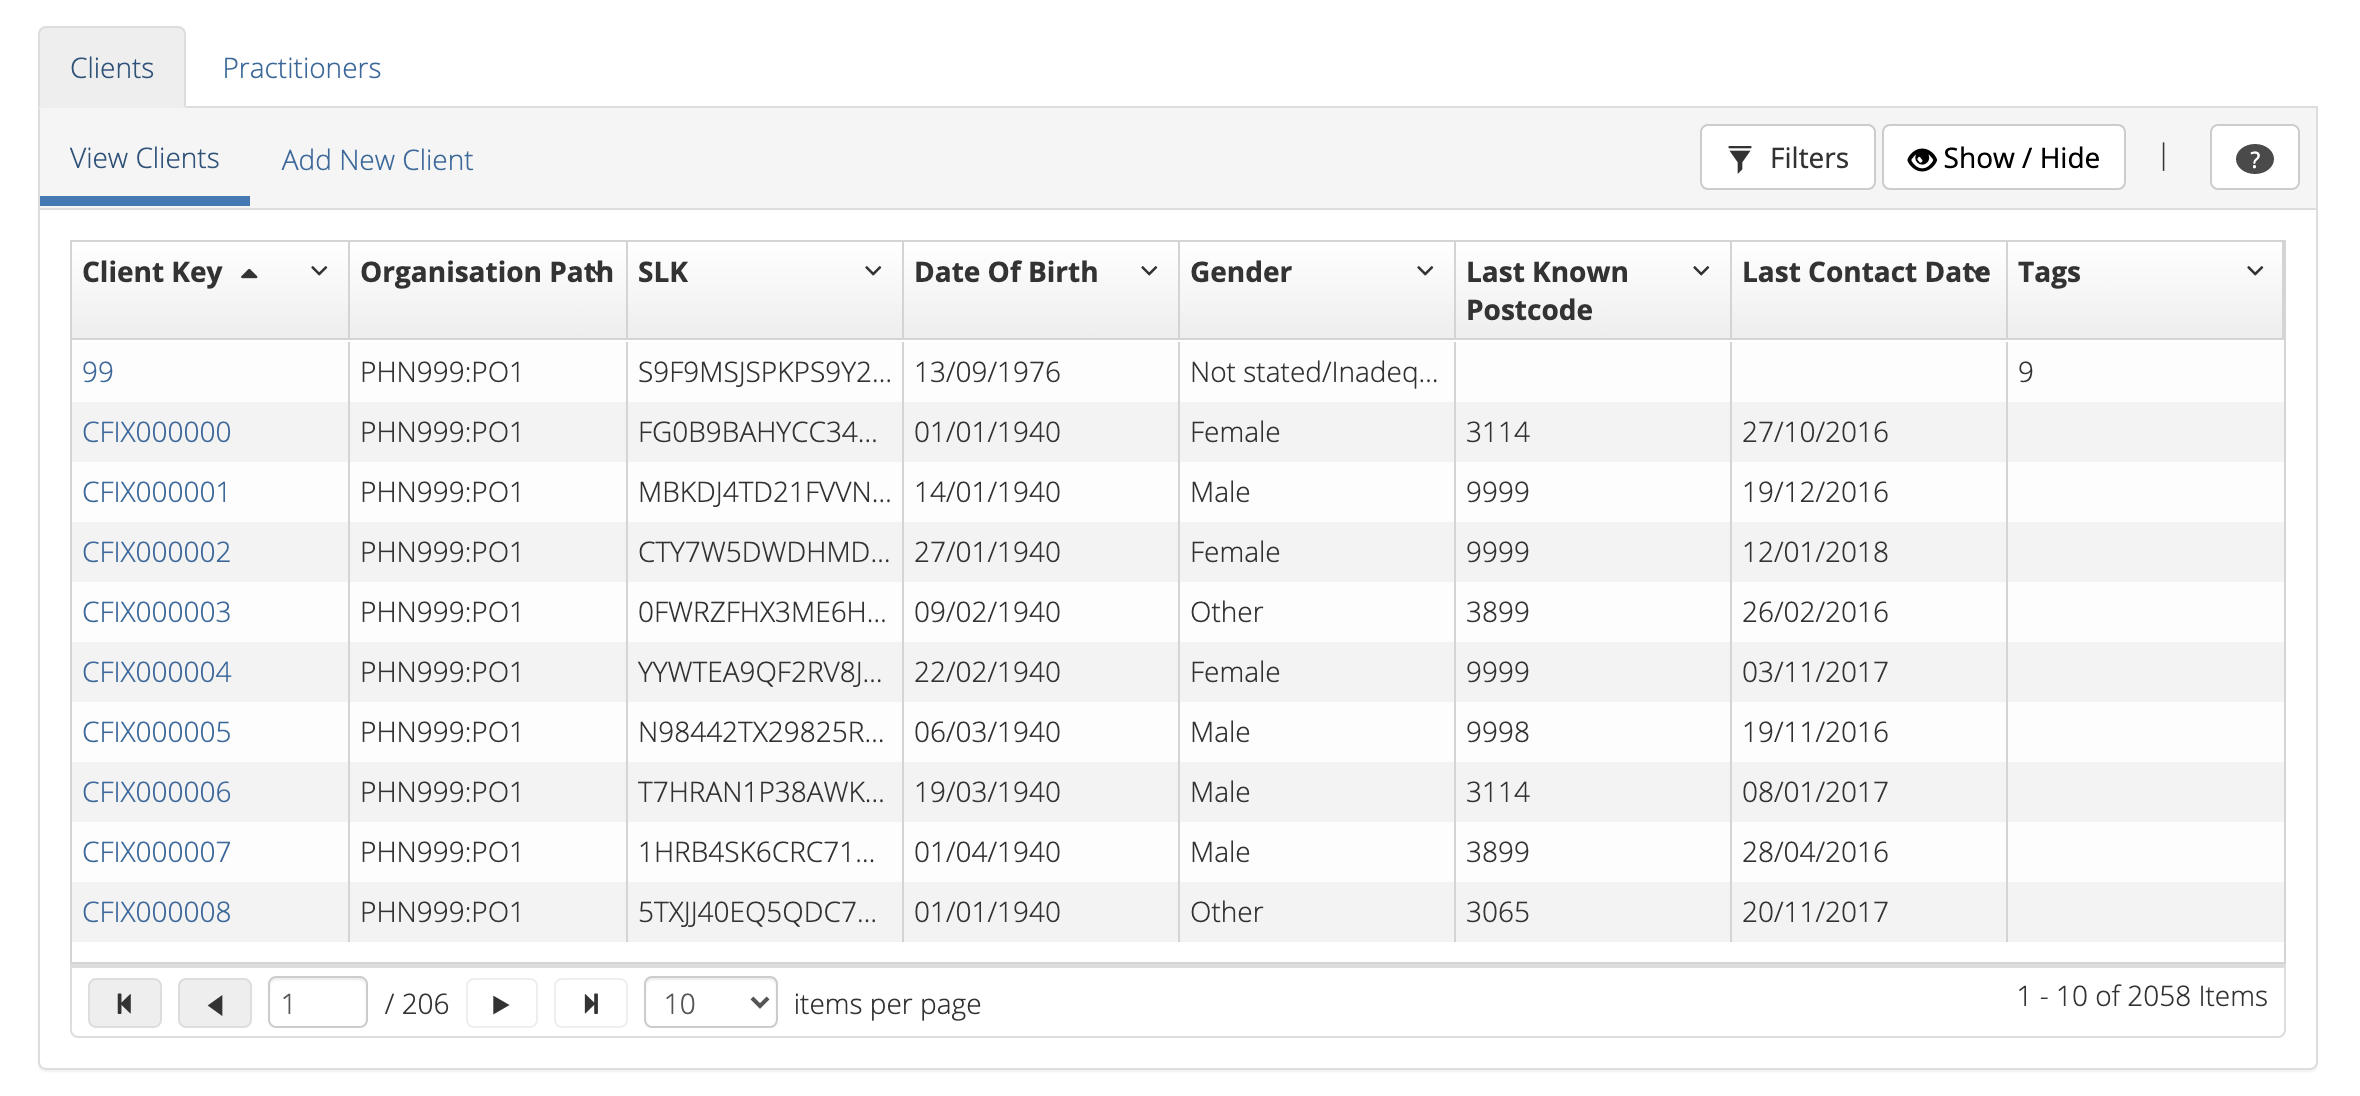
After navigating to the Data Entry tab, you will be presented a table of clients.
You can choose any of the filters to search for a client, depending on the client
information that is available.
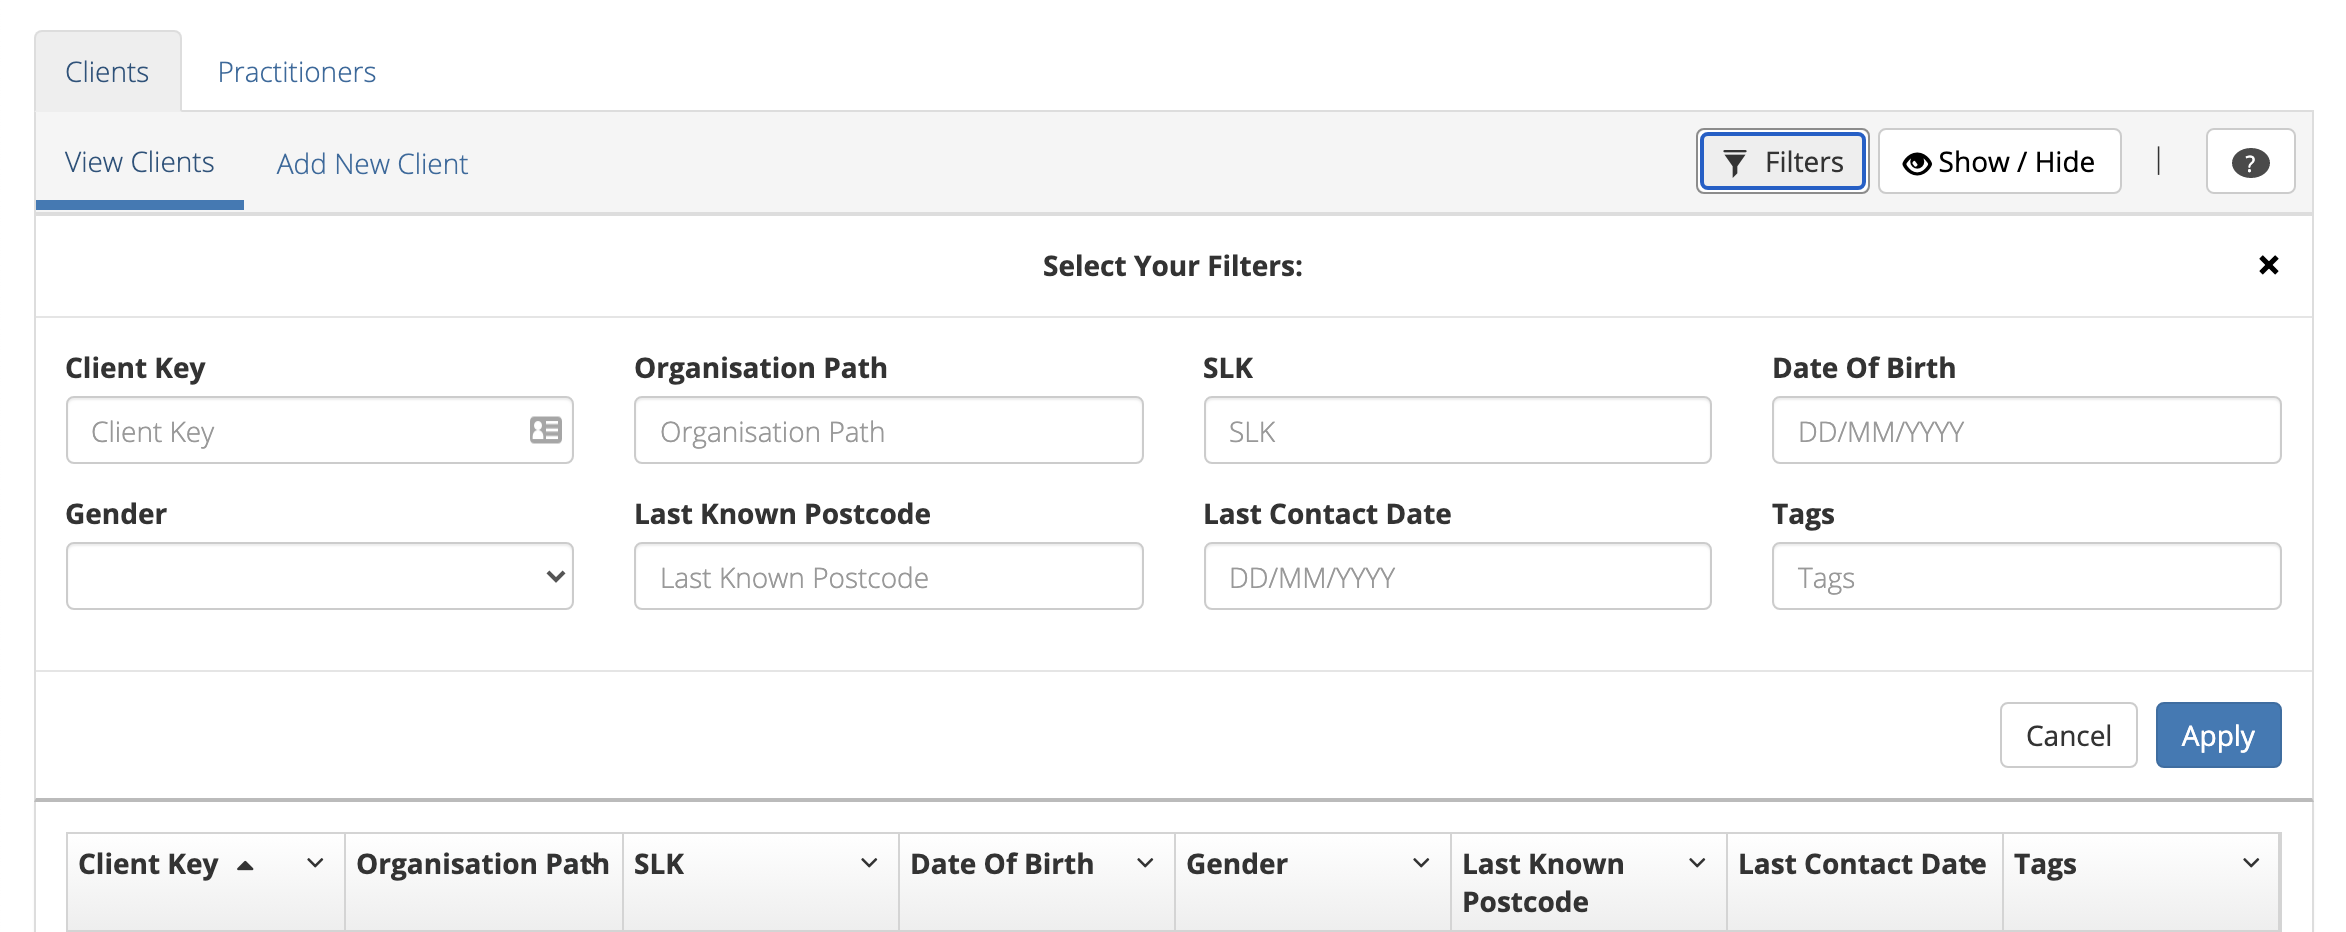
To filter the listed clients:
Click the grey Filters button. This will open a field in which to enter
text
Type an appropriate filter into any of the fields
Click the blue Apply button
(or click the Cancel button if you decide not to filter the client data)
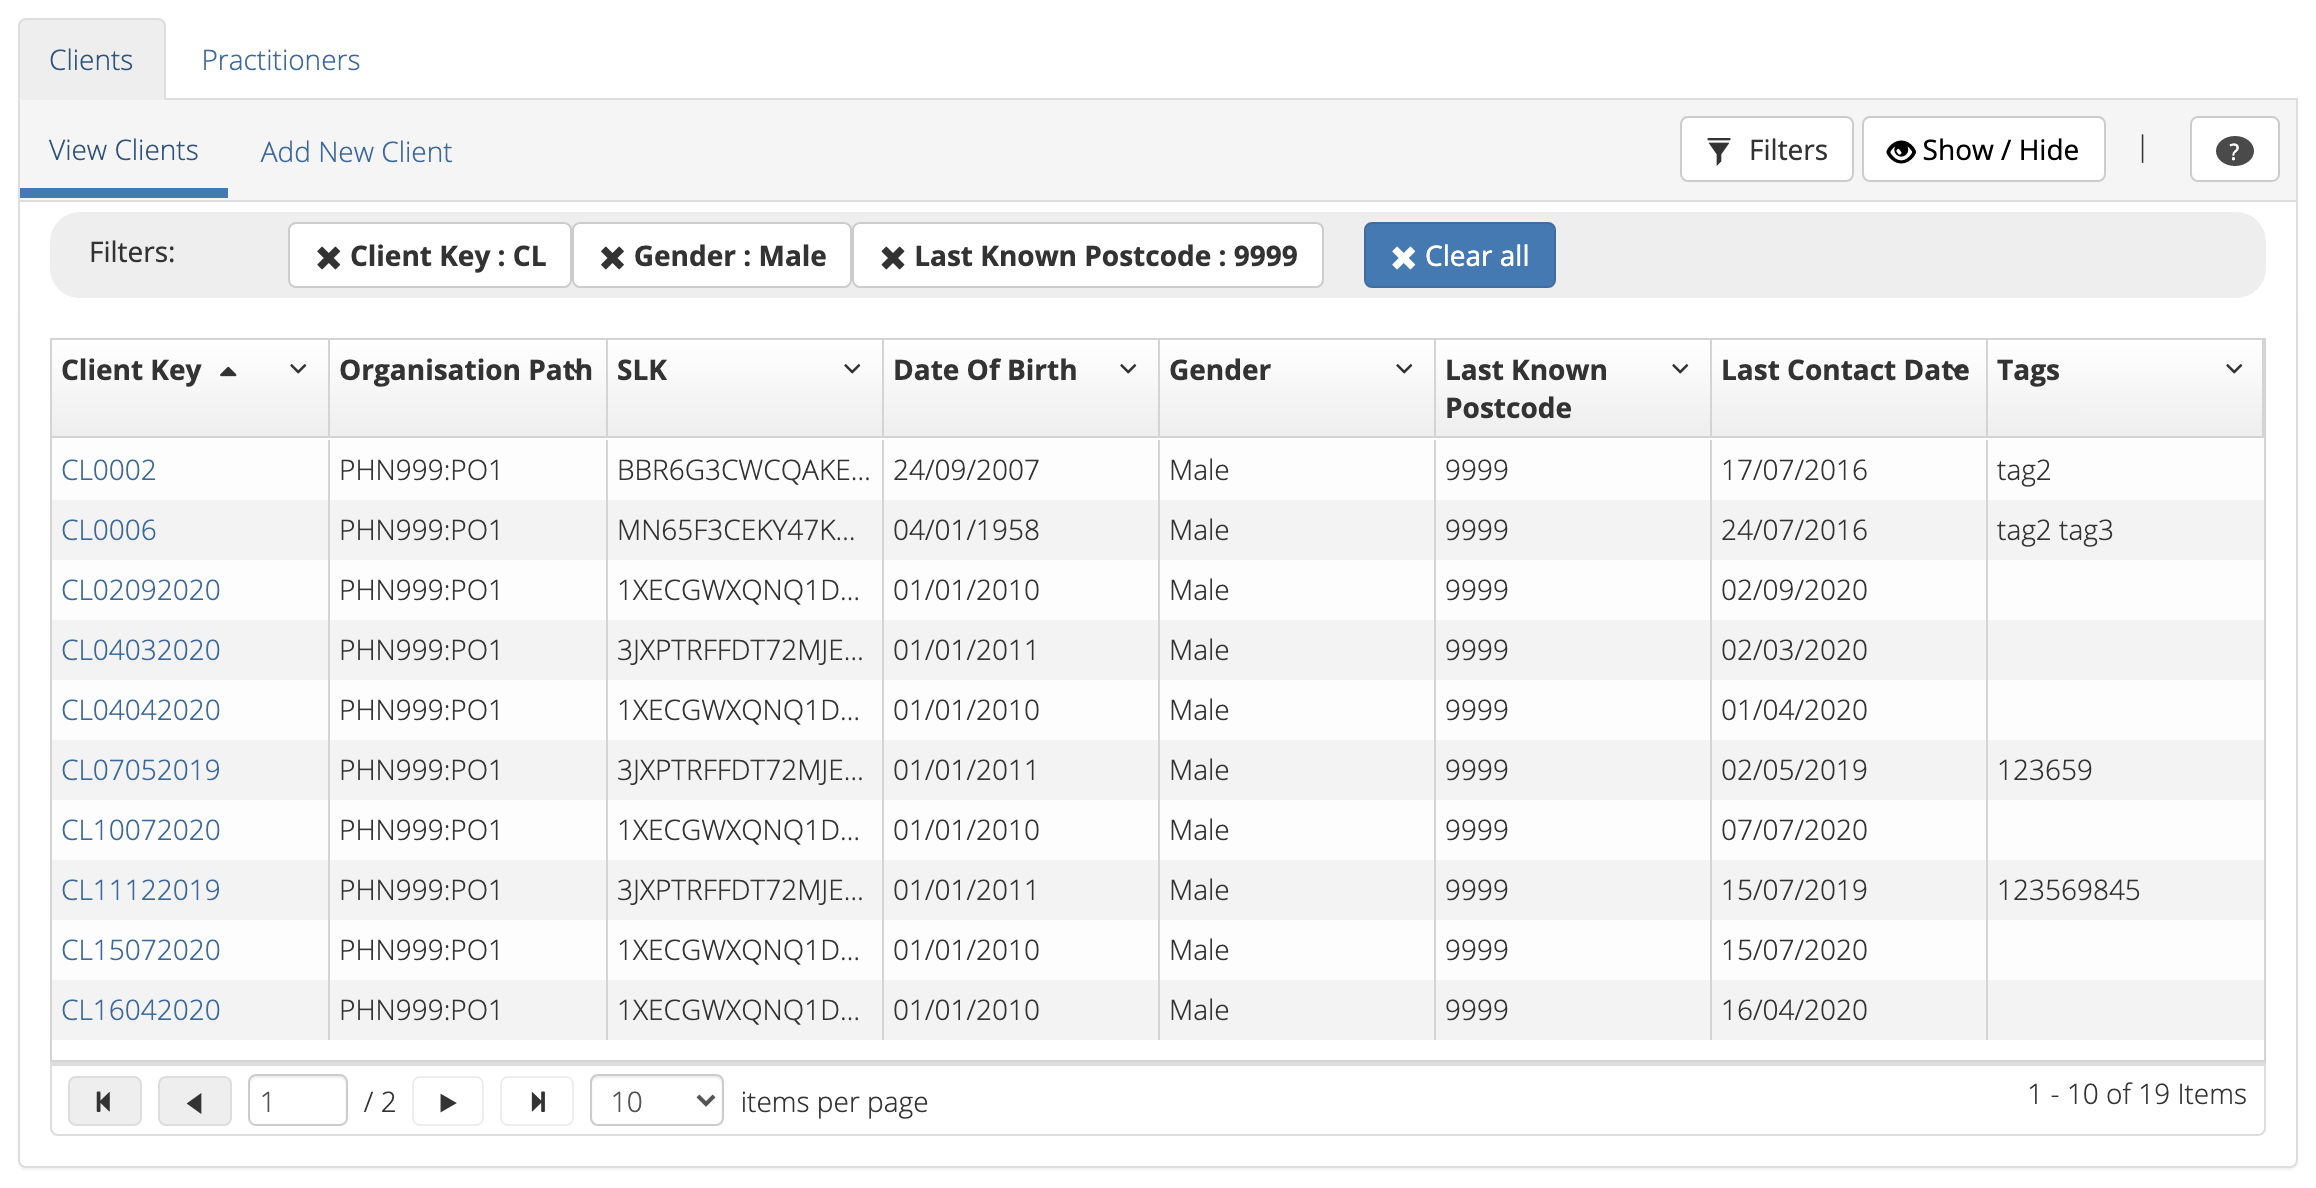
You can view the applied filters at the top of the filtered client data table.
To remove the filter, click the grey cross (X) listed before the filter name
or click the blue Clear all button.
You can sort the listed client search results by simply clicking the column header.
Alternately you can click the arrow beside a column header for more sort options,
as follows:
From the Client Search Table, click the Client Key
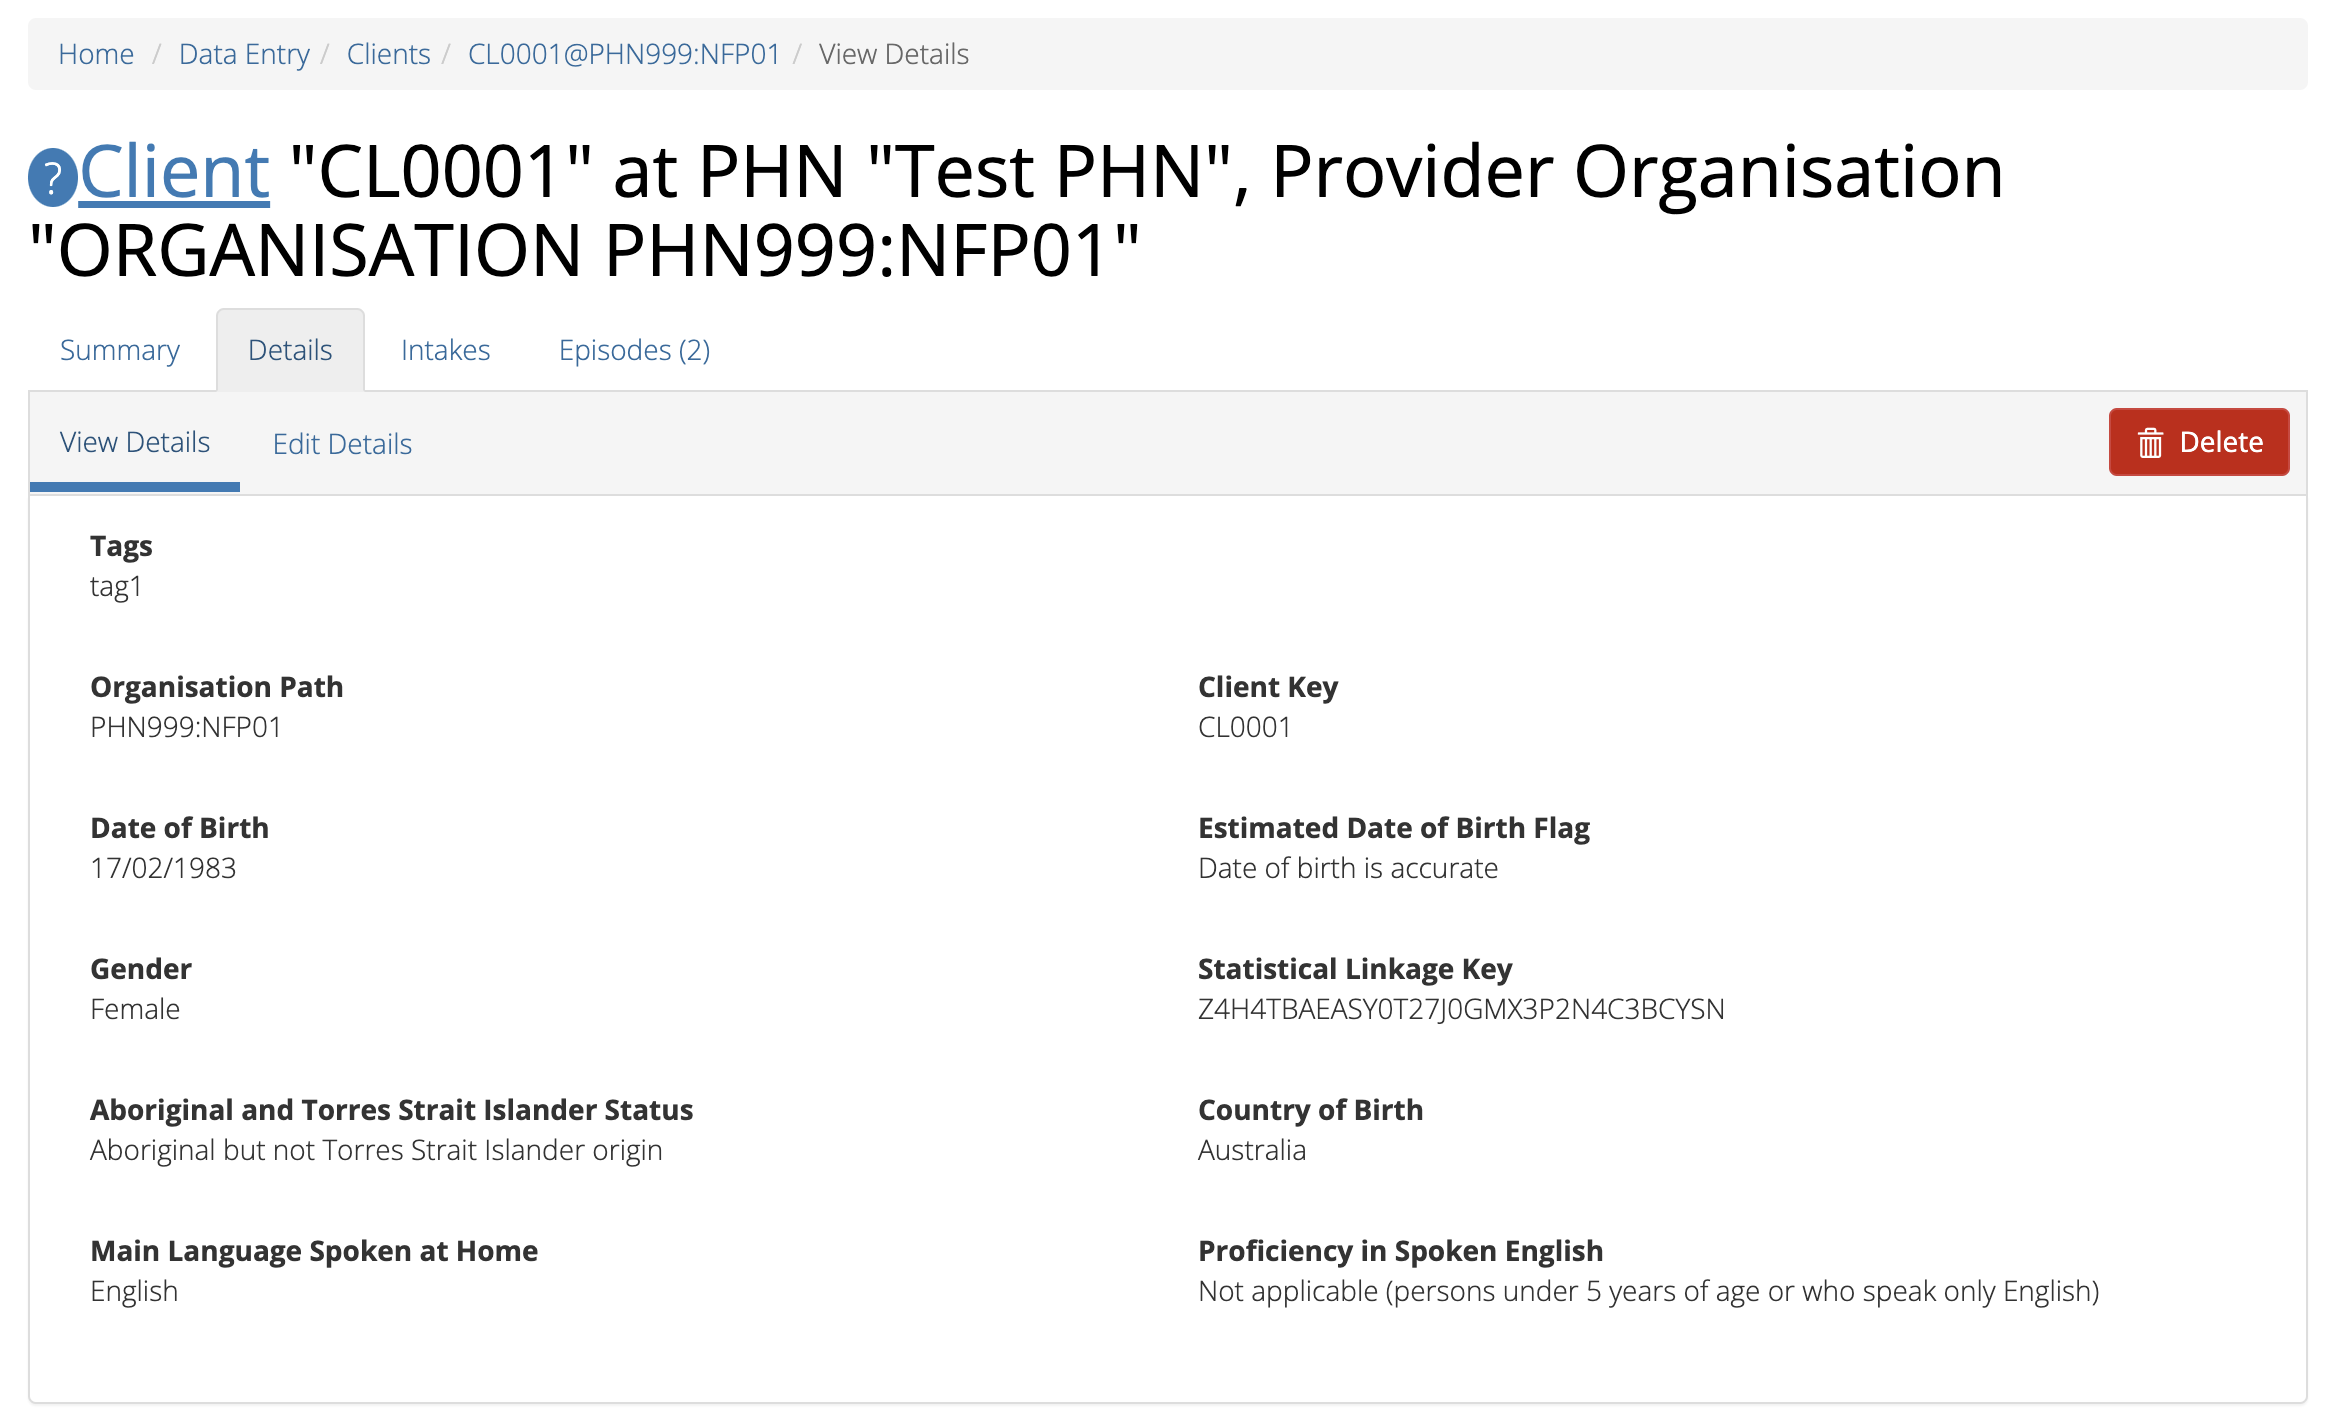
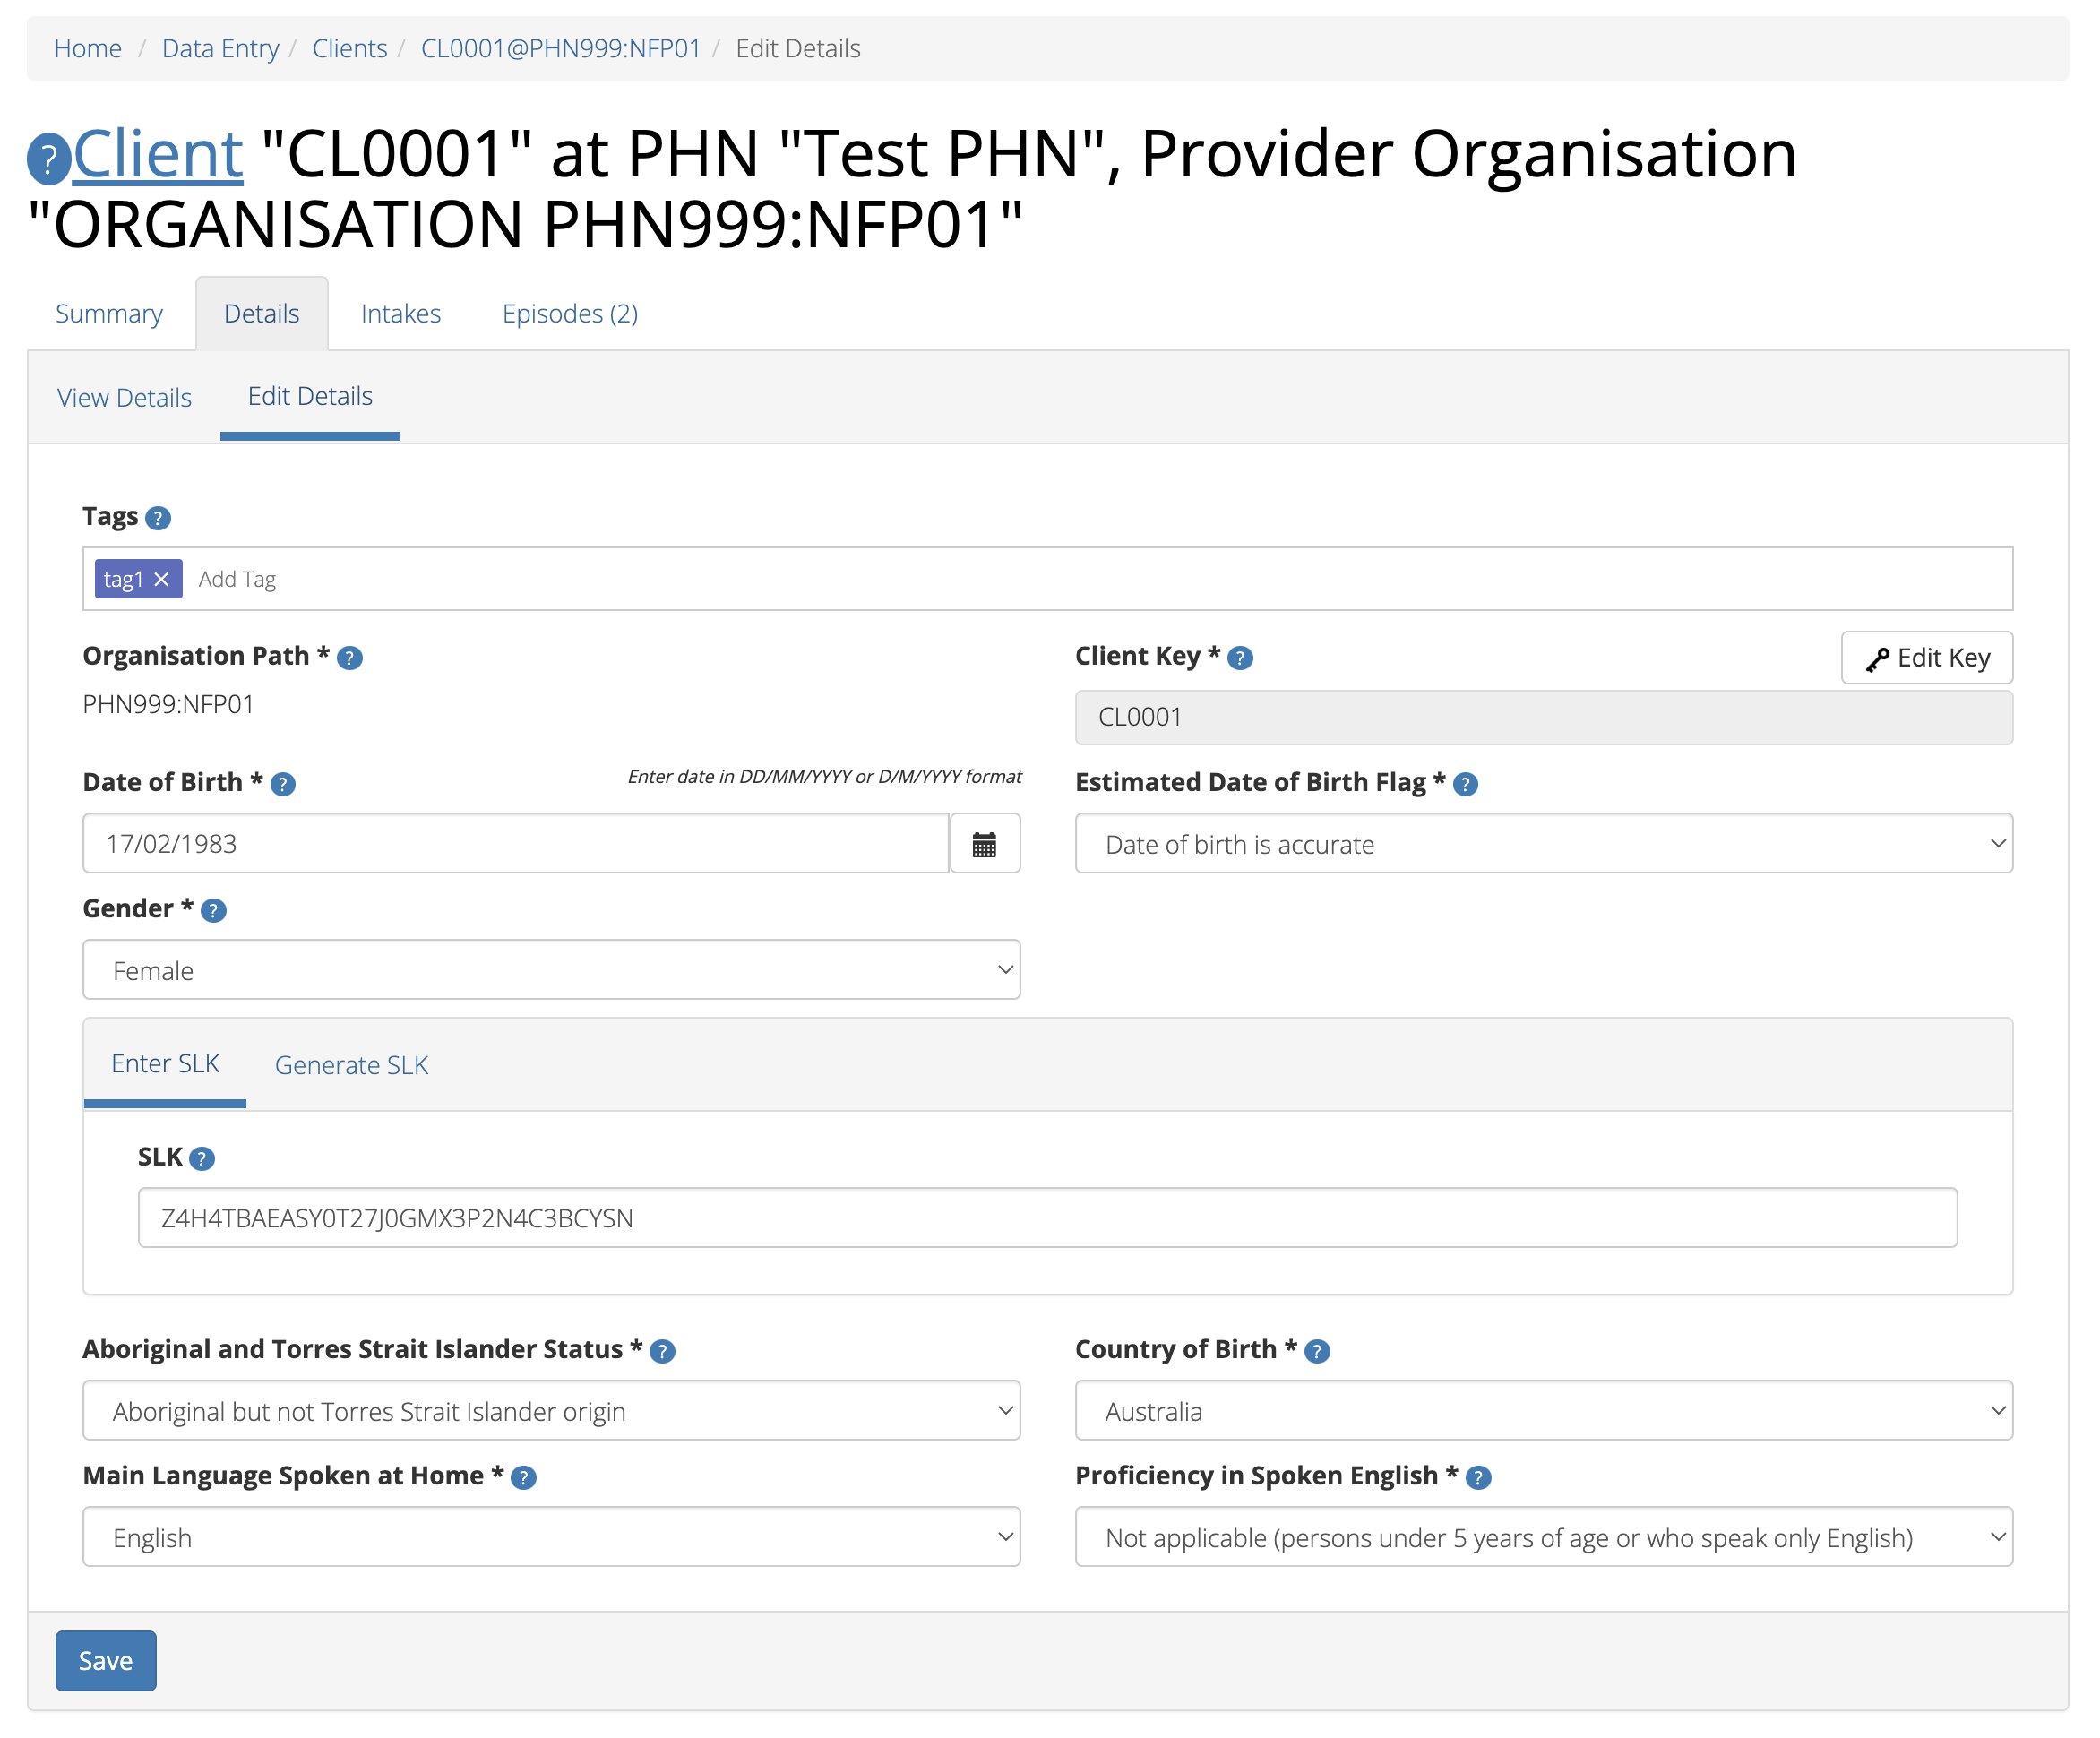
Click the Details tab, to view client’s details
Click the Edit Details tab
Update the client’s details. Mandatory fields are marked with an * (Specification Client Data Elements)
Please note: You can edit the Client Key from this screen. See Editing a Client Key
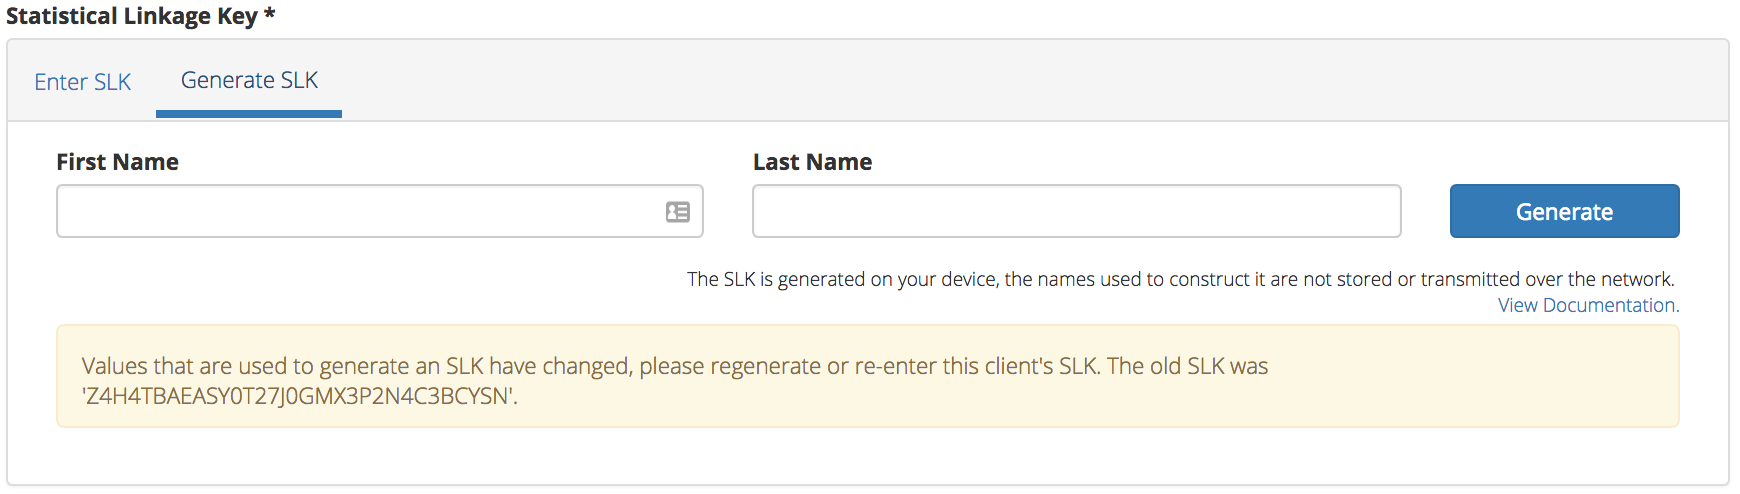
Please note: If you edit the Date of Birth or Gender you will be
required to update the Statistical Linkage Key field.
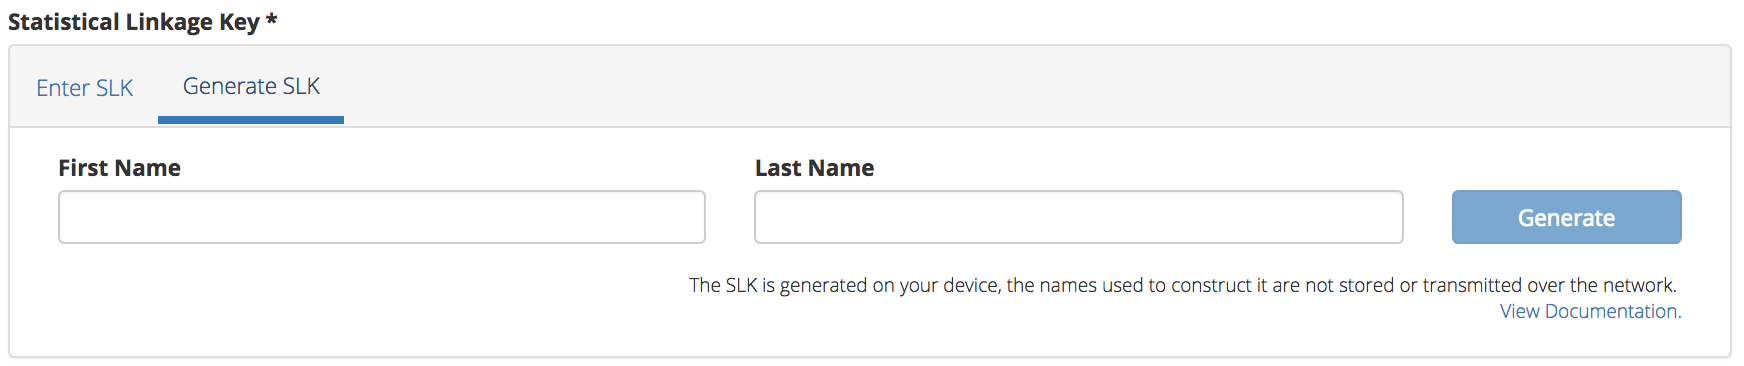
You can choose to Enter or Generate a client’s SLK.
The SLK is generated on your device, the names used are not stored or
transmitted over the network.
Click the blue Save button. (If you decide not to save changes, you can
navigate away from this screen)
You will receive confirmation that the client’s details have been saved, and it
will now be display the updated details in the Clients View Details tab.
If you receive an error message, the data will need to be corrected before the
record is saved and added to the PMHC MDS.
See Validation Rules - Client.
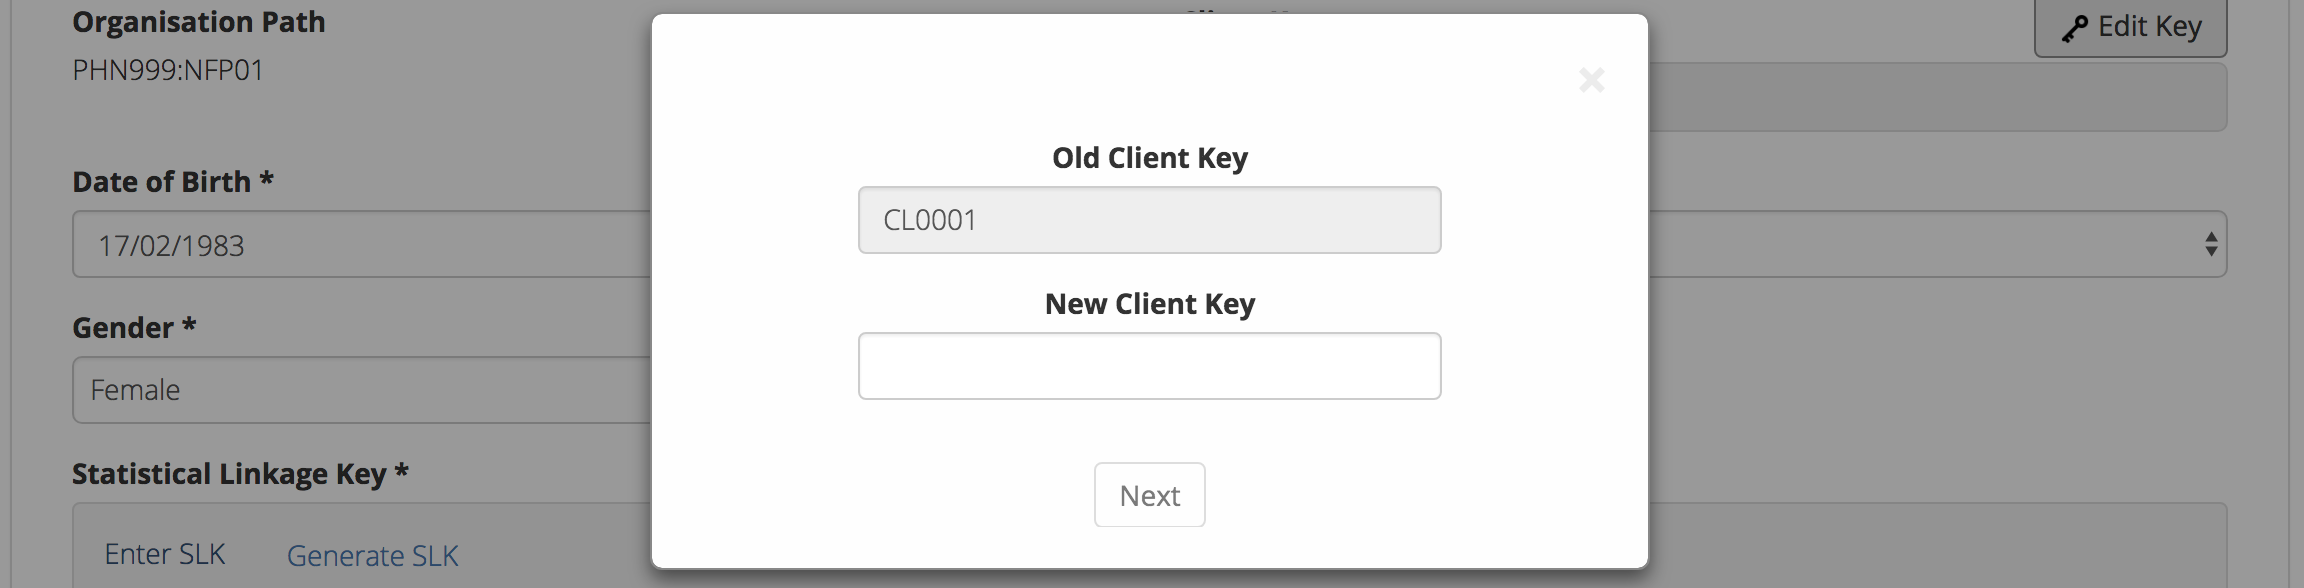
From the Client Edit Details tab, click the Edit Key button
Type in the new client key and click Next
Double check the new key is correct and click Save. (If it is incorrect,
click back to re-enter the key or click the ‘cross’ in the top right to
cancel this key change request)
You will receive confirmation that the client’s key has been saved, and the screen
will now be displaying the updated client key details in the Clients View Details tab.
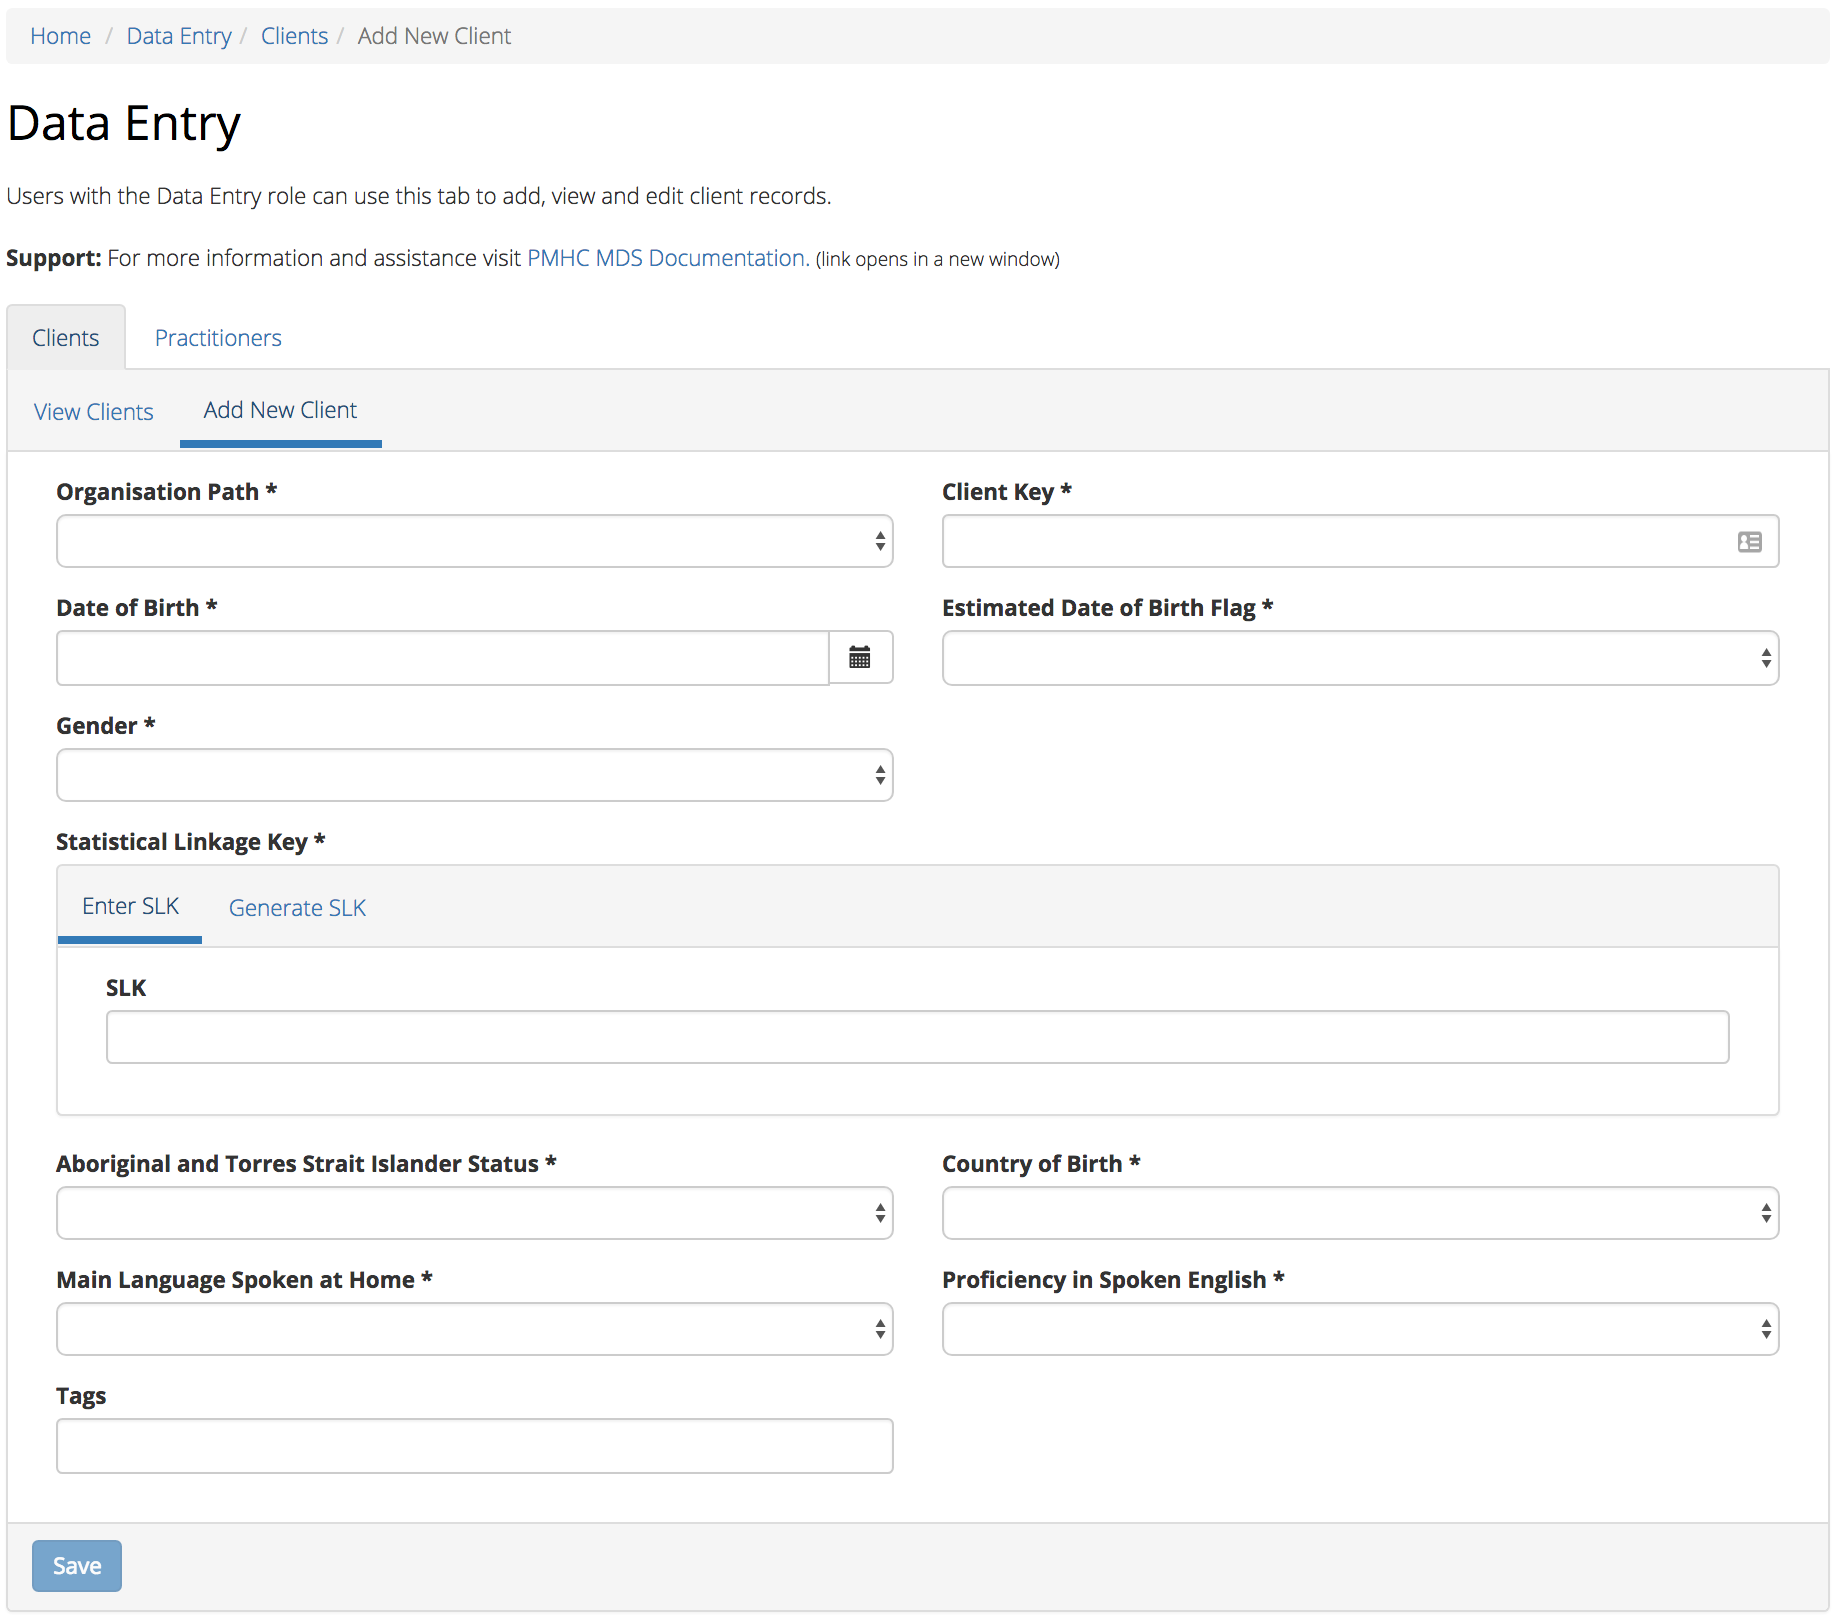
Firstly double check the client is not already added
Click the blue Add New Client button
Choose the Provider Organisation from the drop down list
Enter the client’s details. Mandatory fields are marked with an * (Specification Client Data Elements)
Please note: With the Statistical Linkage Key field you can choose
to Enter or Generate a client’s SLK.
The SLK is generated on your device, the names used are not stored or
transmitted over the network.
Click the blue Save button. (If you decide not to add this client, you
can simply navigate away from this screen)
You will receive confirmation that the Client has been saved, and it will
now be displaying the client’s saved information in the Clients View Details tab.
If you receive an error message, the data will need to be corrected before the
record is saved and added to the PMHC MDS.
See Validation Rules - Client.
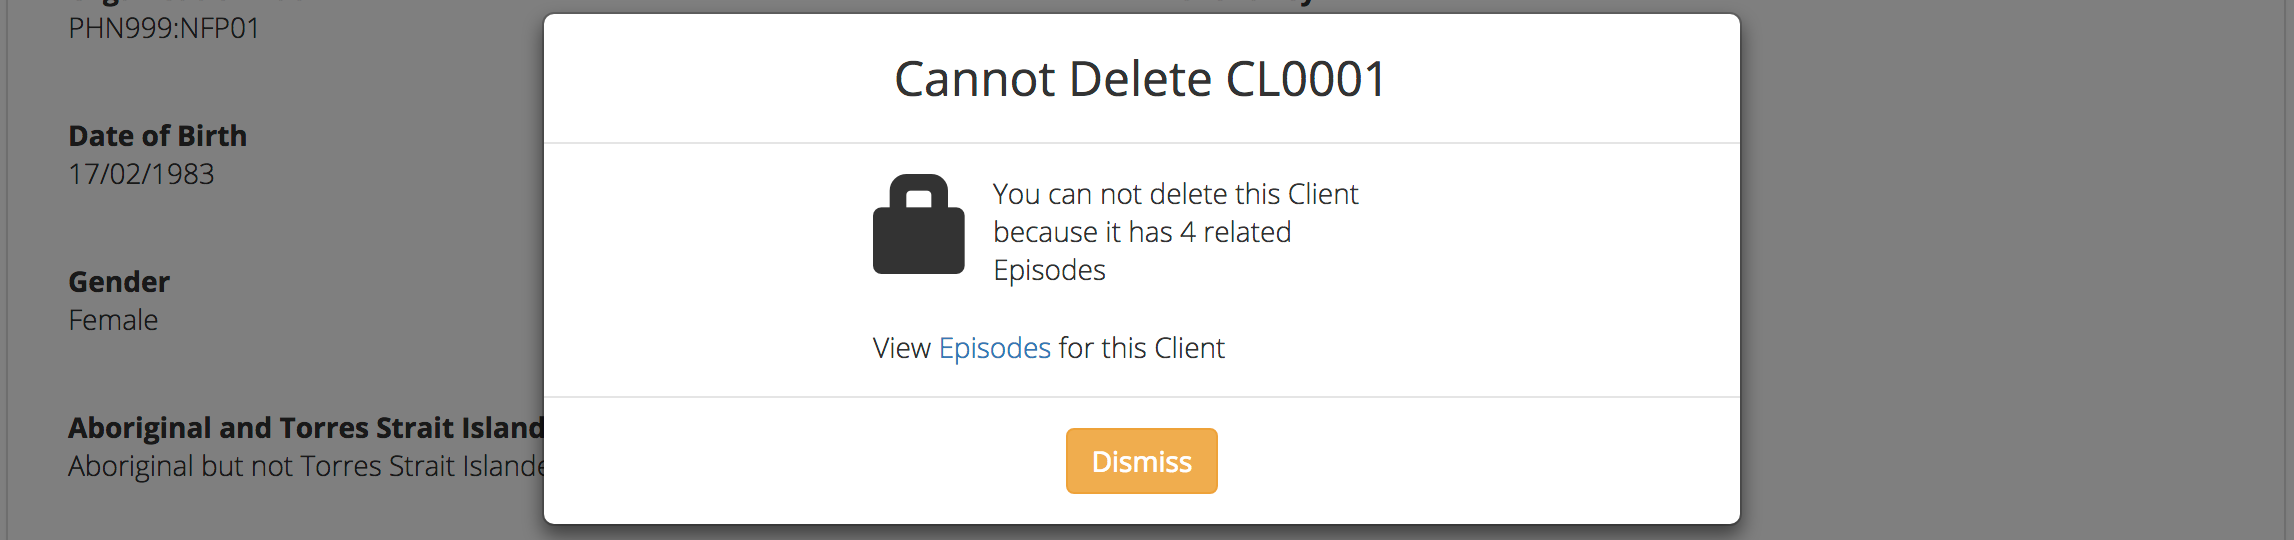
Please note: Once the client is deleted, you will not be able to recover this client data.
Click the blue Confirm button to delete this client.
(or click the orange Cancel button if you decide not to delete this client data)
After you click Confirm, you will receive confirmation that the client has
been deleted, and you will be redirected to the Clients, which
will no longer display the deleted client.
If the client you are trying to delete has any dependant records, you will not
be able to proceed with deleting this client until all the related records have
been deleted.
Click on the link provided to view the Client’s Episodes, or click the orange Dismiss button
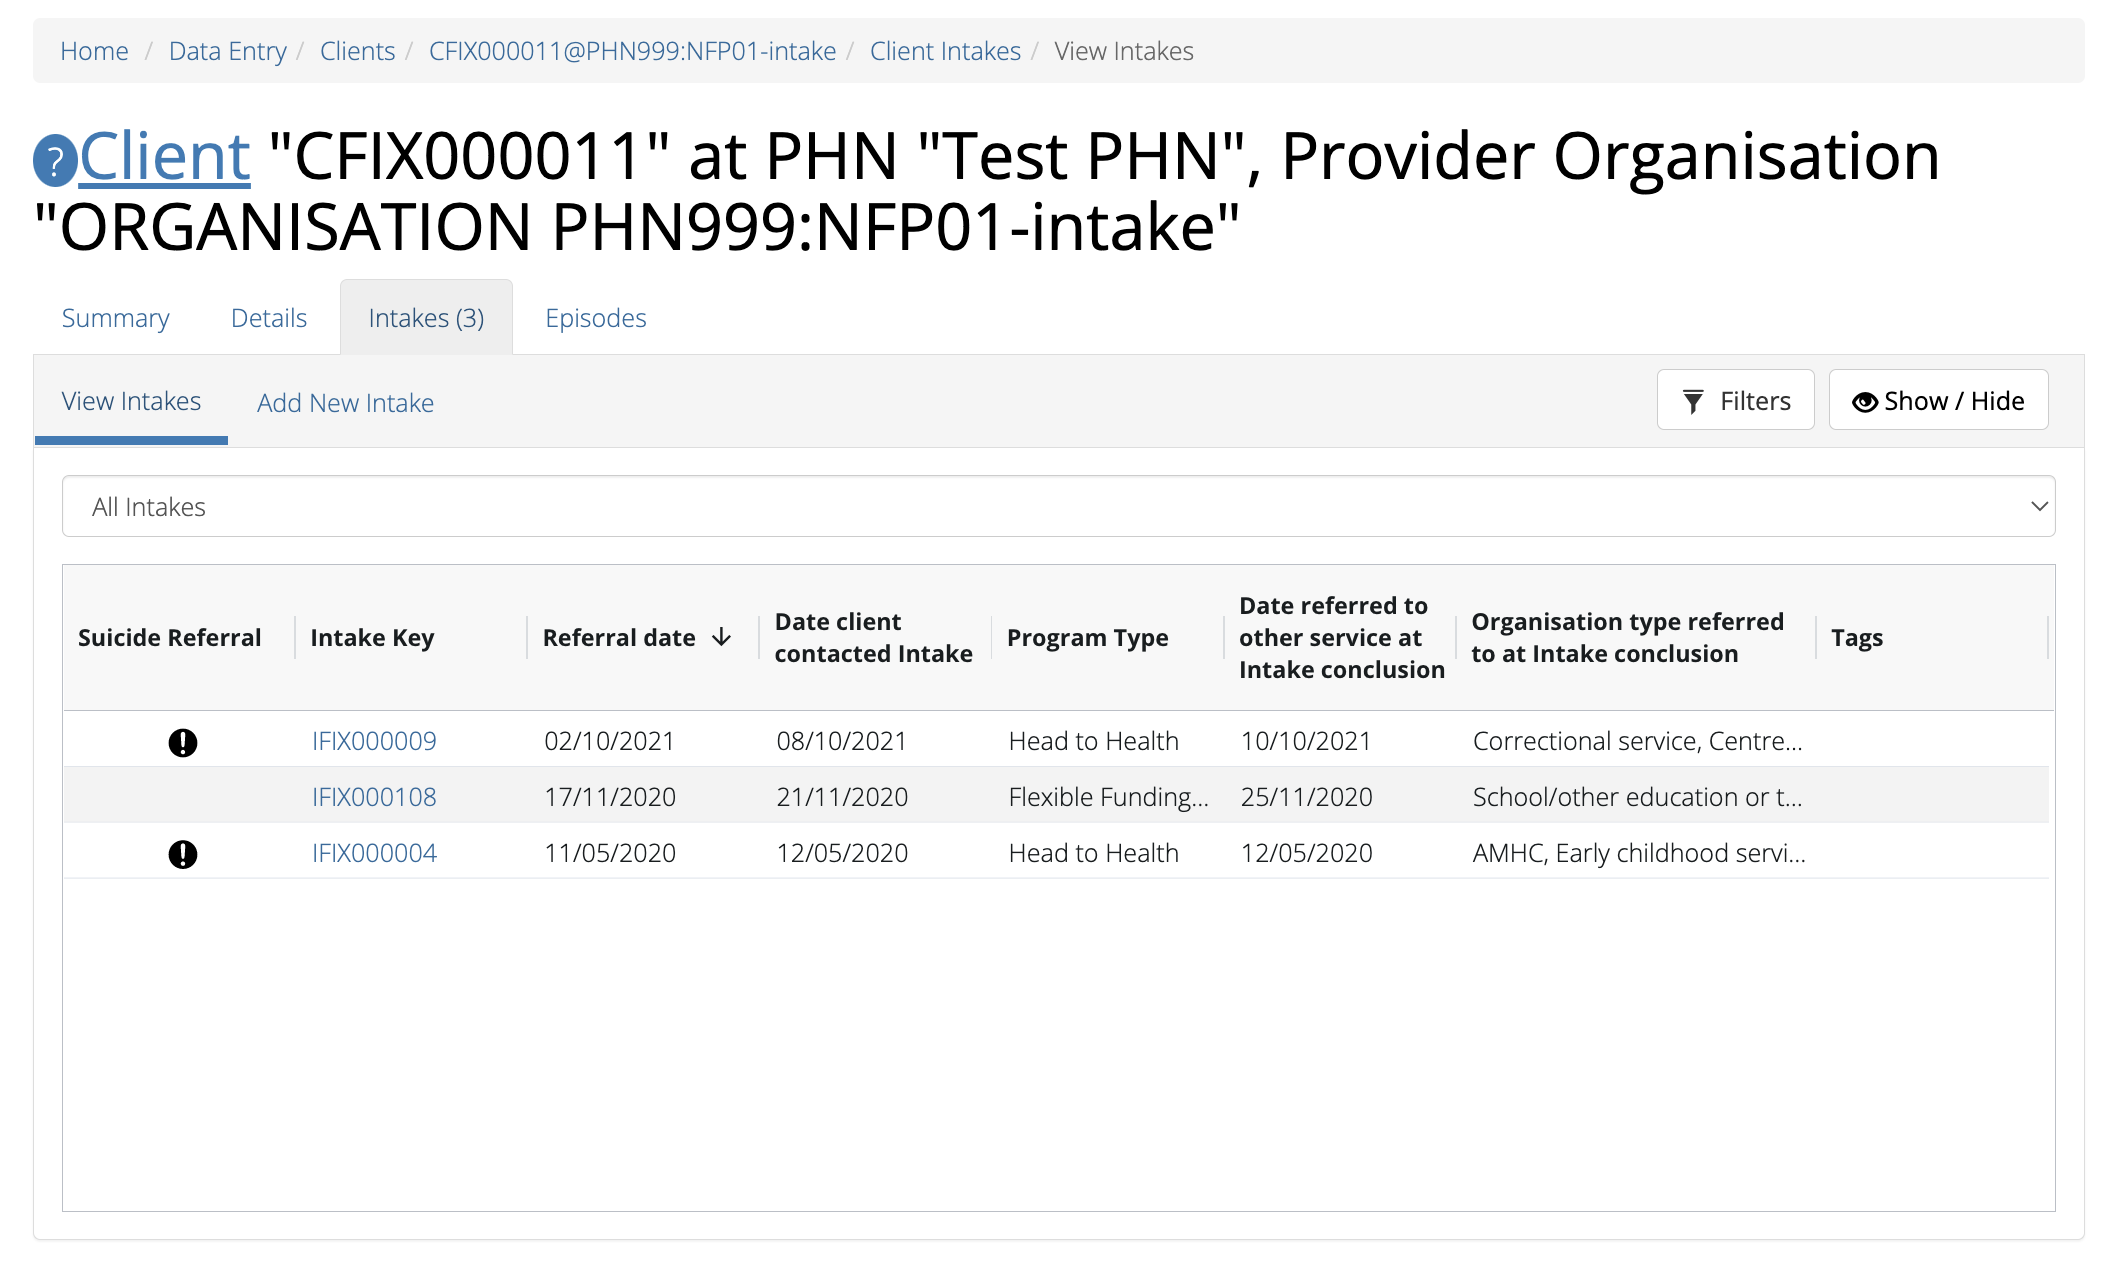
From the client’s tab, you can view all intakes by clicking on the
Intakes tab. The heading for this tab displays in brackets the total number of intakes recorded
in the PMHC MDS for this client at the Intake Provider Organisations for which you have access.
A table will display all the Client’s Intakes at Provider Organisations for which you have access.
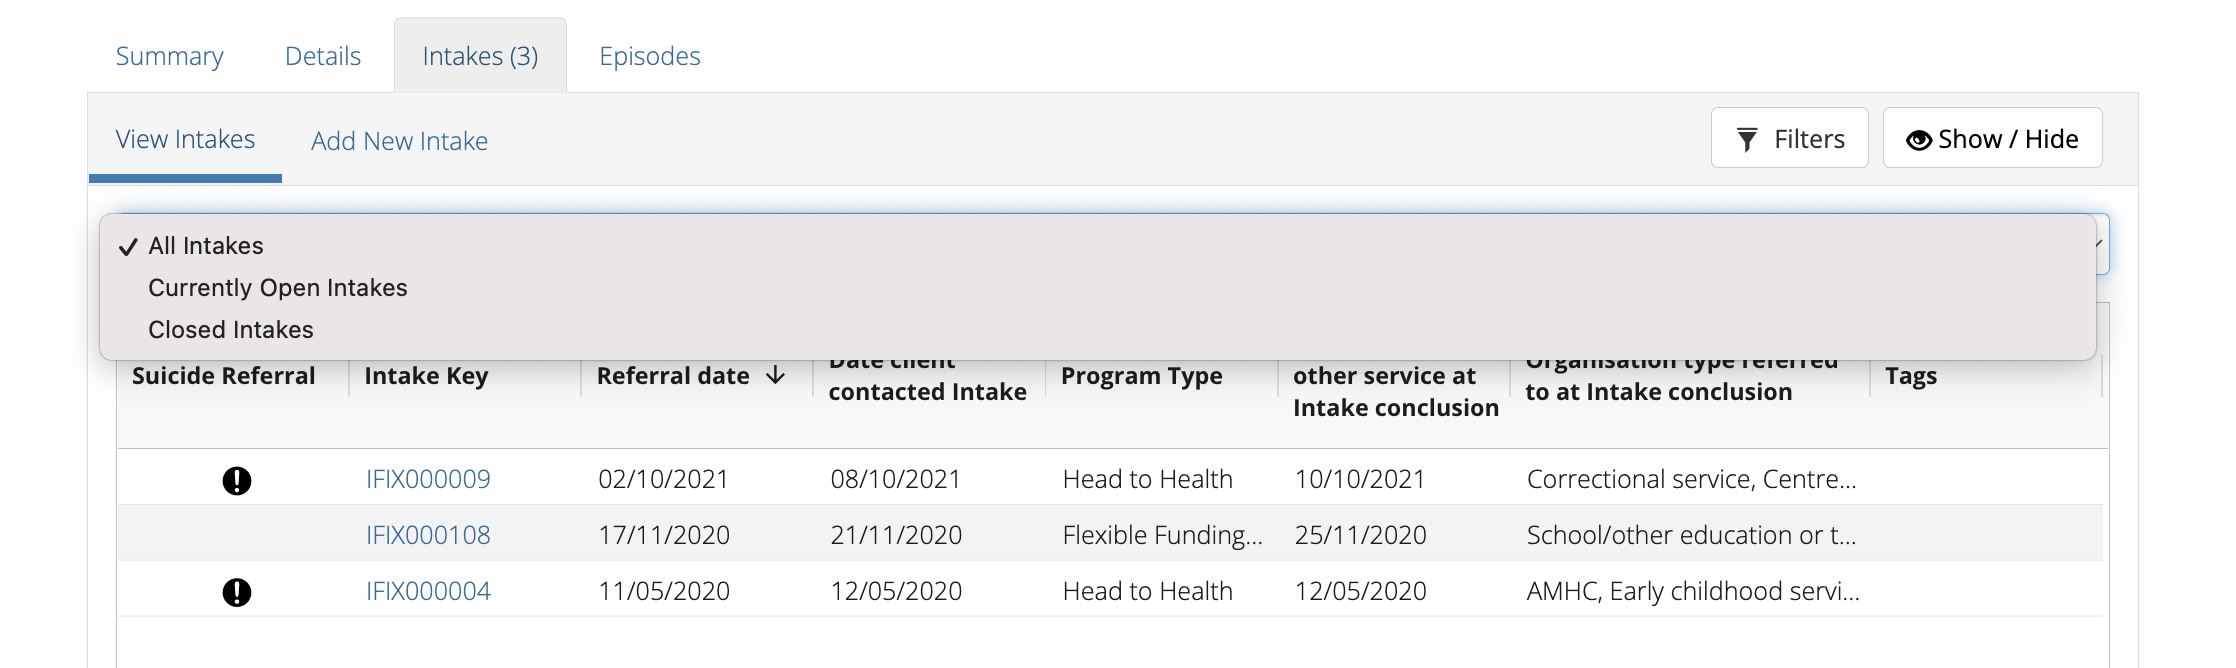
A drop down list is available to view:
All Intakes
Currently Open Intakes
Closed Intakes
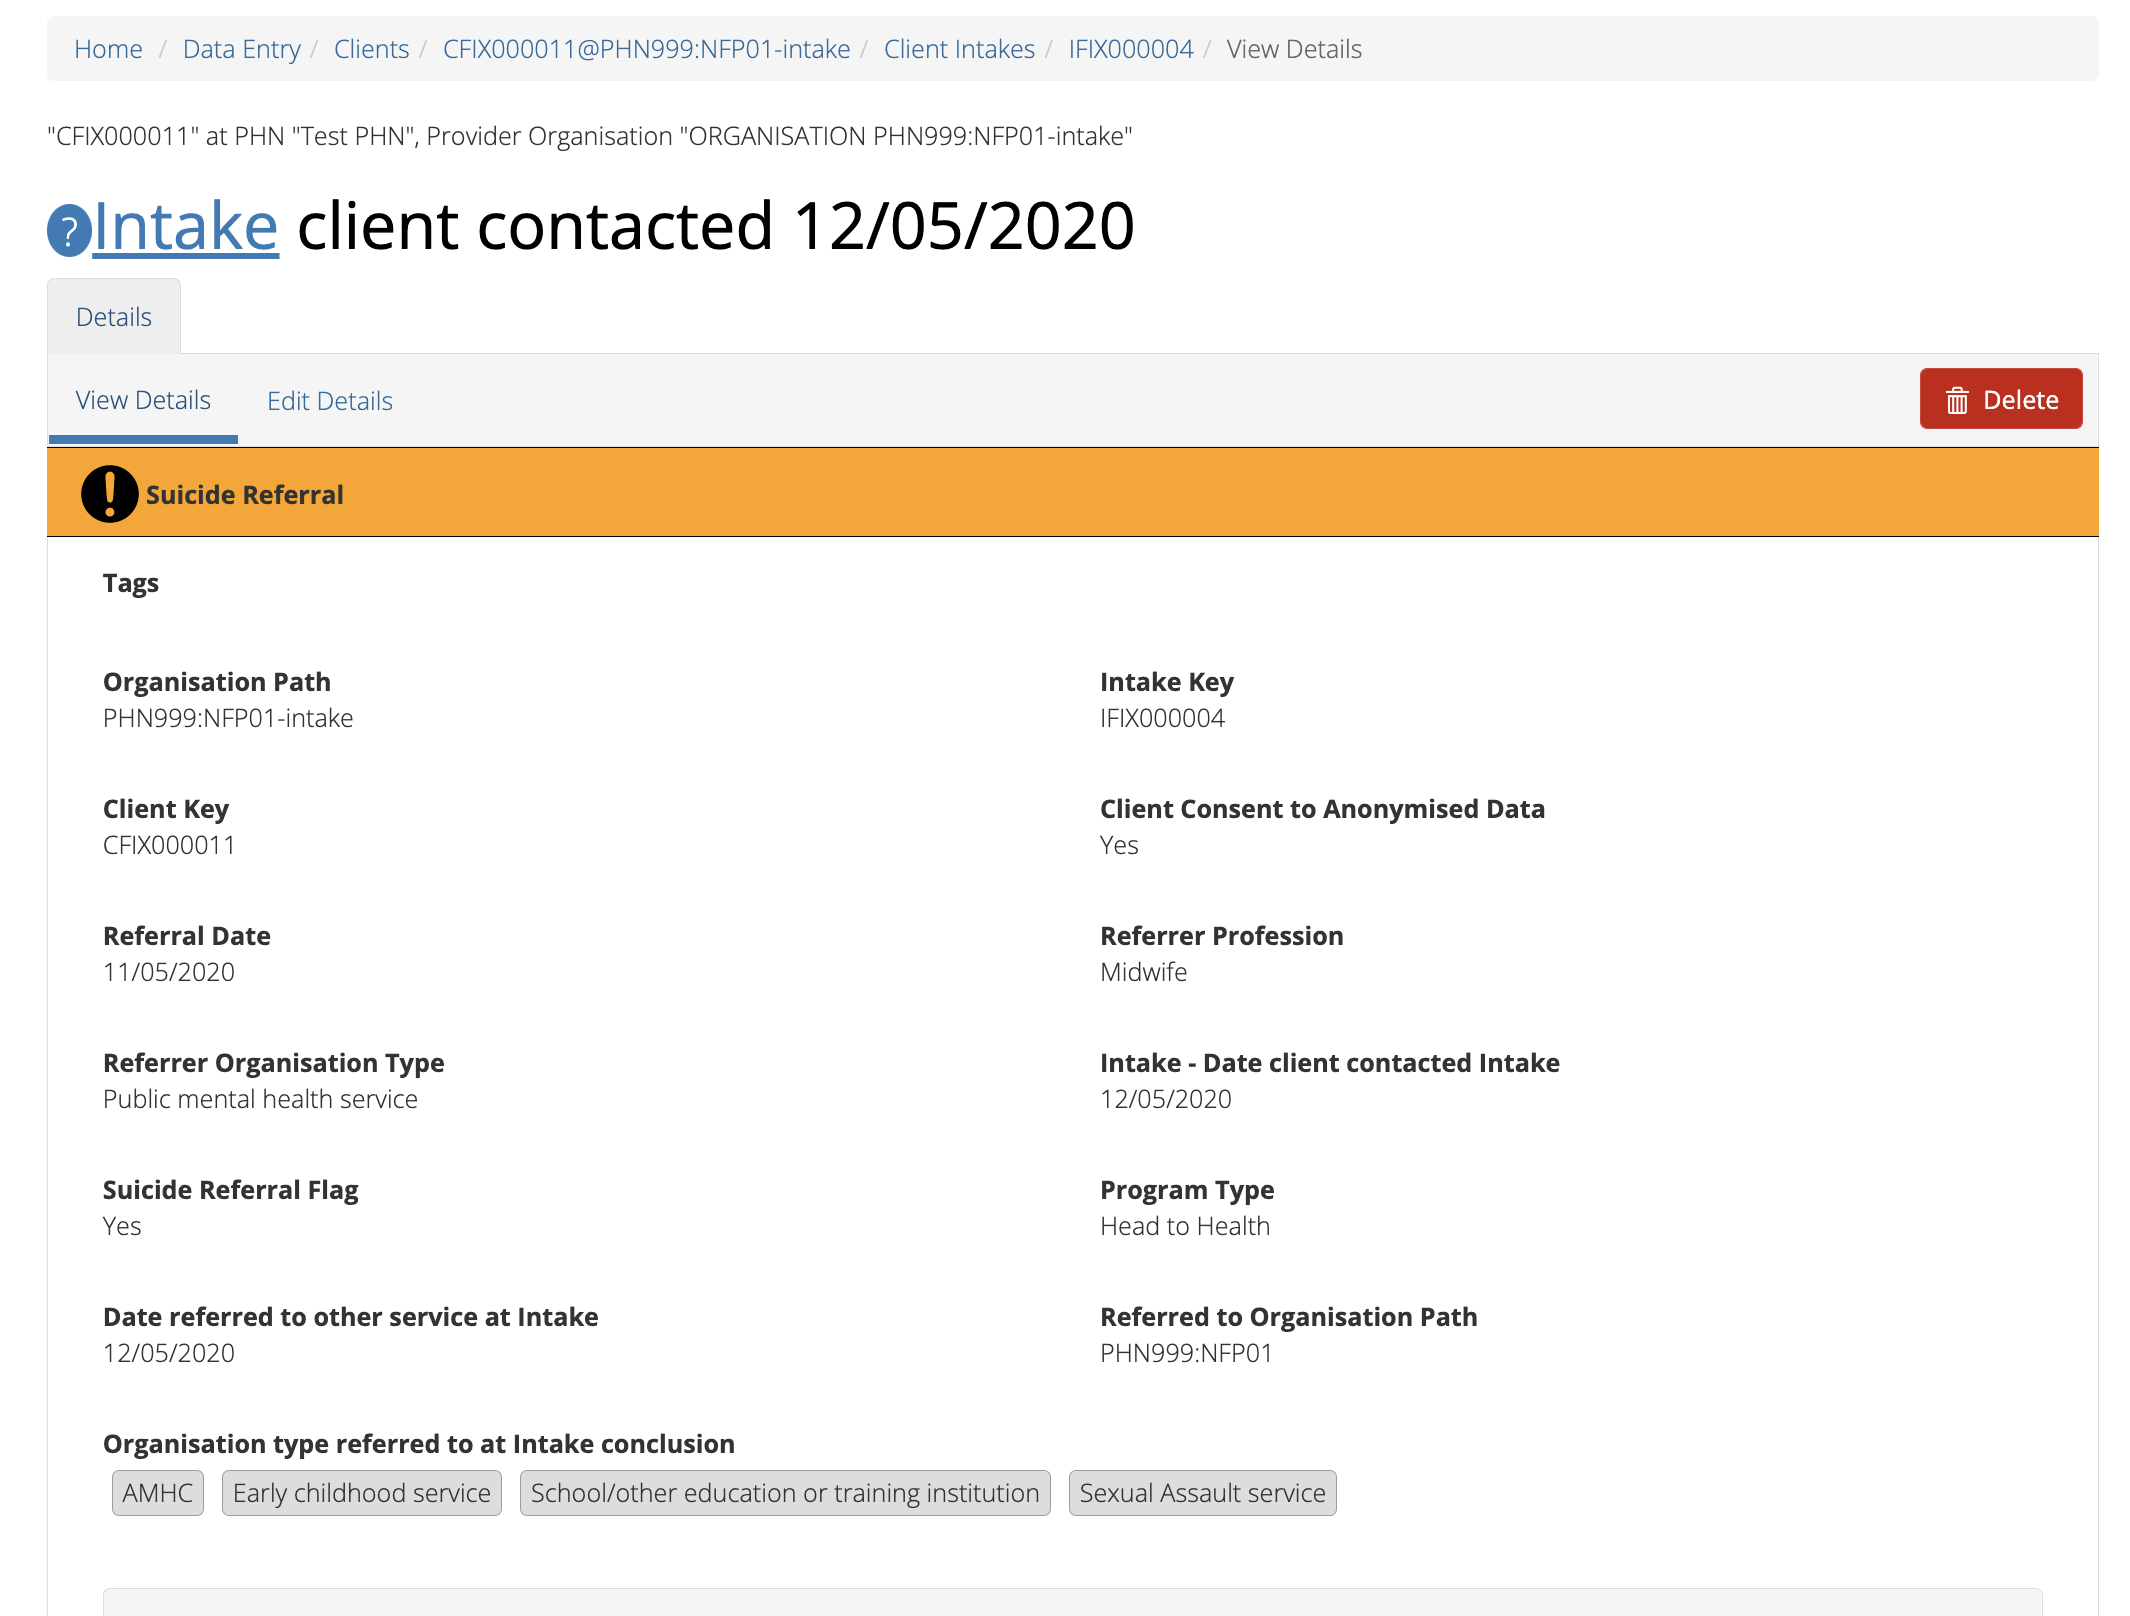
To view the client’s intake details, click the blue Intake Key
A page will display the client’s intakes details as recorded via the
Intake Data Elements.
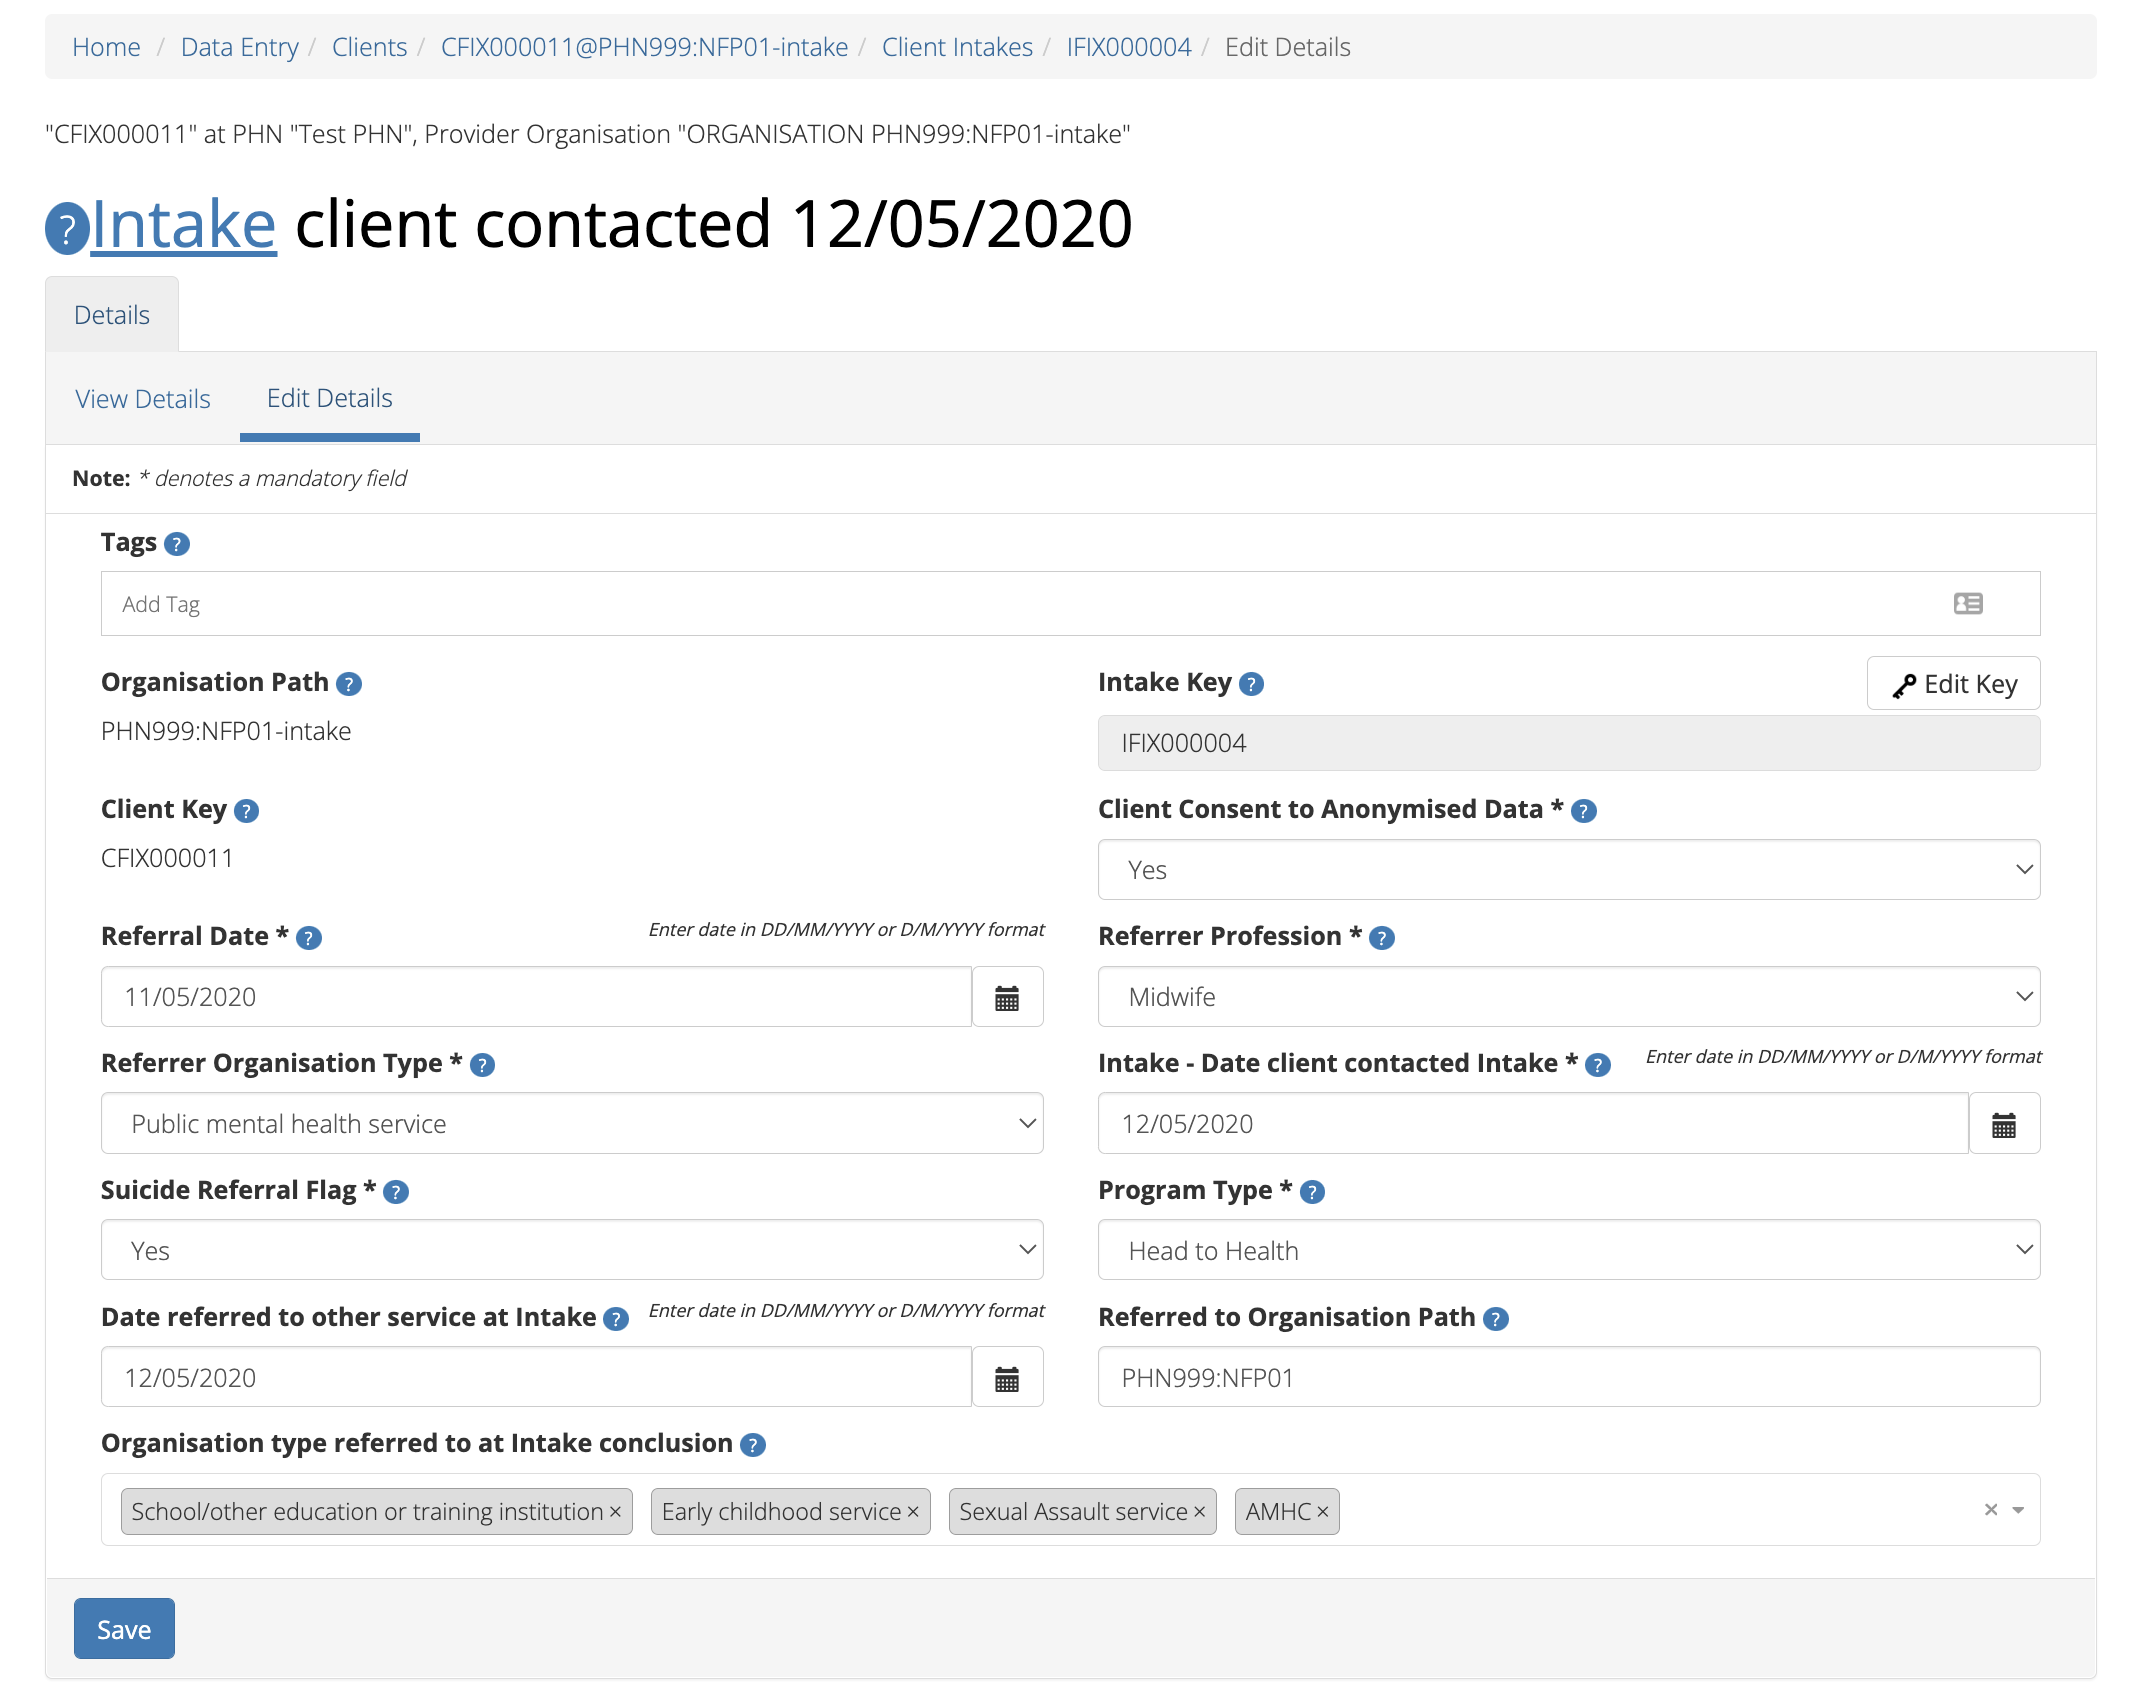
From the client’s Intakes table, click the Intake Key
Click the Edit Details tab
Update the client’s Intakes details. Mandatory fields are marked with an *
(Specification Intake Data Elements)
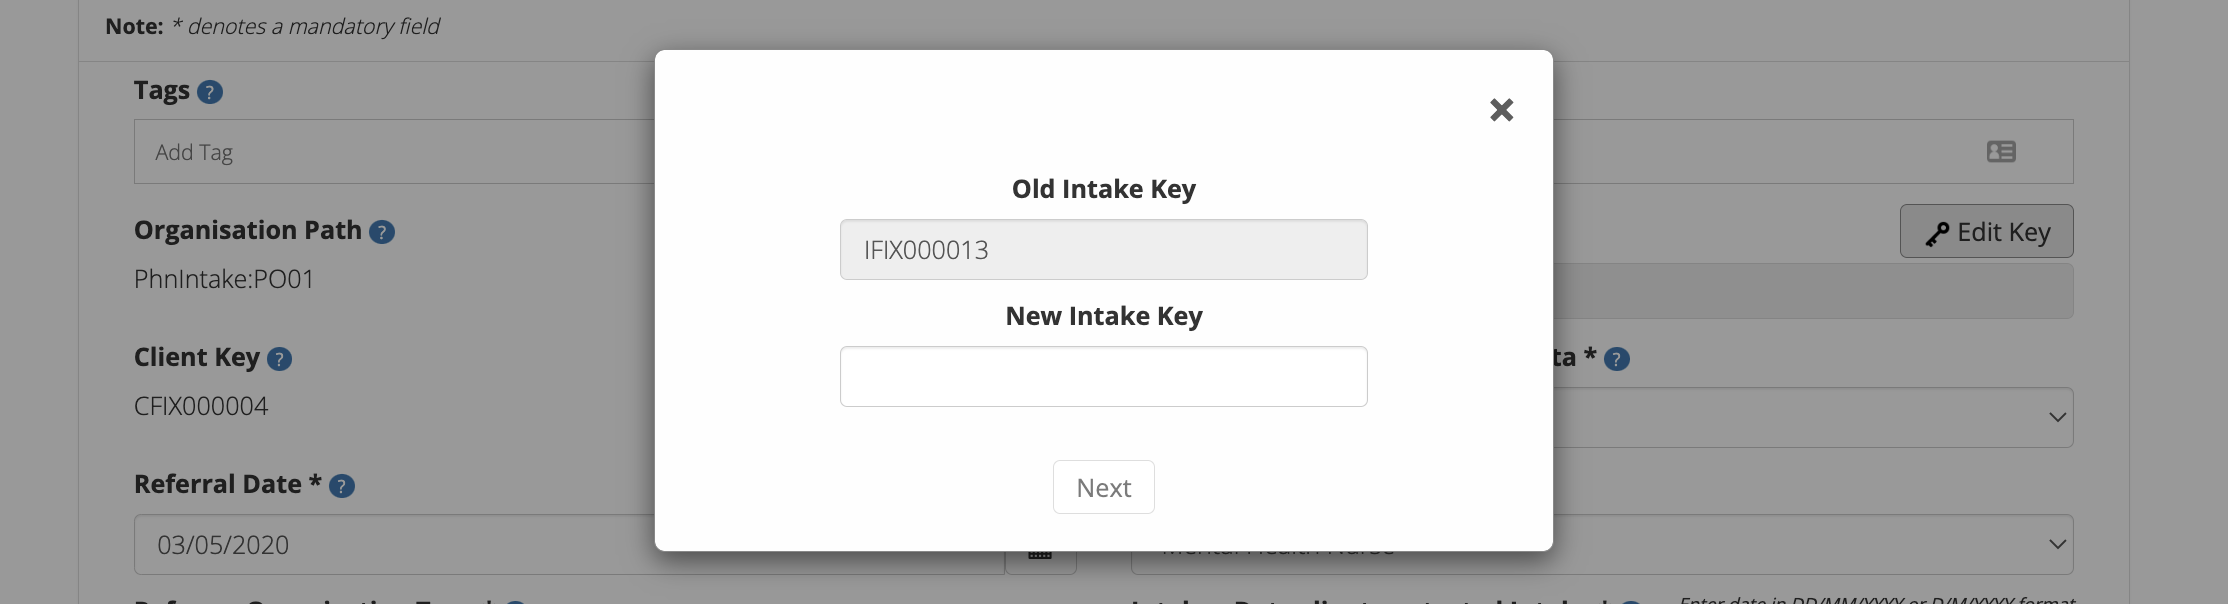
Please note: You can edit the Intake Key from this screen. See Editing an Intake Key
Click the blue Save button. (If you decide not to save changes, you can
simply navigate away from this screen)
You will receive confirmation that the client’s intake details have been saved,
and it will now be displaying these new details in the intake View Details tab.
If you receive an error message, the data will need to be corrected before the
record is saved and added to the PMHC MDS.
See Validation Rules - Intake.
From the Episode Edit Details tab, click the Edit Key button
Type in the new episode key and click Next
Double check the new key is correct and click Save. (If it is incorrect,
click back to re-enter the key or click the ‘cross’ in the top right to cancel
this key change request)
You will receive confirmation that the Intake’s key has been saved, and the screen
will now be displaying the updated intake key details in the Intake View Details tab.
Click the blue Save button. (If you decide not to add this client’s
intake, you can simply navigate away from this screen)
You will receive confirmation that the client’s intake details have been added,
and it will now be displaying these new details in the intake View Details tab.
If you receive an error message, the data will need to be corrected before the
record is saved and added to the PMHC MDS.
See Validation Rules - Intake.
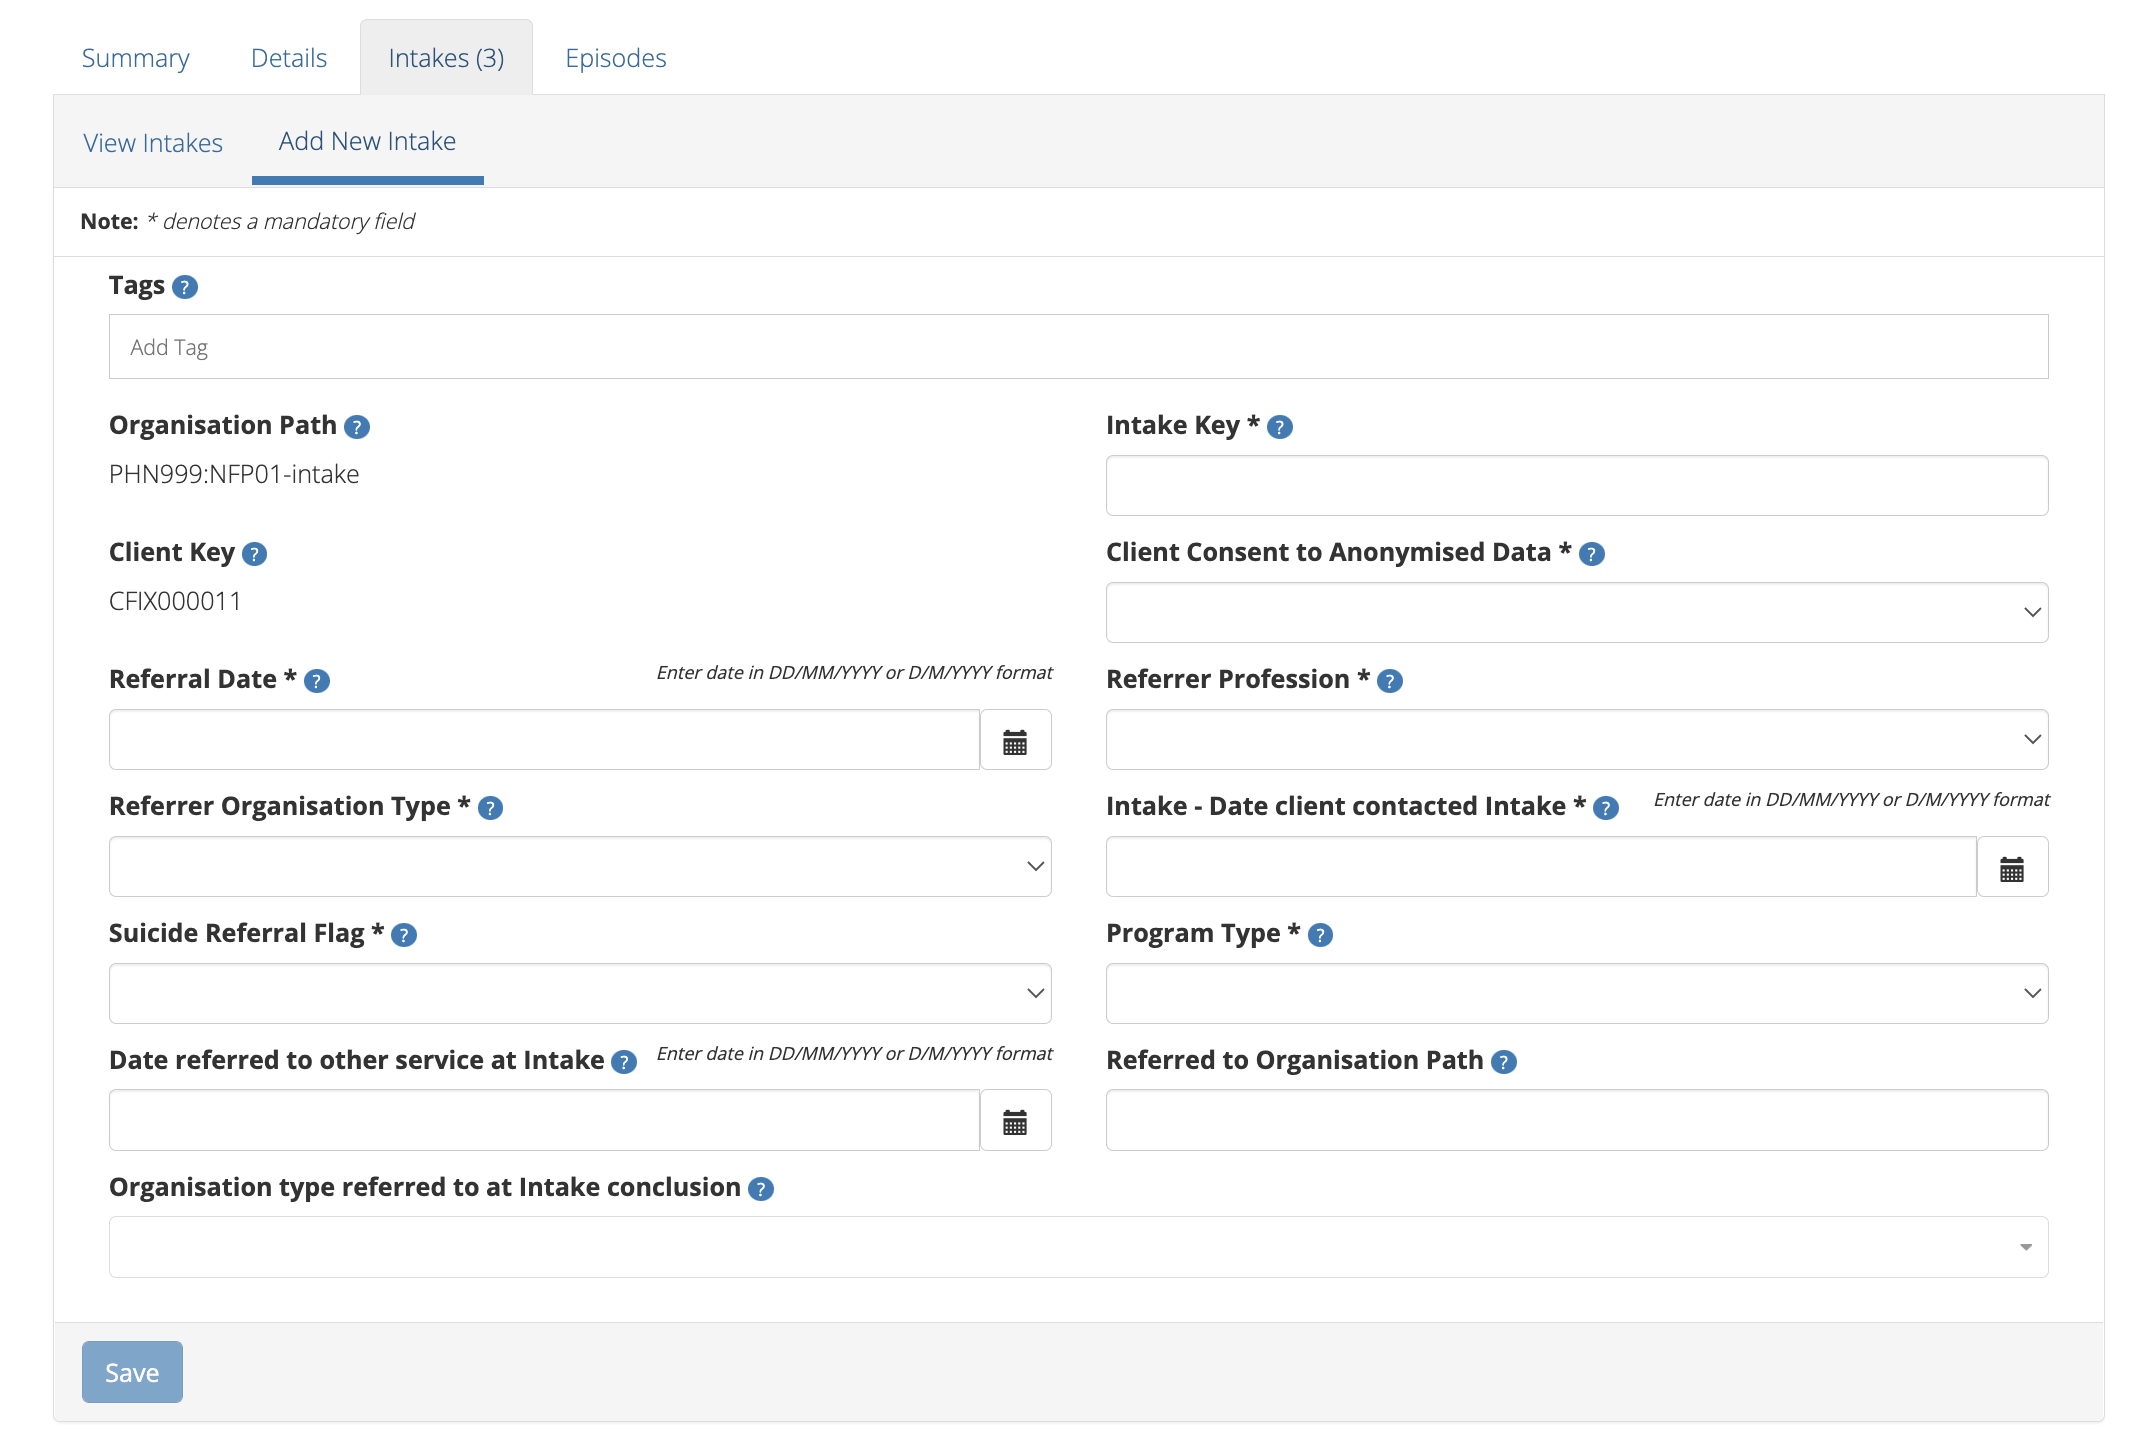
From the client’s Intake table, click the Intake Key of the open intake
Click the Edit Details tab
Update the client’s intake details, by entering an Date referred to other service at Intake and Referred to Organisation Path and Organisation type referred to at Intake conclusion (Specification Intake Data Elements)
Click the blue Save button. (If you decide not to save changes, you can
simply navigate away from this screen)
You will receive confirmation that the client’s intake details have been saved,
and it will now be displaying these new details in the intake View Details tab.
If you receive an error message, the data will need to be corrected before the
record is saved and added to the PMHC MDS.
See Validation Rules - Intake.
Please note: Once the intake is deleted, you will not be able to recover this intake data.
Click the blue Confirm button to delete this intake. (or click the
orange Cancel button if you decide not to delete this intake data)
After you click Confirm, you will receive confirmation that the intake has
been deleted, and you will be redirected to View Intakes where the
intake will no longer be displayed.
If the intake you are trying to delete has any dependant records, you will not
be able to proceed with deleting this intake until all the related records have
been deleted.
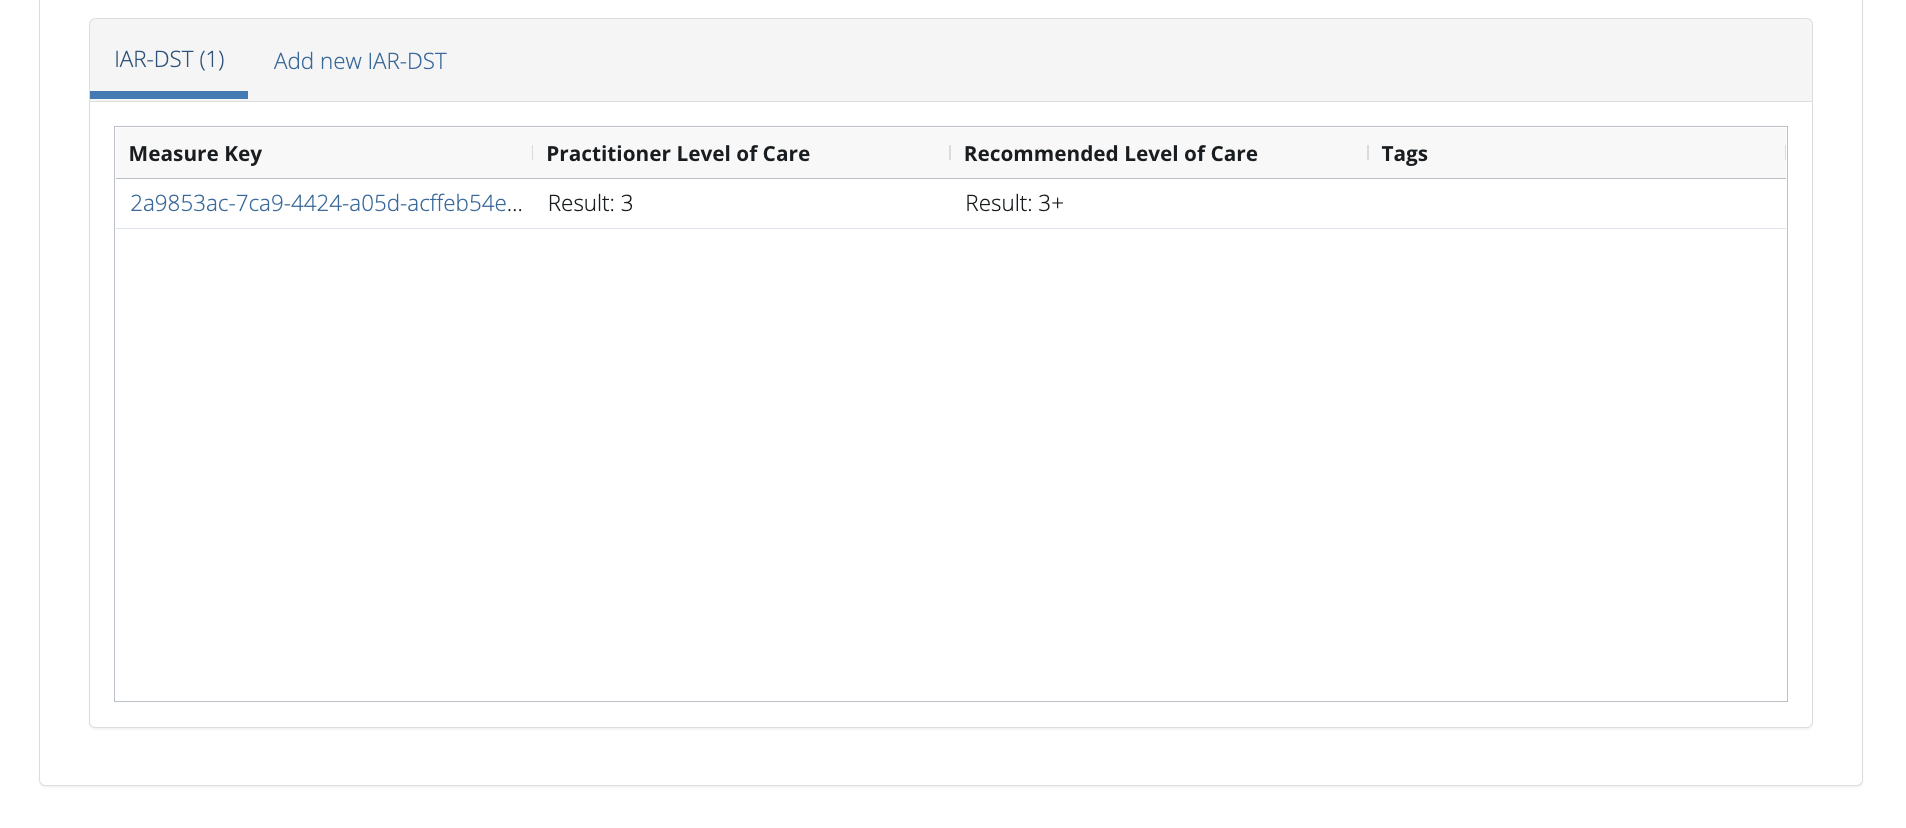
You can click on the link provided to view the client’s intake measure,
or click the orange Dismiss button
Click the blue Save button. (If you decide not to add this client’s measure, you can simply navigate away from this screen)
You will receive confirmation that the Client’s Measure details have been added,
and it will now be displaying these new details in the View Measure tab.
If you receive an error message, the data will need to be corrected before the
record is saved and added to the PMHC MDS.
See Validation Rules - IAR-DST.
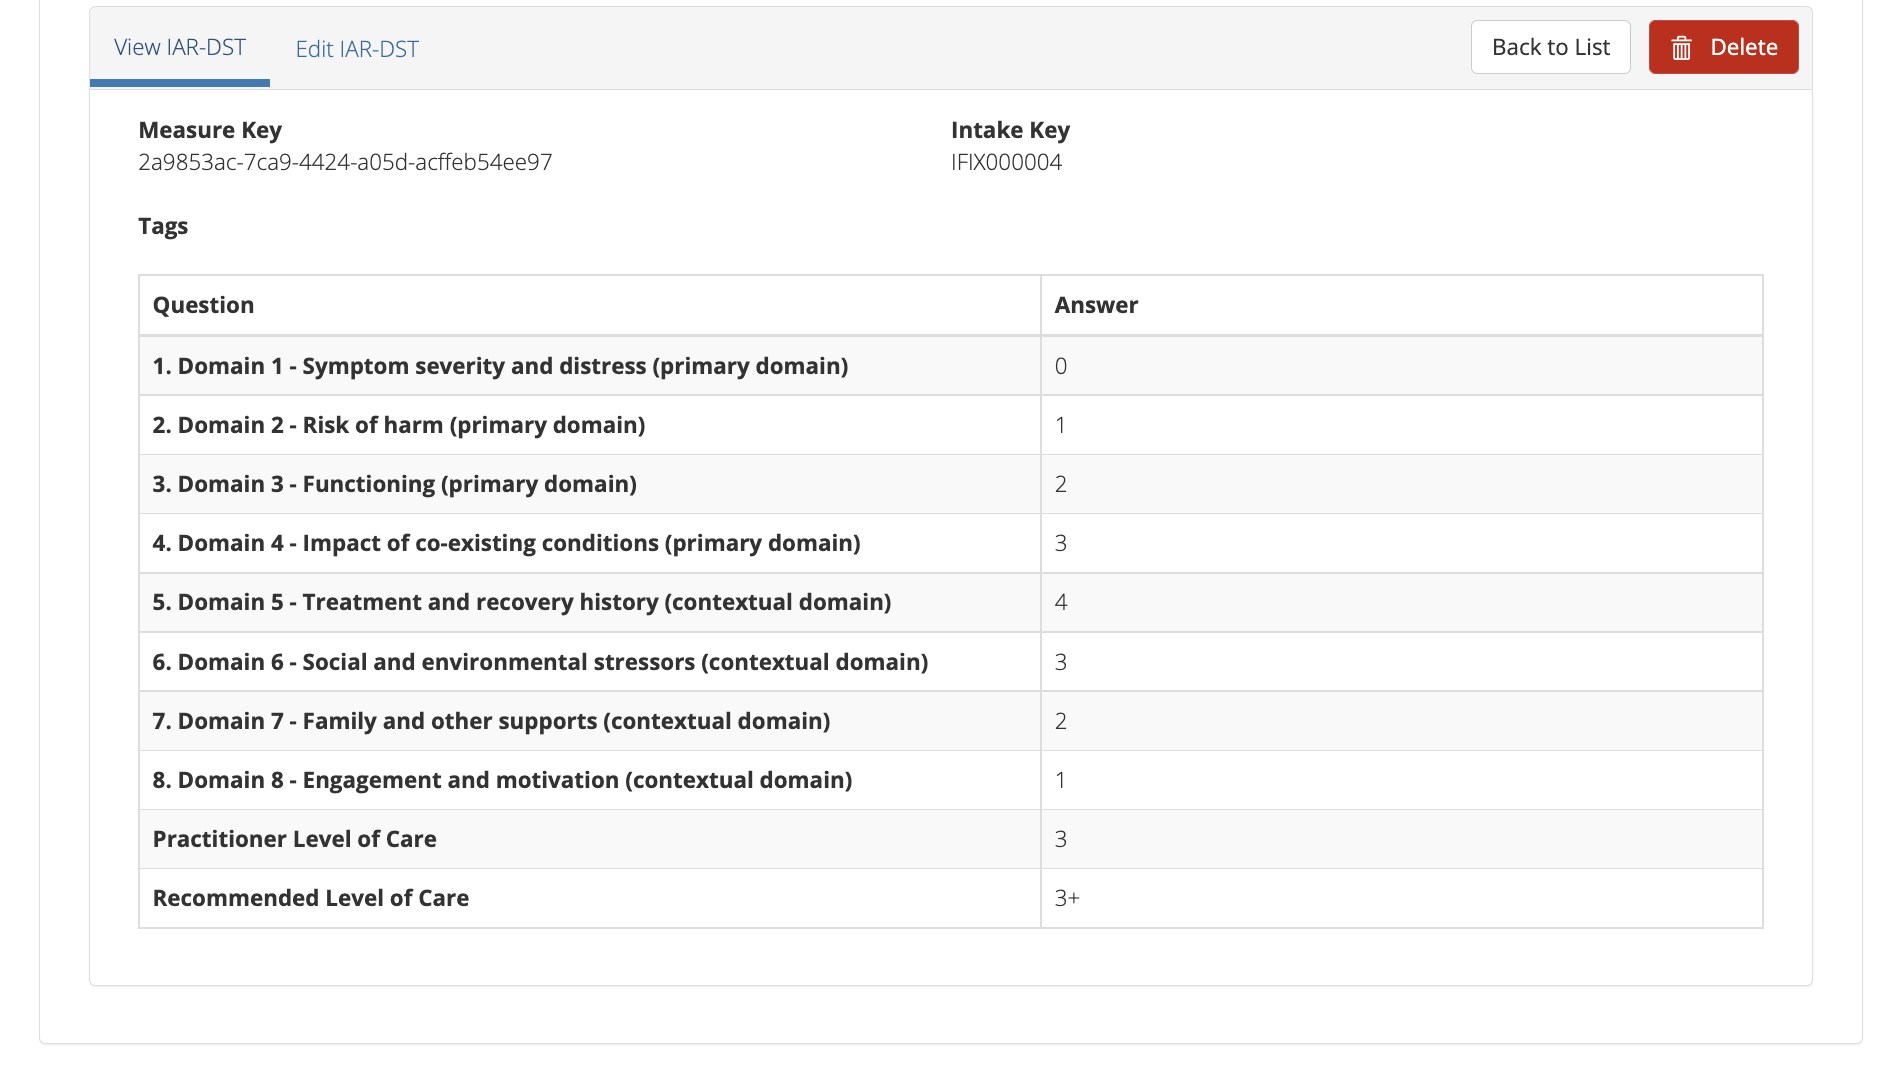
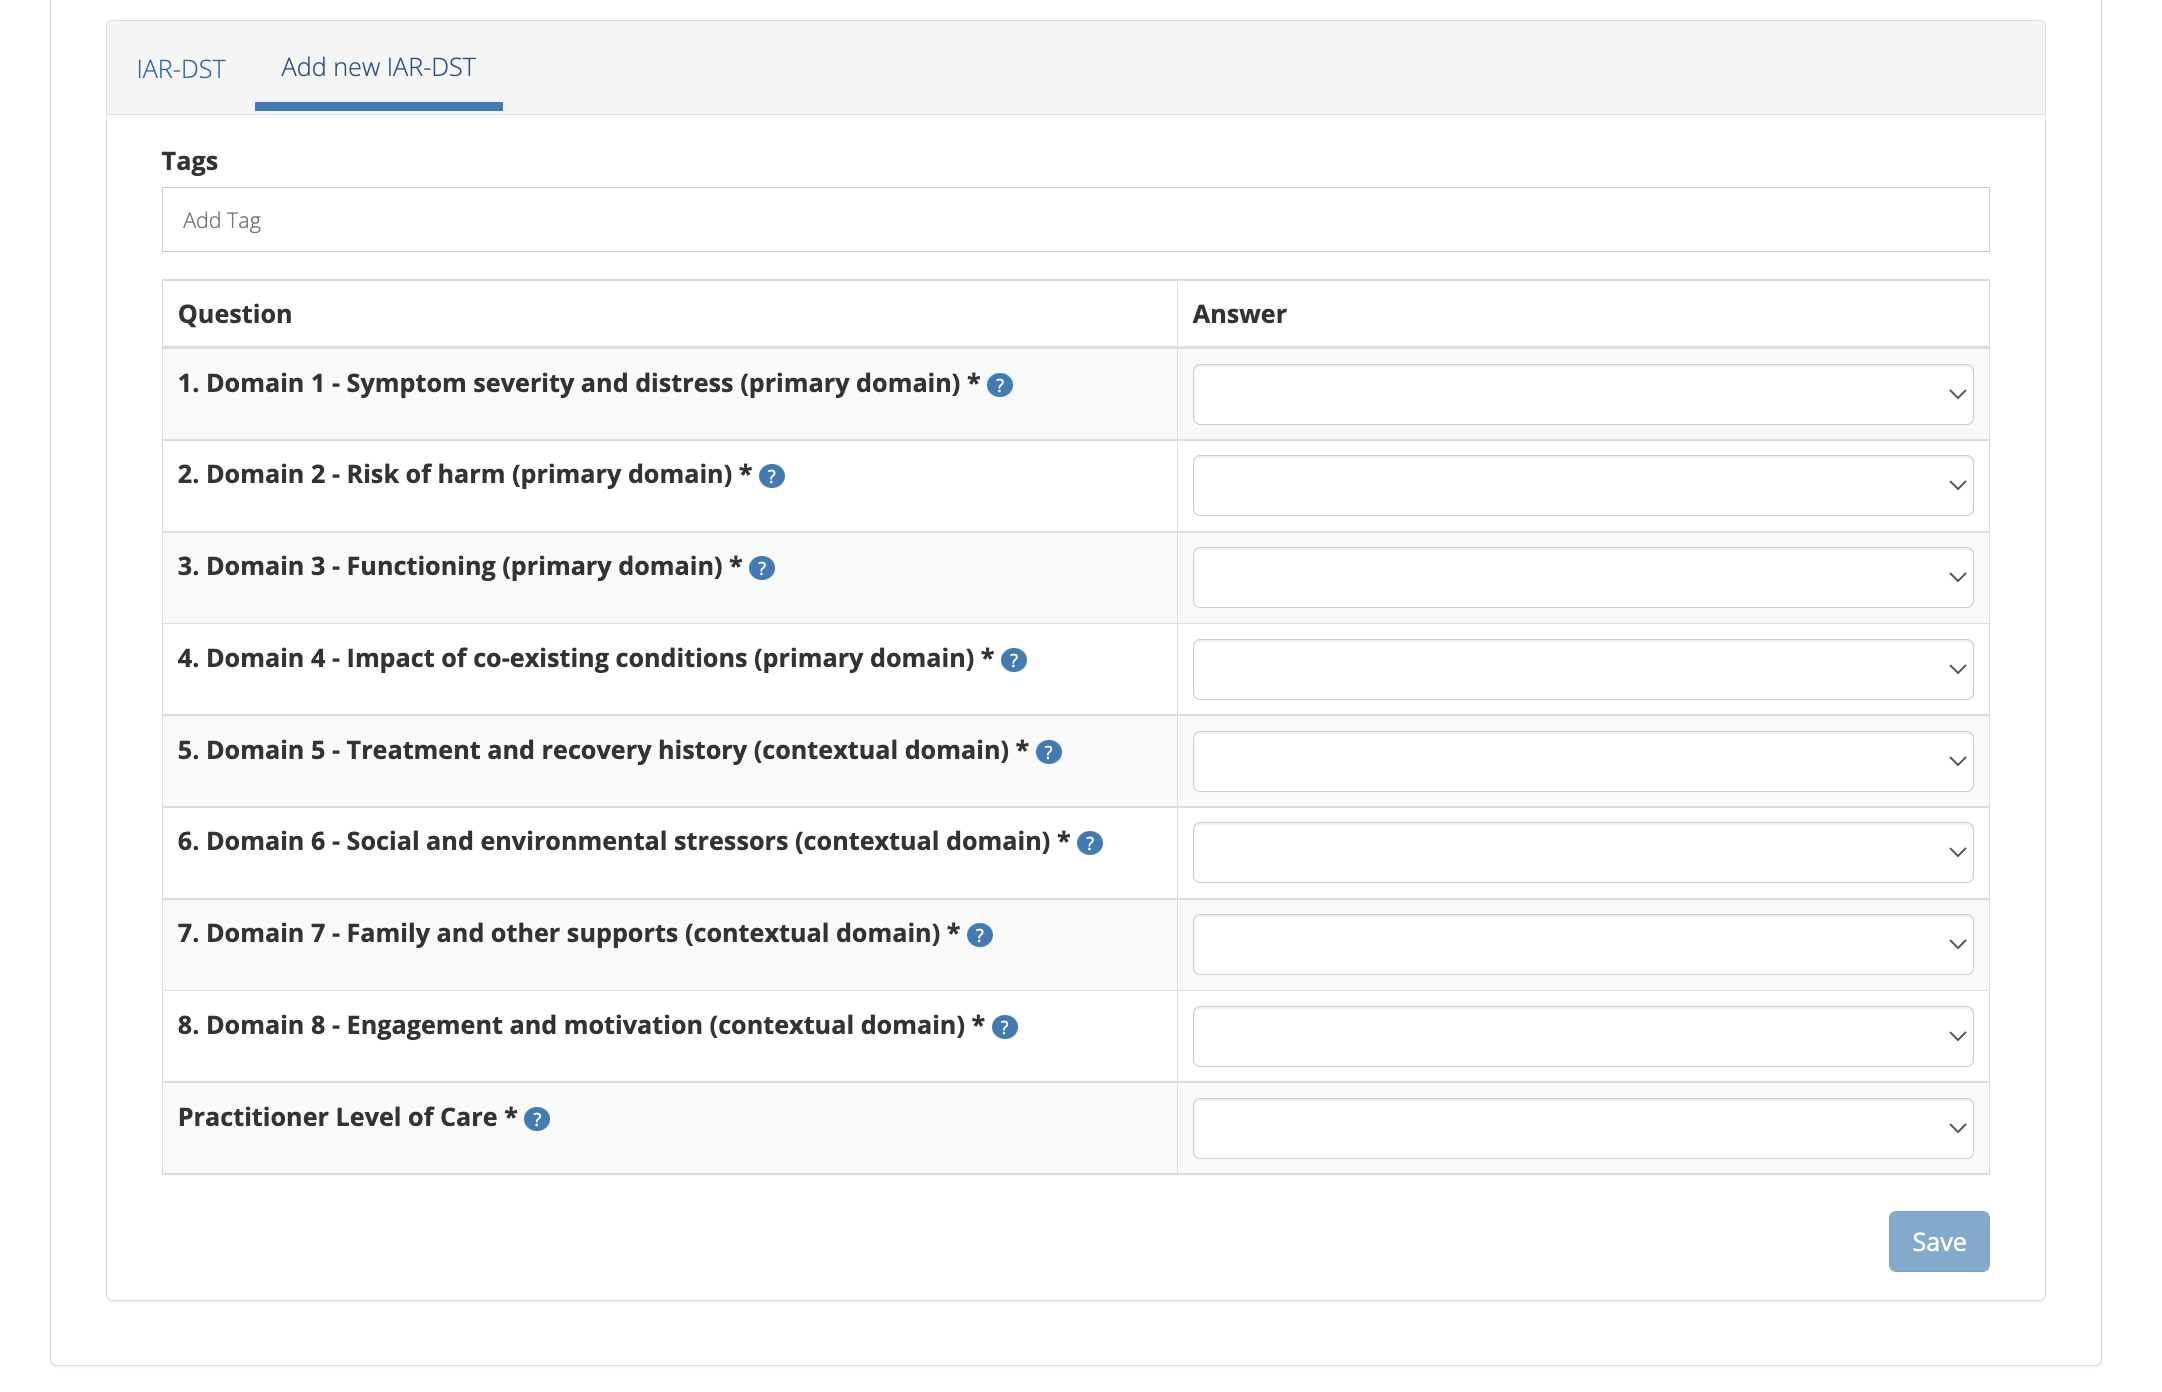
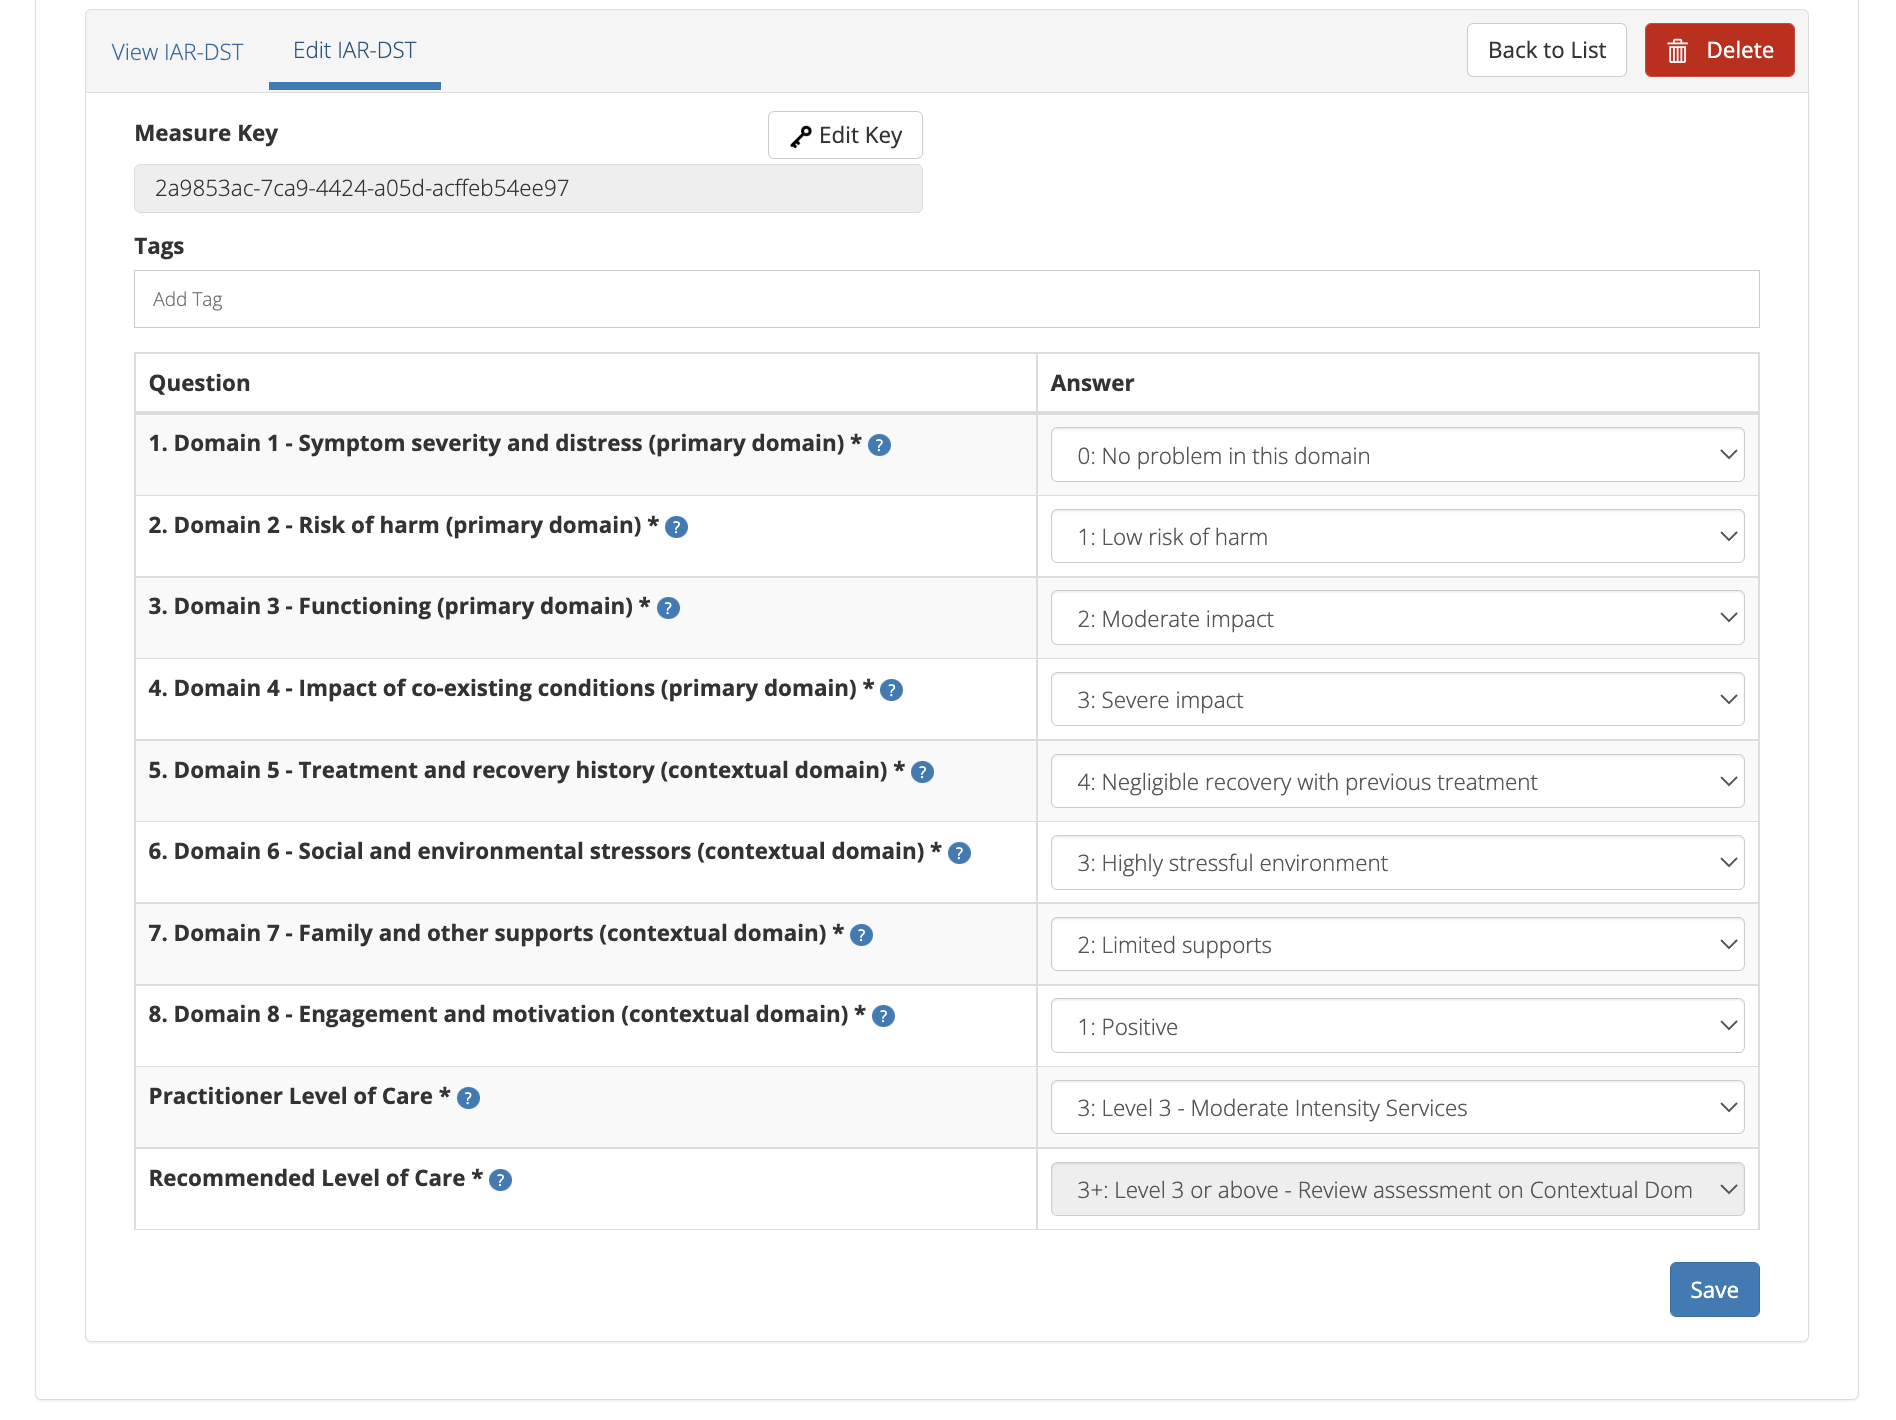
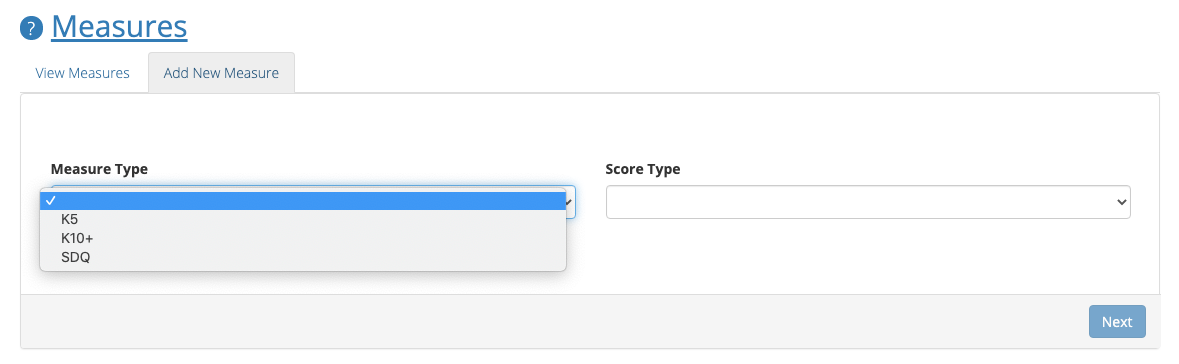
Update the Client’s Measure details. Mandatory fields are marked with an * .
Please note: You can edit the Measure Key from this screen. SeeEditing a Measure Key.
Click the blue Save button. (If you decide not to save changes, you can simply navigate away from this screen)
You will receive confirmation that the Client’s Intakes details have been saved,
and it will now be displaying these new details in the View Intake Details tab.
If you receive an error message, the data will need to be corrected before the
record is saved and added to the PMHC MDS.
See Validation Rules - IAR-DST.
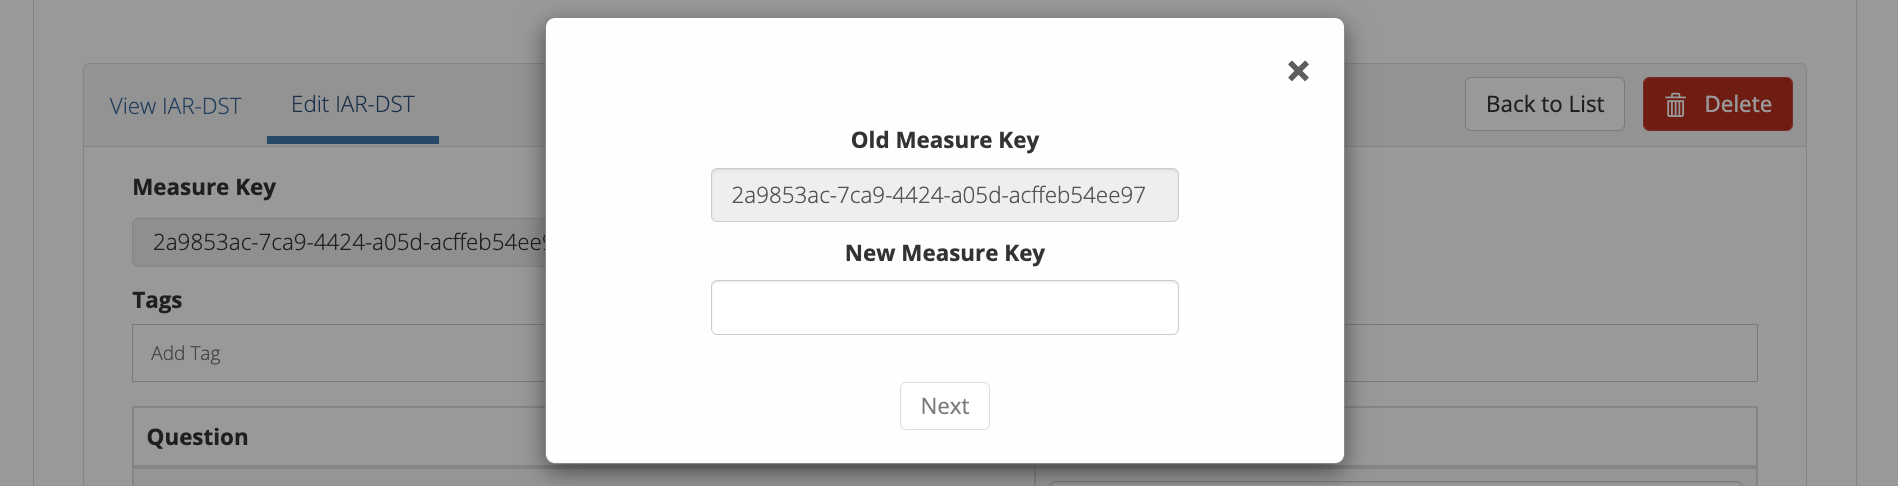
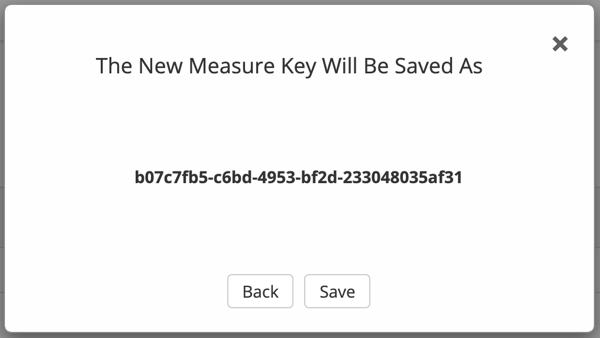
From the Edit IAR-DST measure details tab, click the Edit Key button.
Type in the new measure key and click ‘Next’.
Double check the new key is correct and click save. (If it is incorrect, click back to re-enter the key or click the ‘cross’ in the top right to cancel this key change request)
You will receive confirmation that the Measure’s key has been saved, and the screen
will now be displaying the updated measure key details in the View Measure details tab.
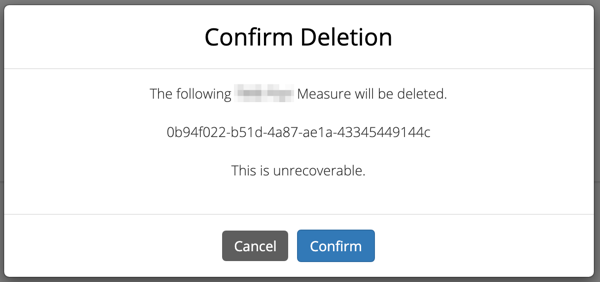
You will be displayed a ‘Confirm Deletion’ screen.
Please note: Once the measure is deleted, you will not be able to recover this measure data.
Click the blue Confirm button to delete this measure. (or click the orange Cancel button if you decide not to delete this measure data)
After you click ‘Confirm’, you will receive confirmation that the measure has
been deleted, and you will be redirected to the View Measures where the
measure will no longer be displayed.
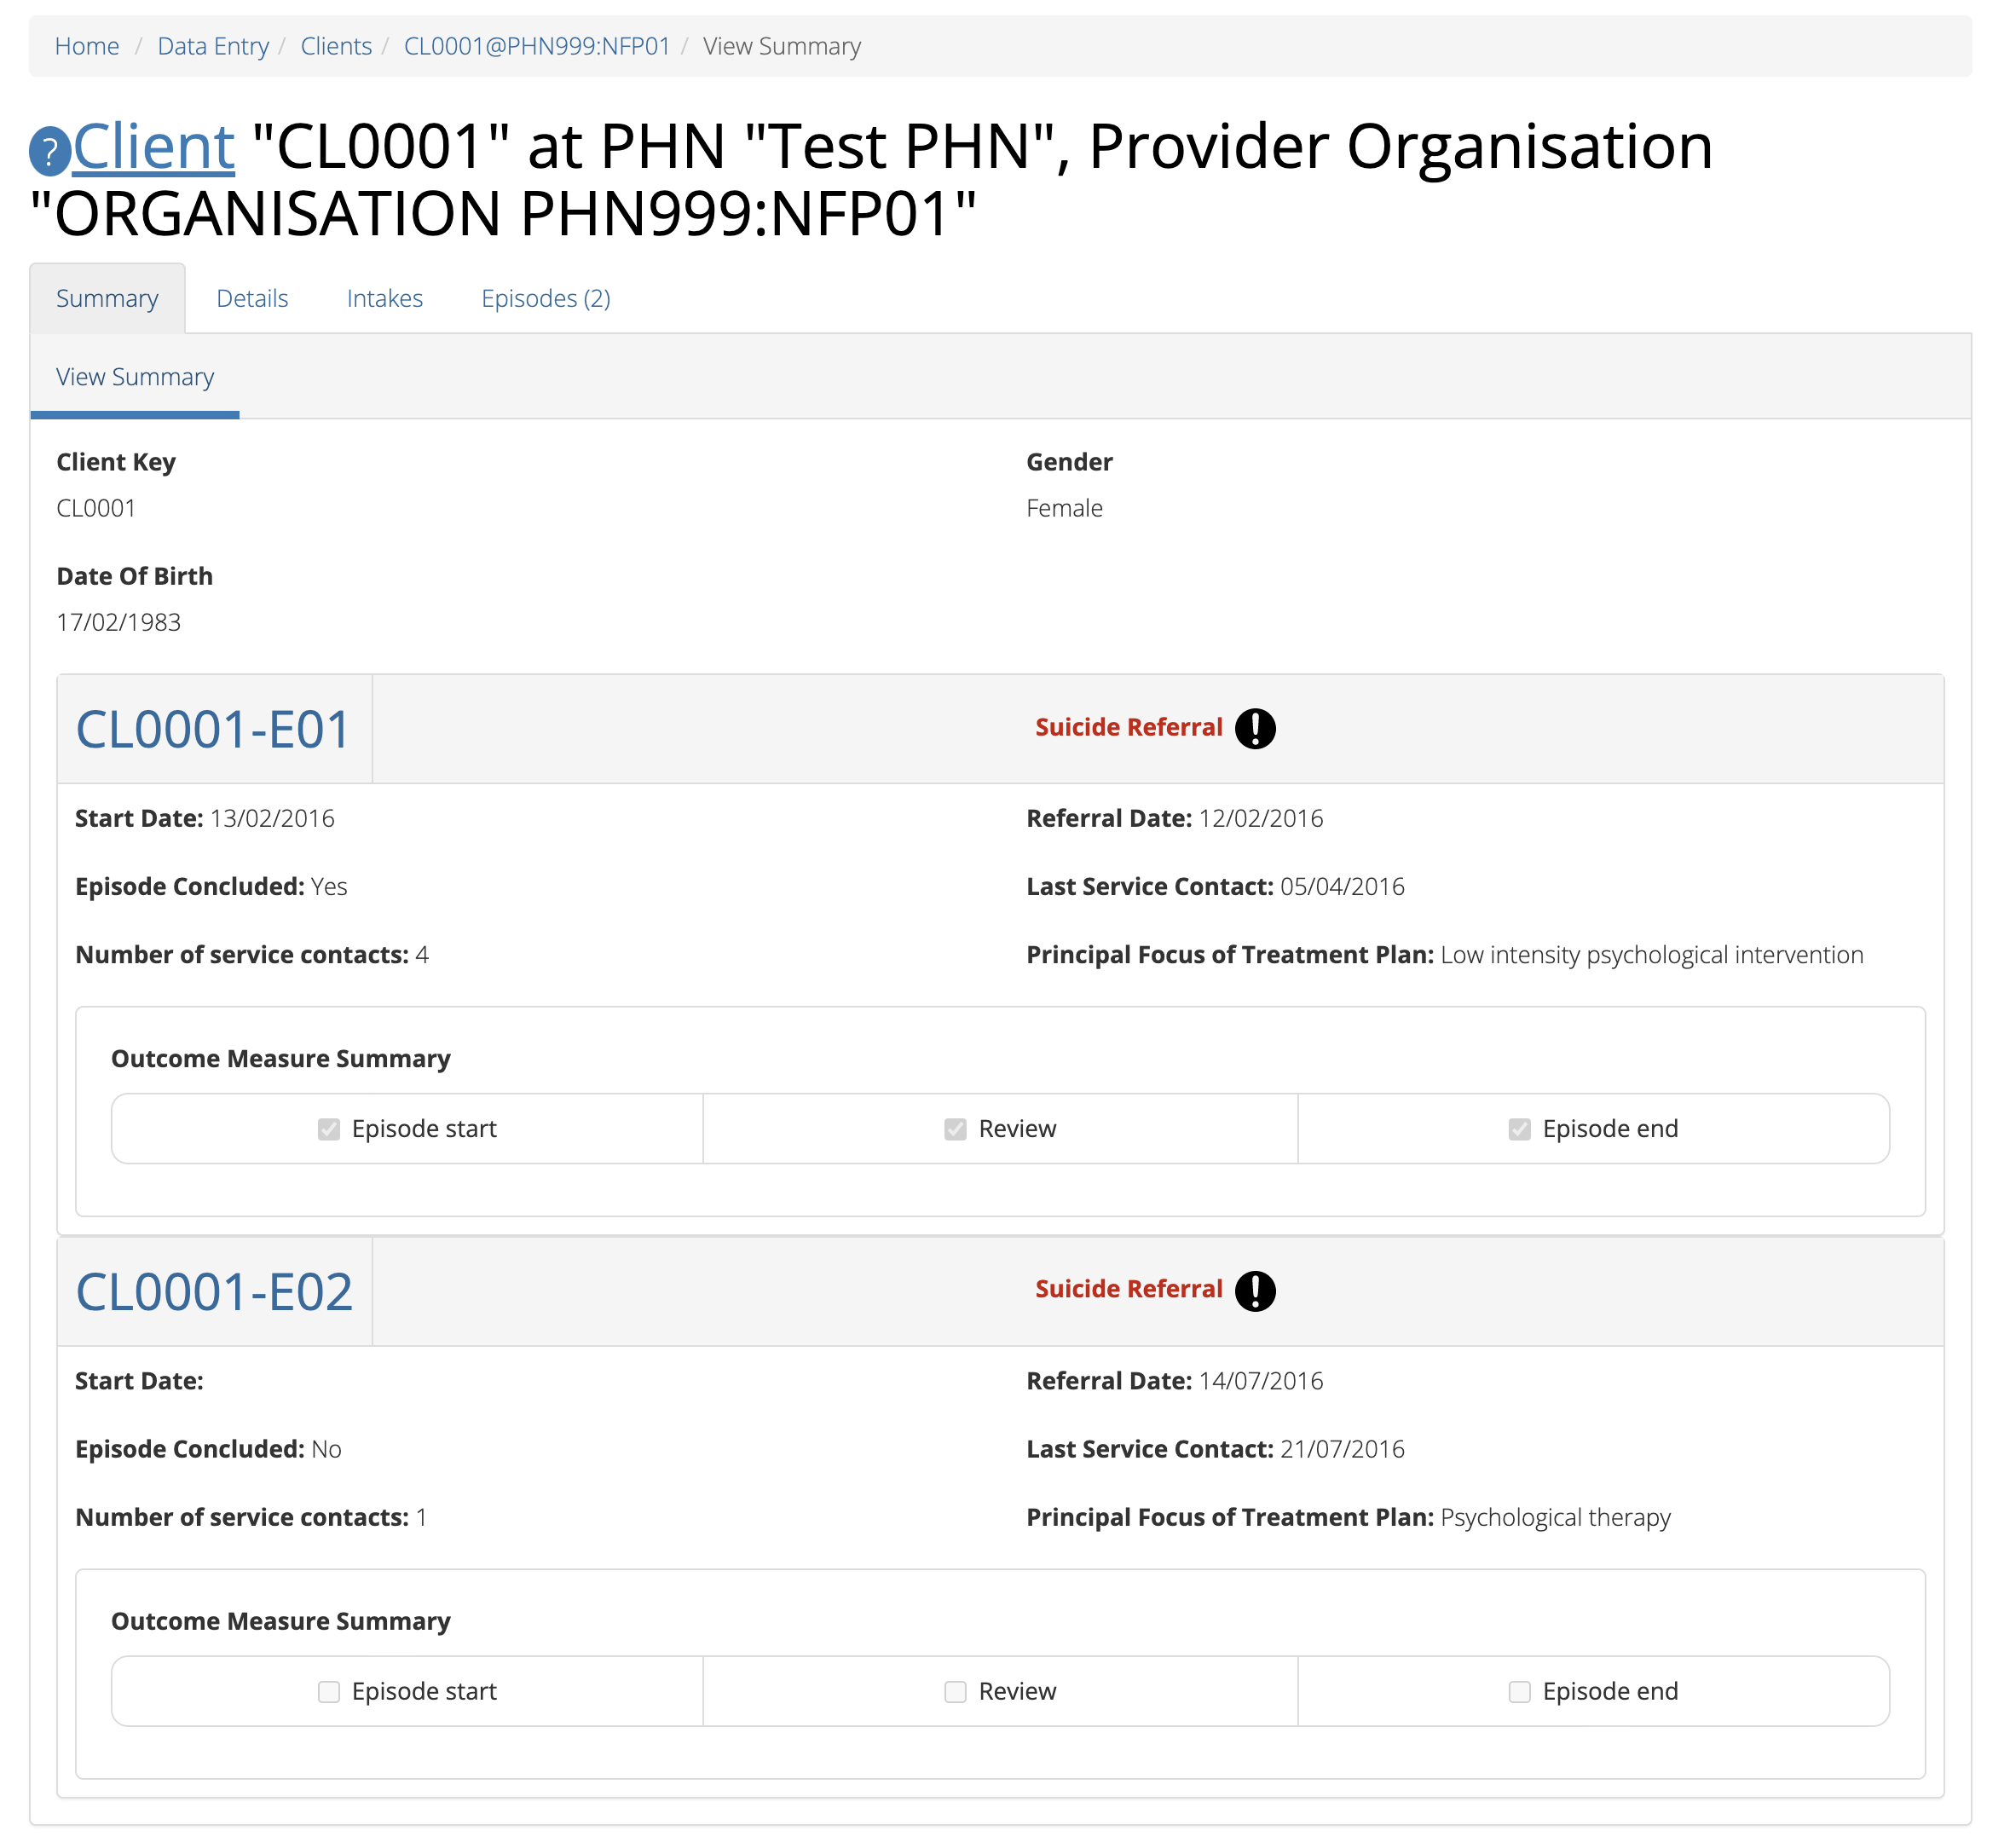
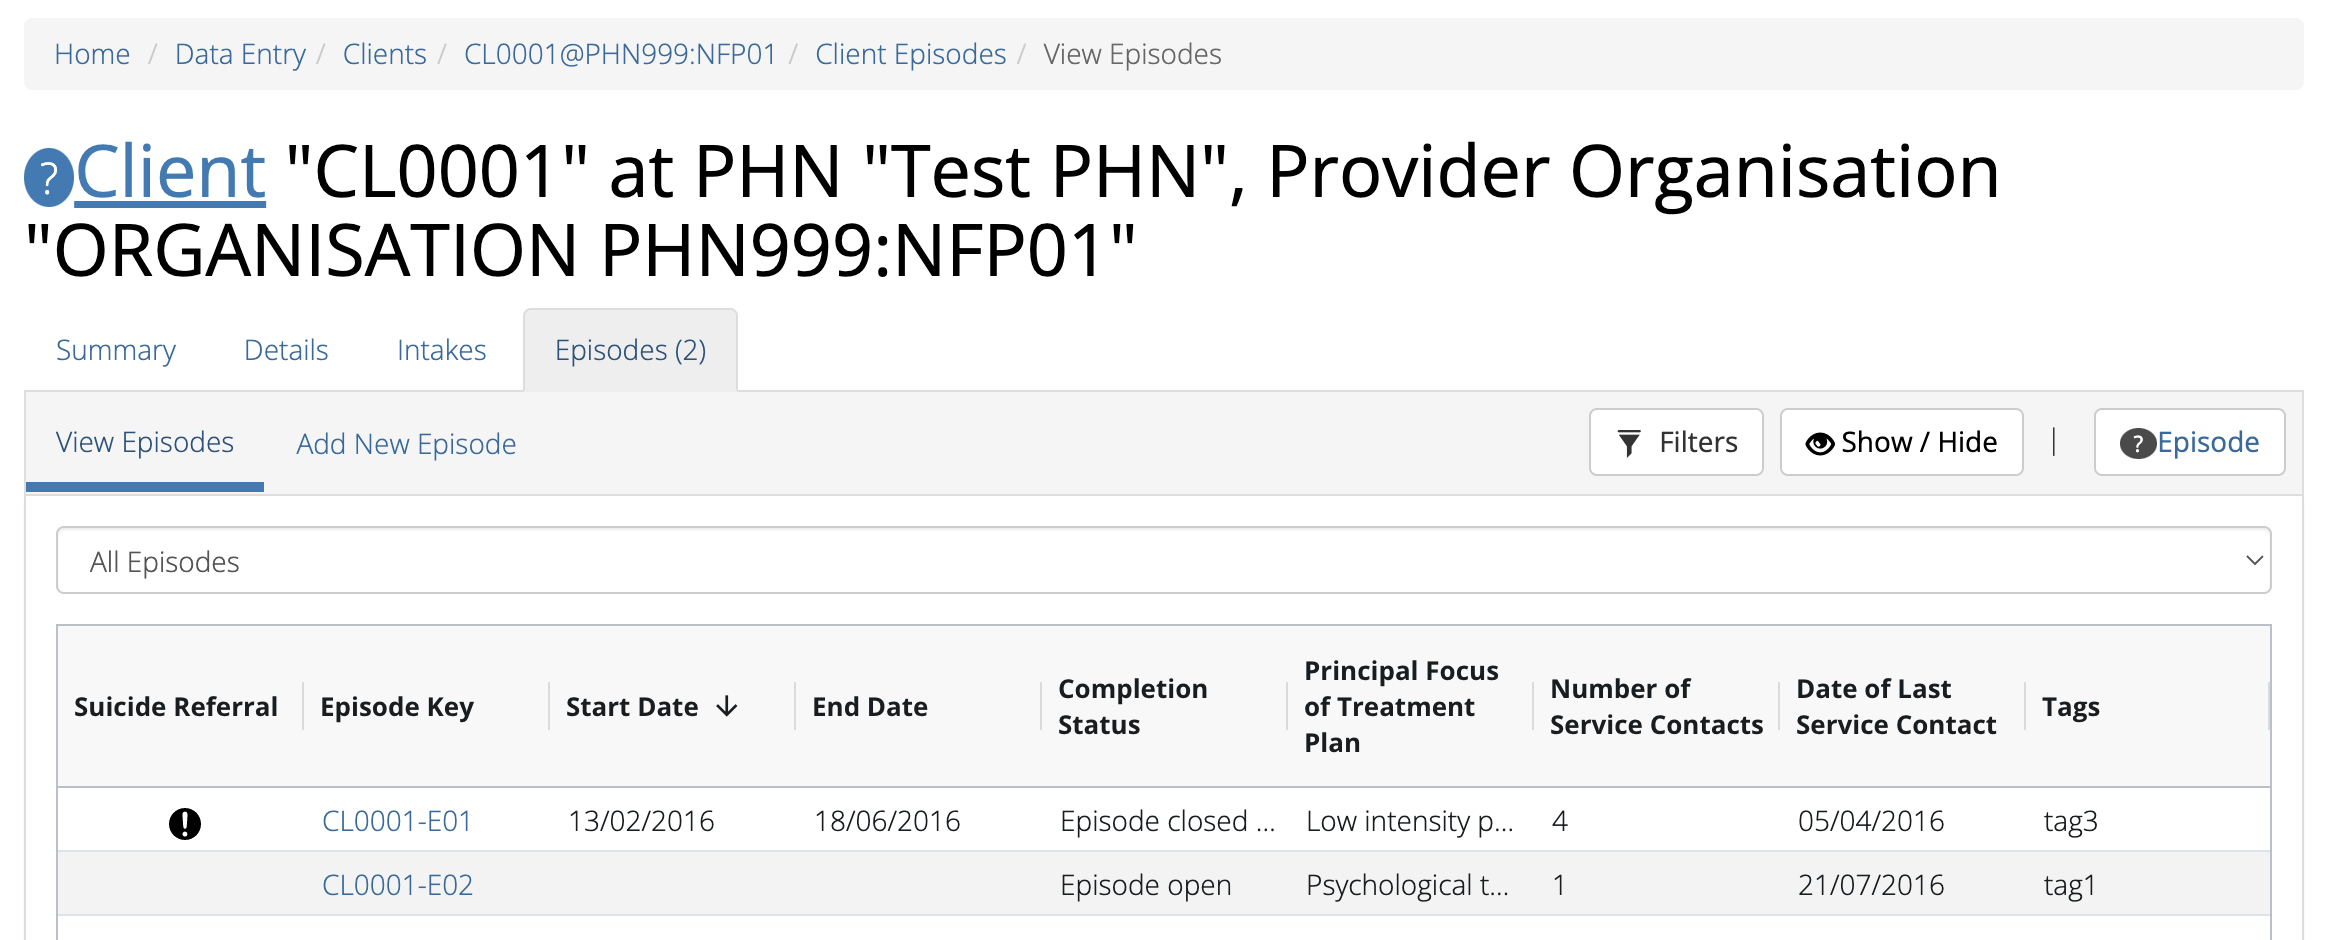
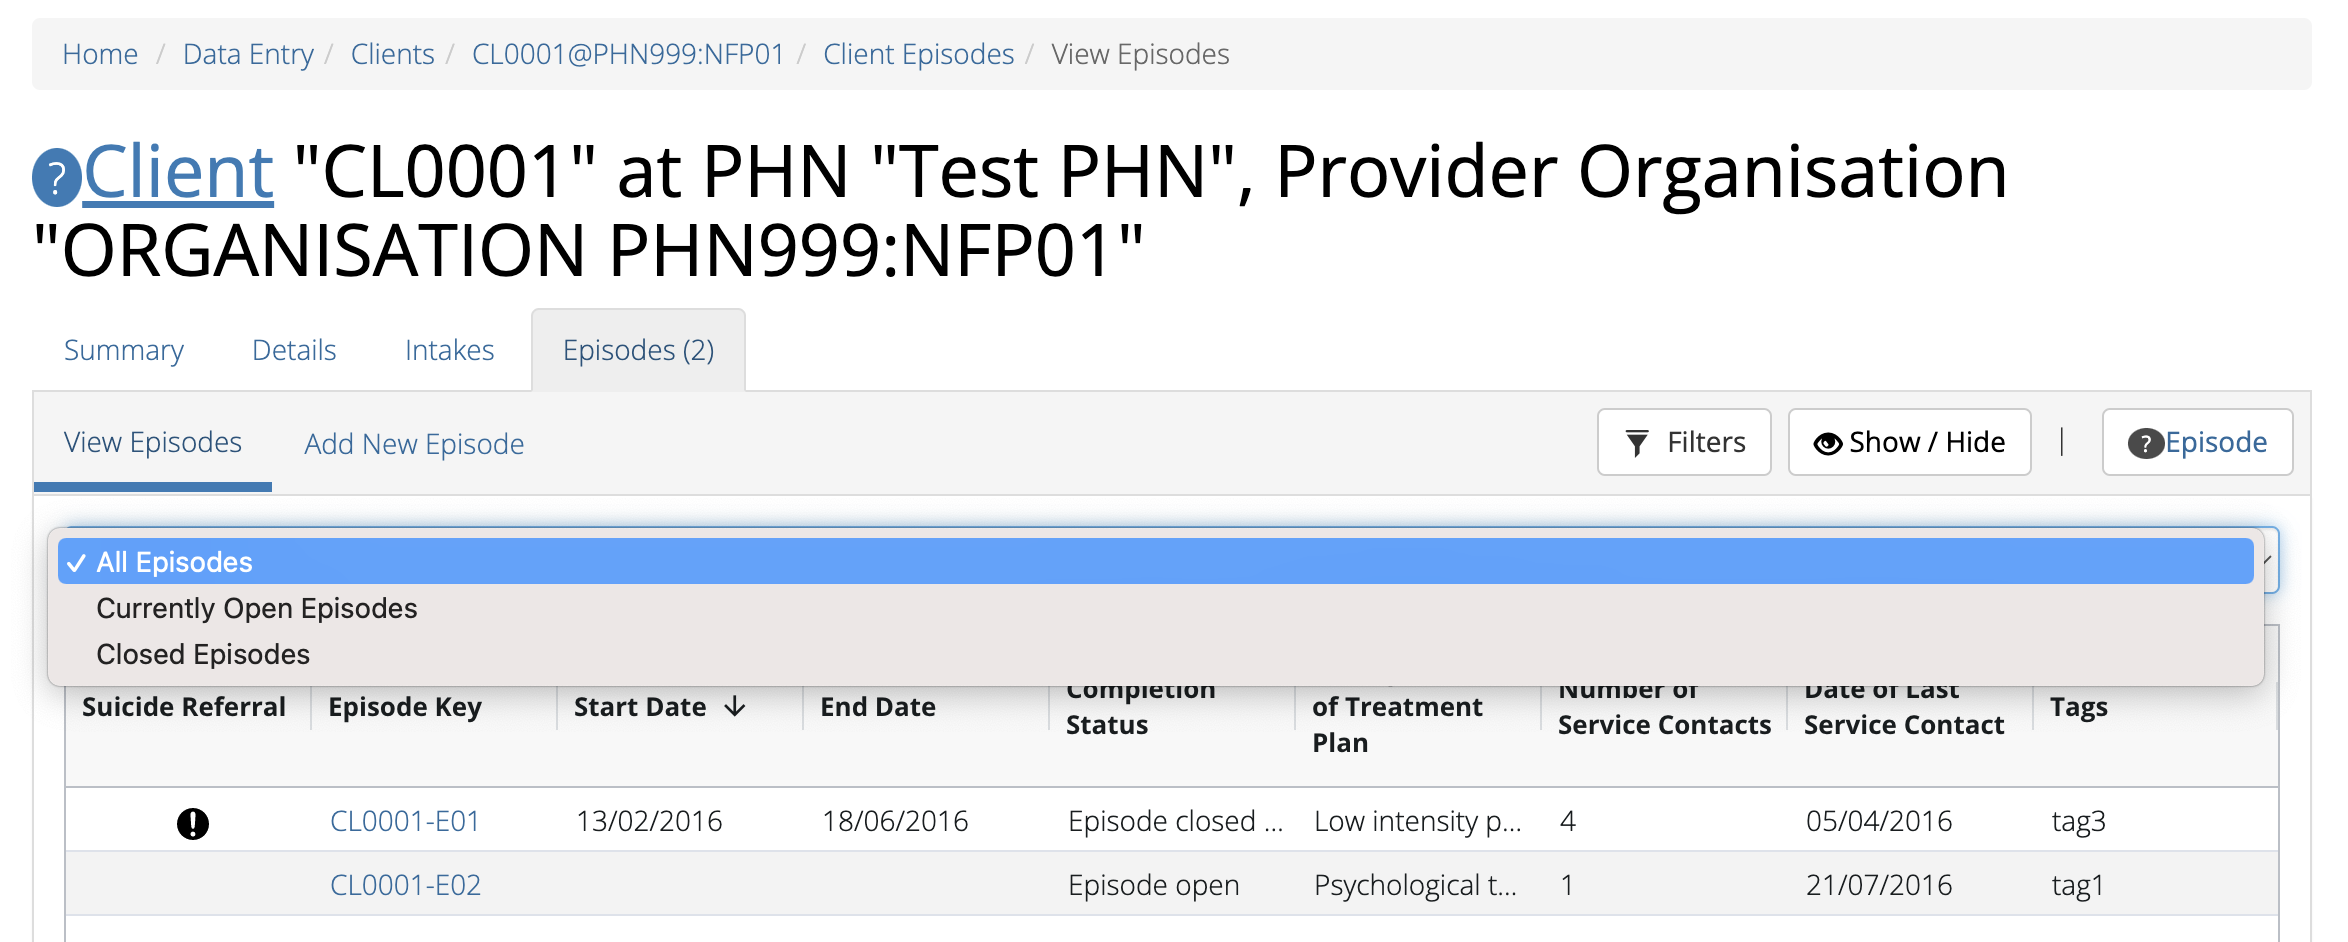
From the client’s Summary tab, you can shortcut straight to an episode by clicking
the blue Episode Key displayed in the snapshot of the five most recent episodes
Alternately, if you would like to view all episodes you can click on the
Episode tab. The heading for this tab displays in brackets the total number of episodes recorded
in the PMHC MDS for this client at Provider Organisations for which you have access.
A table will display all the Client’s Episodes at Provider Organisations for which you have access.
A drop down list is available to view:
All Episodes
Currently Open Episodes
Closed Episodes
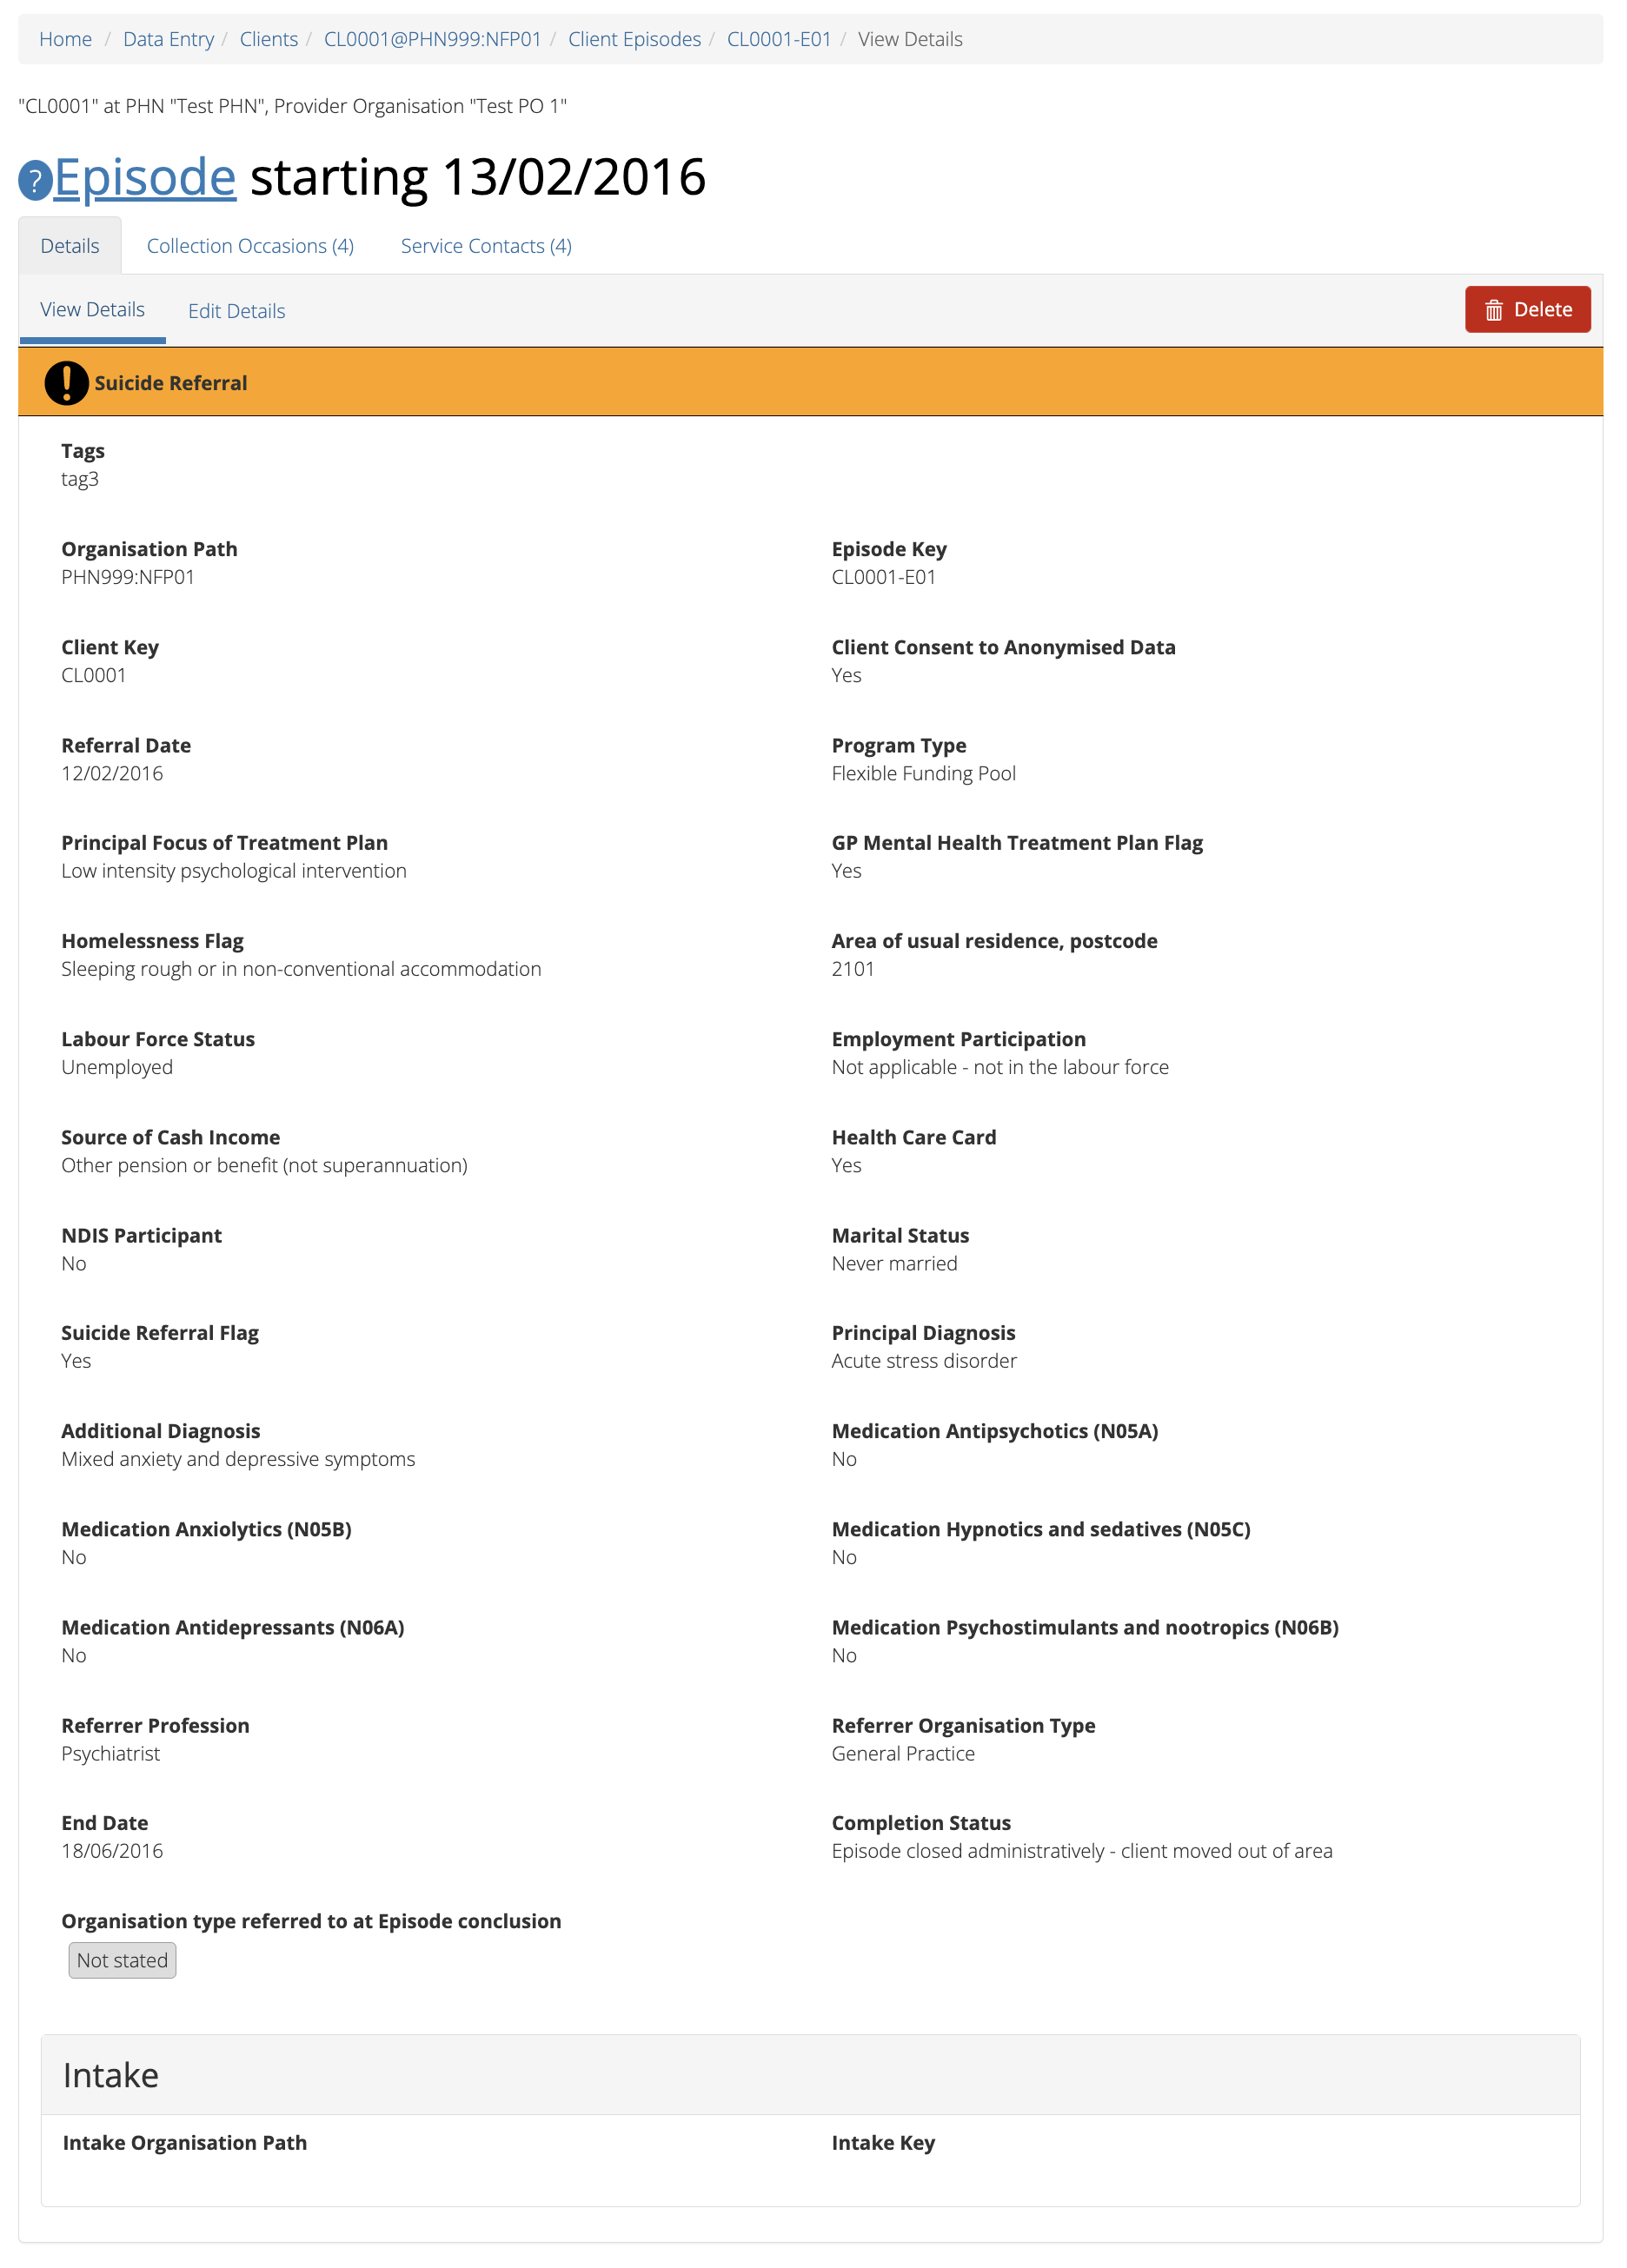
To view the client’s episode details, click the blue Episode Key
A page will display the client’s episode details as recorded via the Episode Data Elements.
The Department has recently changed some reserve tags. For more information please see System Tags.
Click the blue Save button. (If you decide not to save changes, you can
simply navigate away from this screen)
You will receive confirmation that the client’s episode details have been saved,
and it will now be displaying these new details in the episode View Details tab.
If you receive an error message, the data will need to be corrected before the
record is saved and added to the PMHC MDS.
See Validation Rules - Episode.
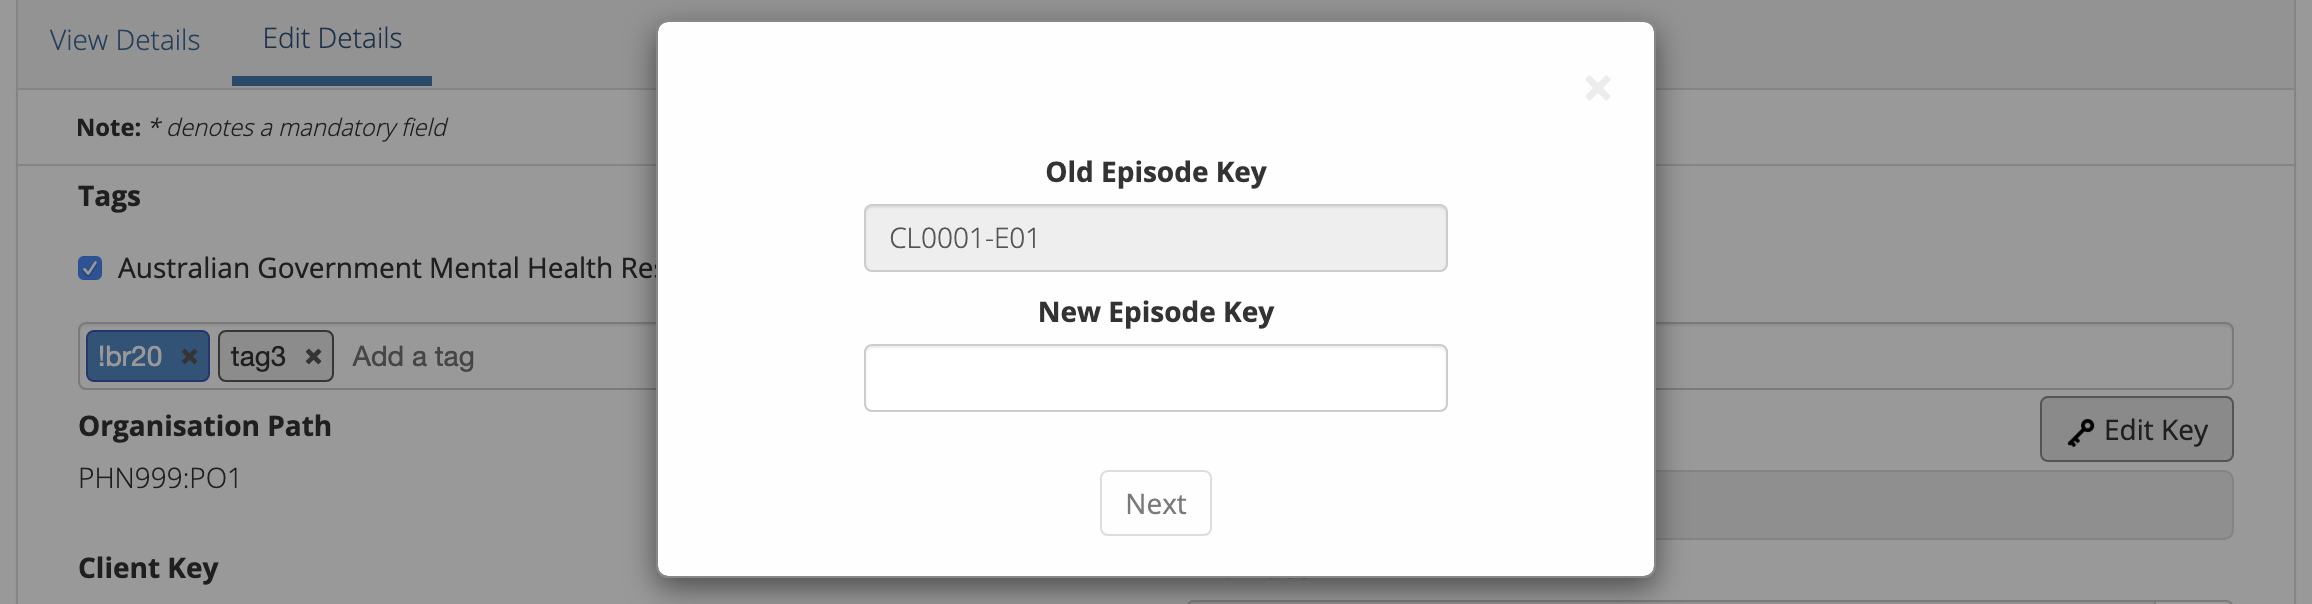
From the Episode Edit Details tab, click the Edit Key button
Type in the new episode key and click Next
Double check the new key is correct and click Save. (If it is incorrect,
click back to re-enter the key or click the ‘cross’ in the top right to cancel
this key change request)
You will receive confirmation that the Episode’s key has been saved, and the screen
will now be displaying the updated episode key details in the Episode View Details tab.
Check to ensure the client does not have any open episodes already showing.
(A client can only have one open episode at a provider organisation)
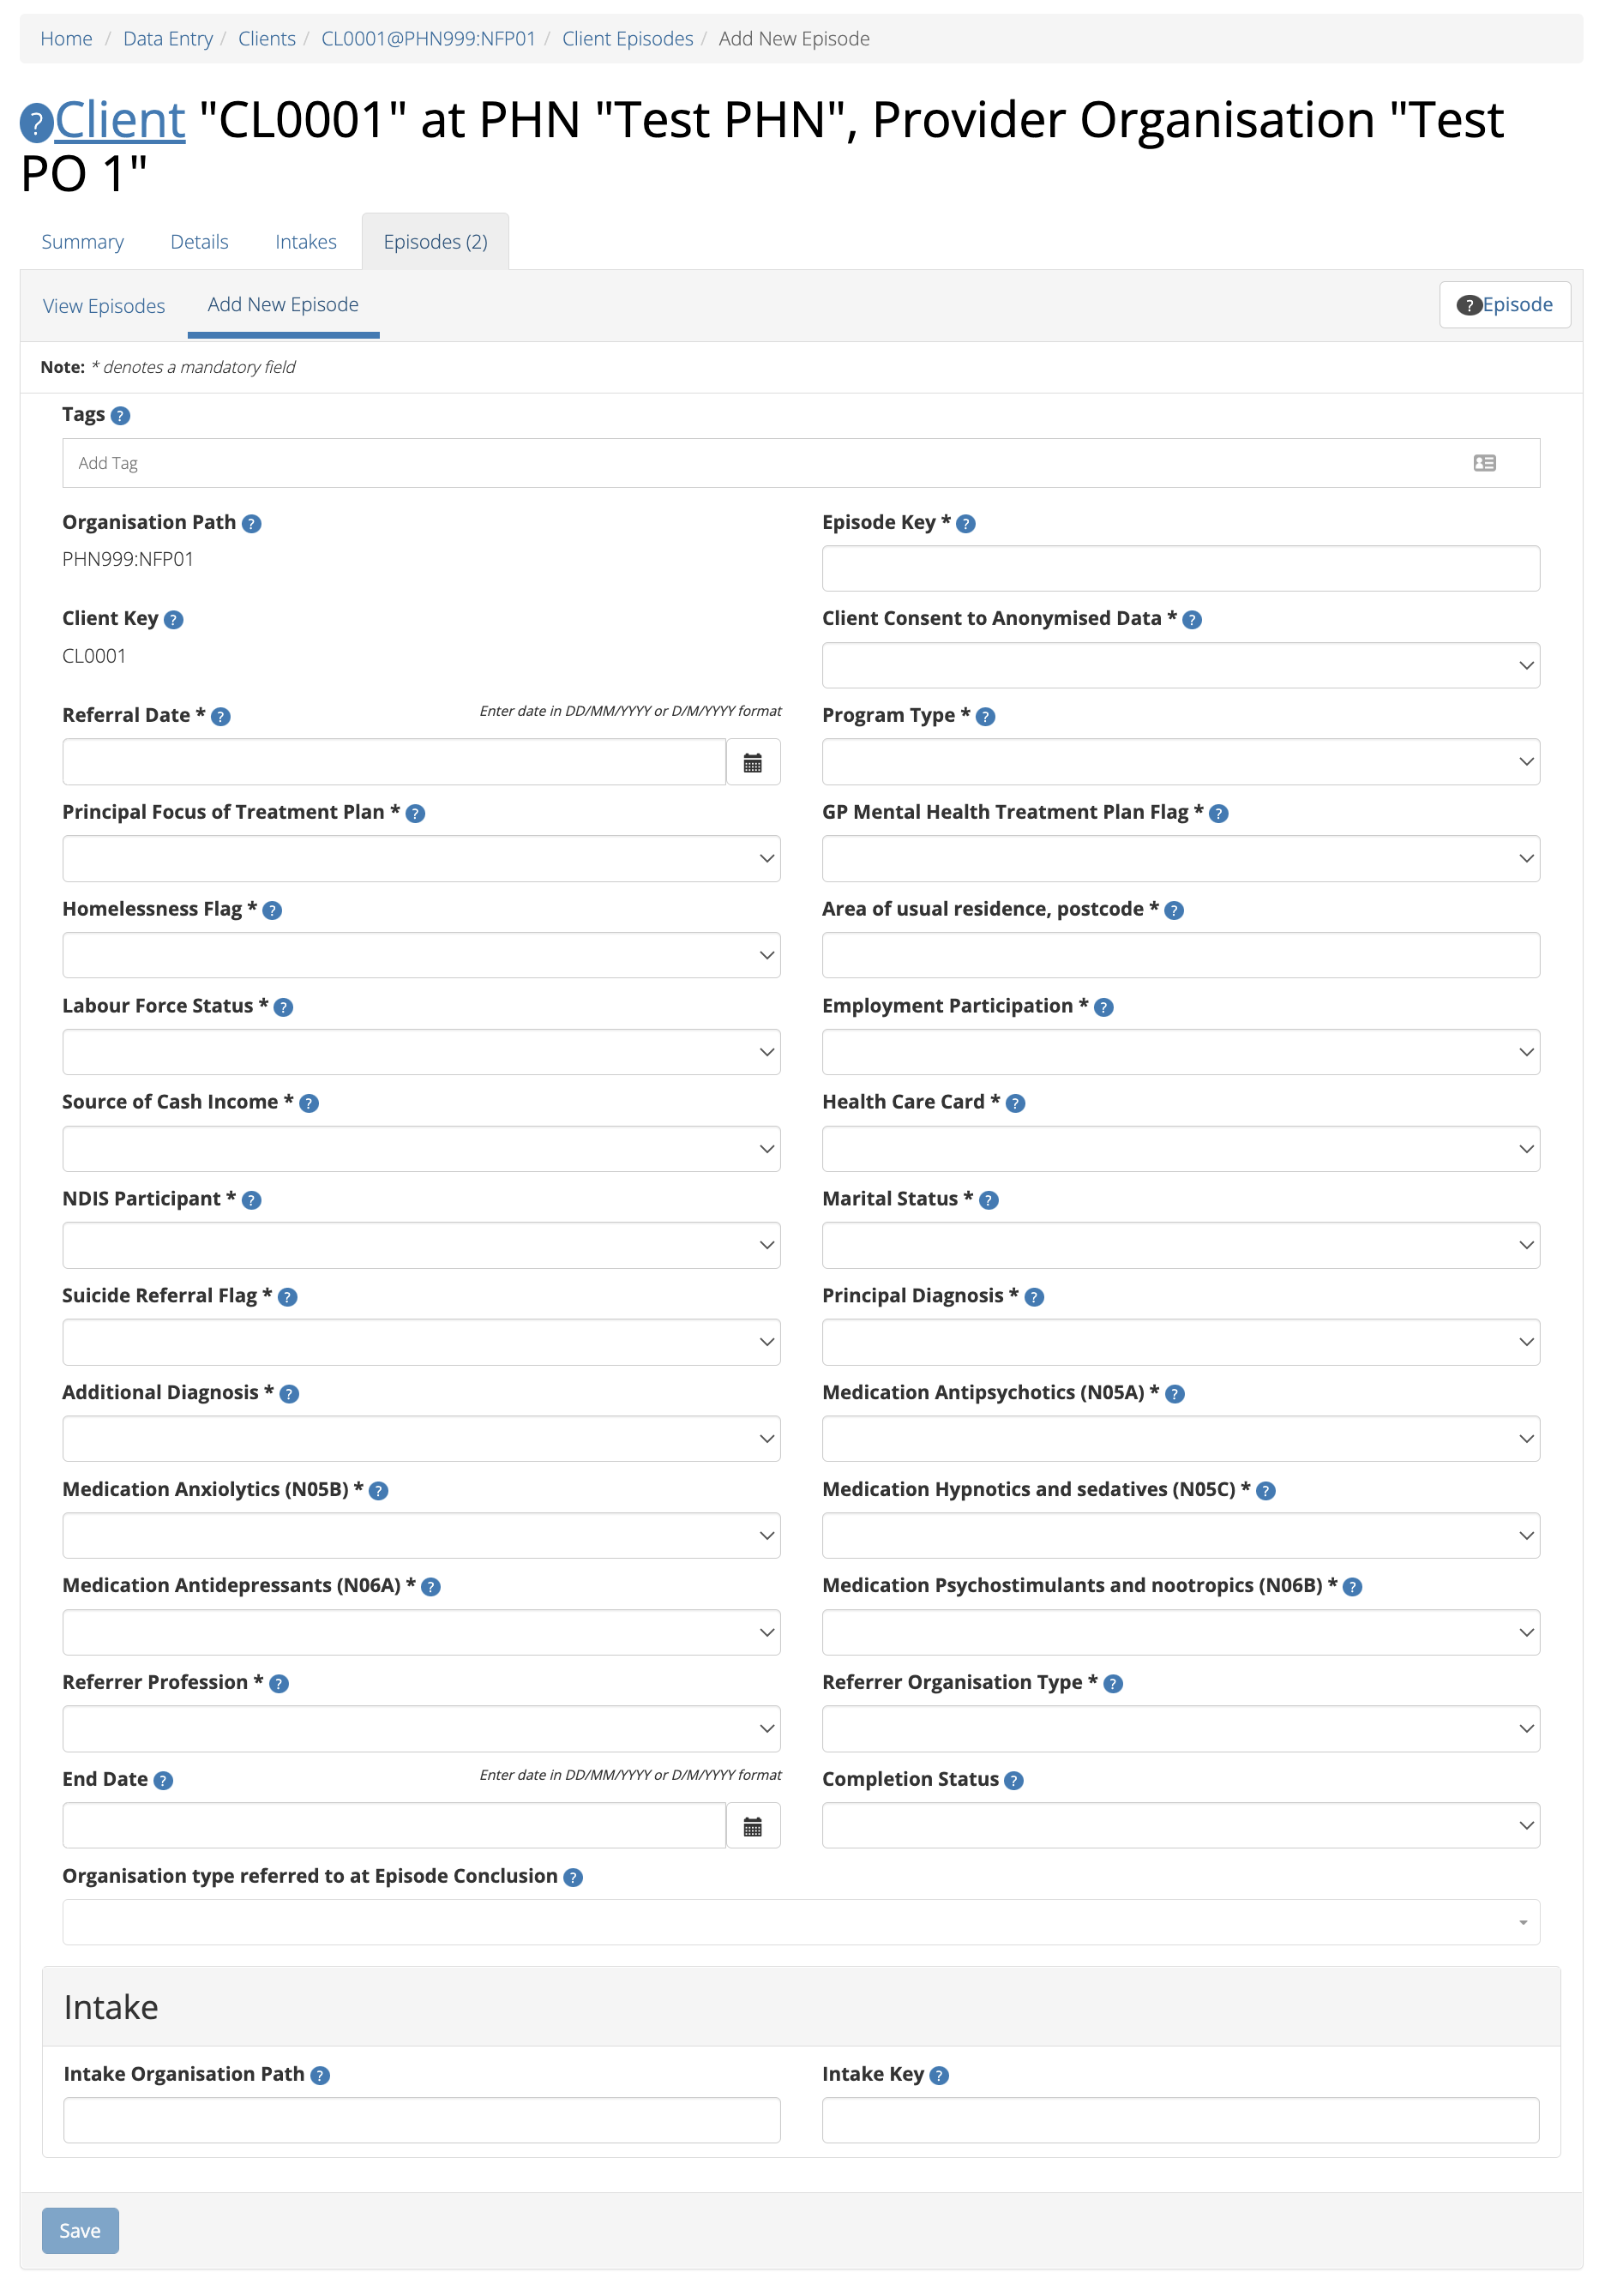
Click the Add Episode tab
(If a client already has an open episode, the following warning message will be displayed at the top off the Add Episode form)
Enter the client’s episode details. Mandatory fields are marked with an *
(Specification Episode Data Elements)
Note
The Department has recently changed some reserve tags. For more information please see System Tags.
Click the blue Save button. (If you decide not to add this client’s
episode, you can simply navigate away from this screen)
You will receive confirmation that the client’s episode details have been added,
and it will now be displaying these new details in the episode View Details tab.
If you receive an error message, the data will need to be corrected before the
record is saved and added to the PMHC MDS.
See Validation Rules - Episode.
From the client’s Episode table, click the Episode Key of the open episode
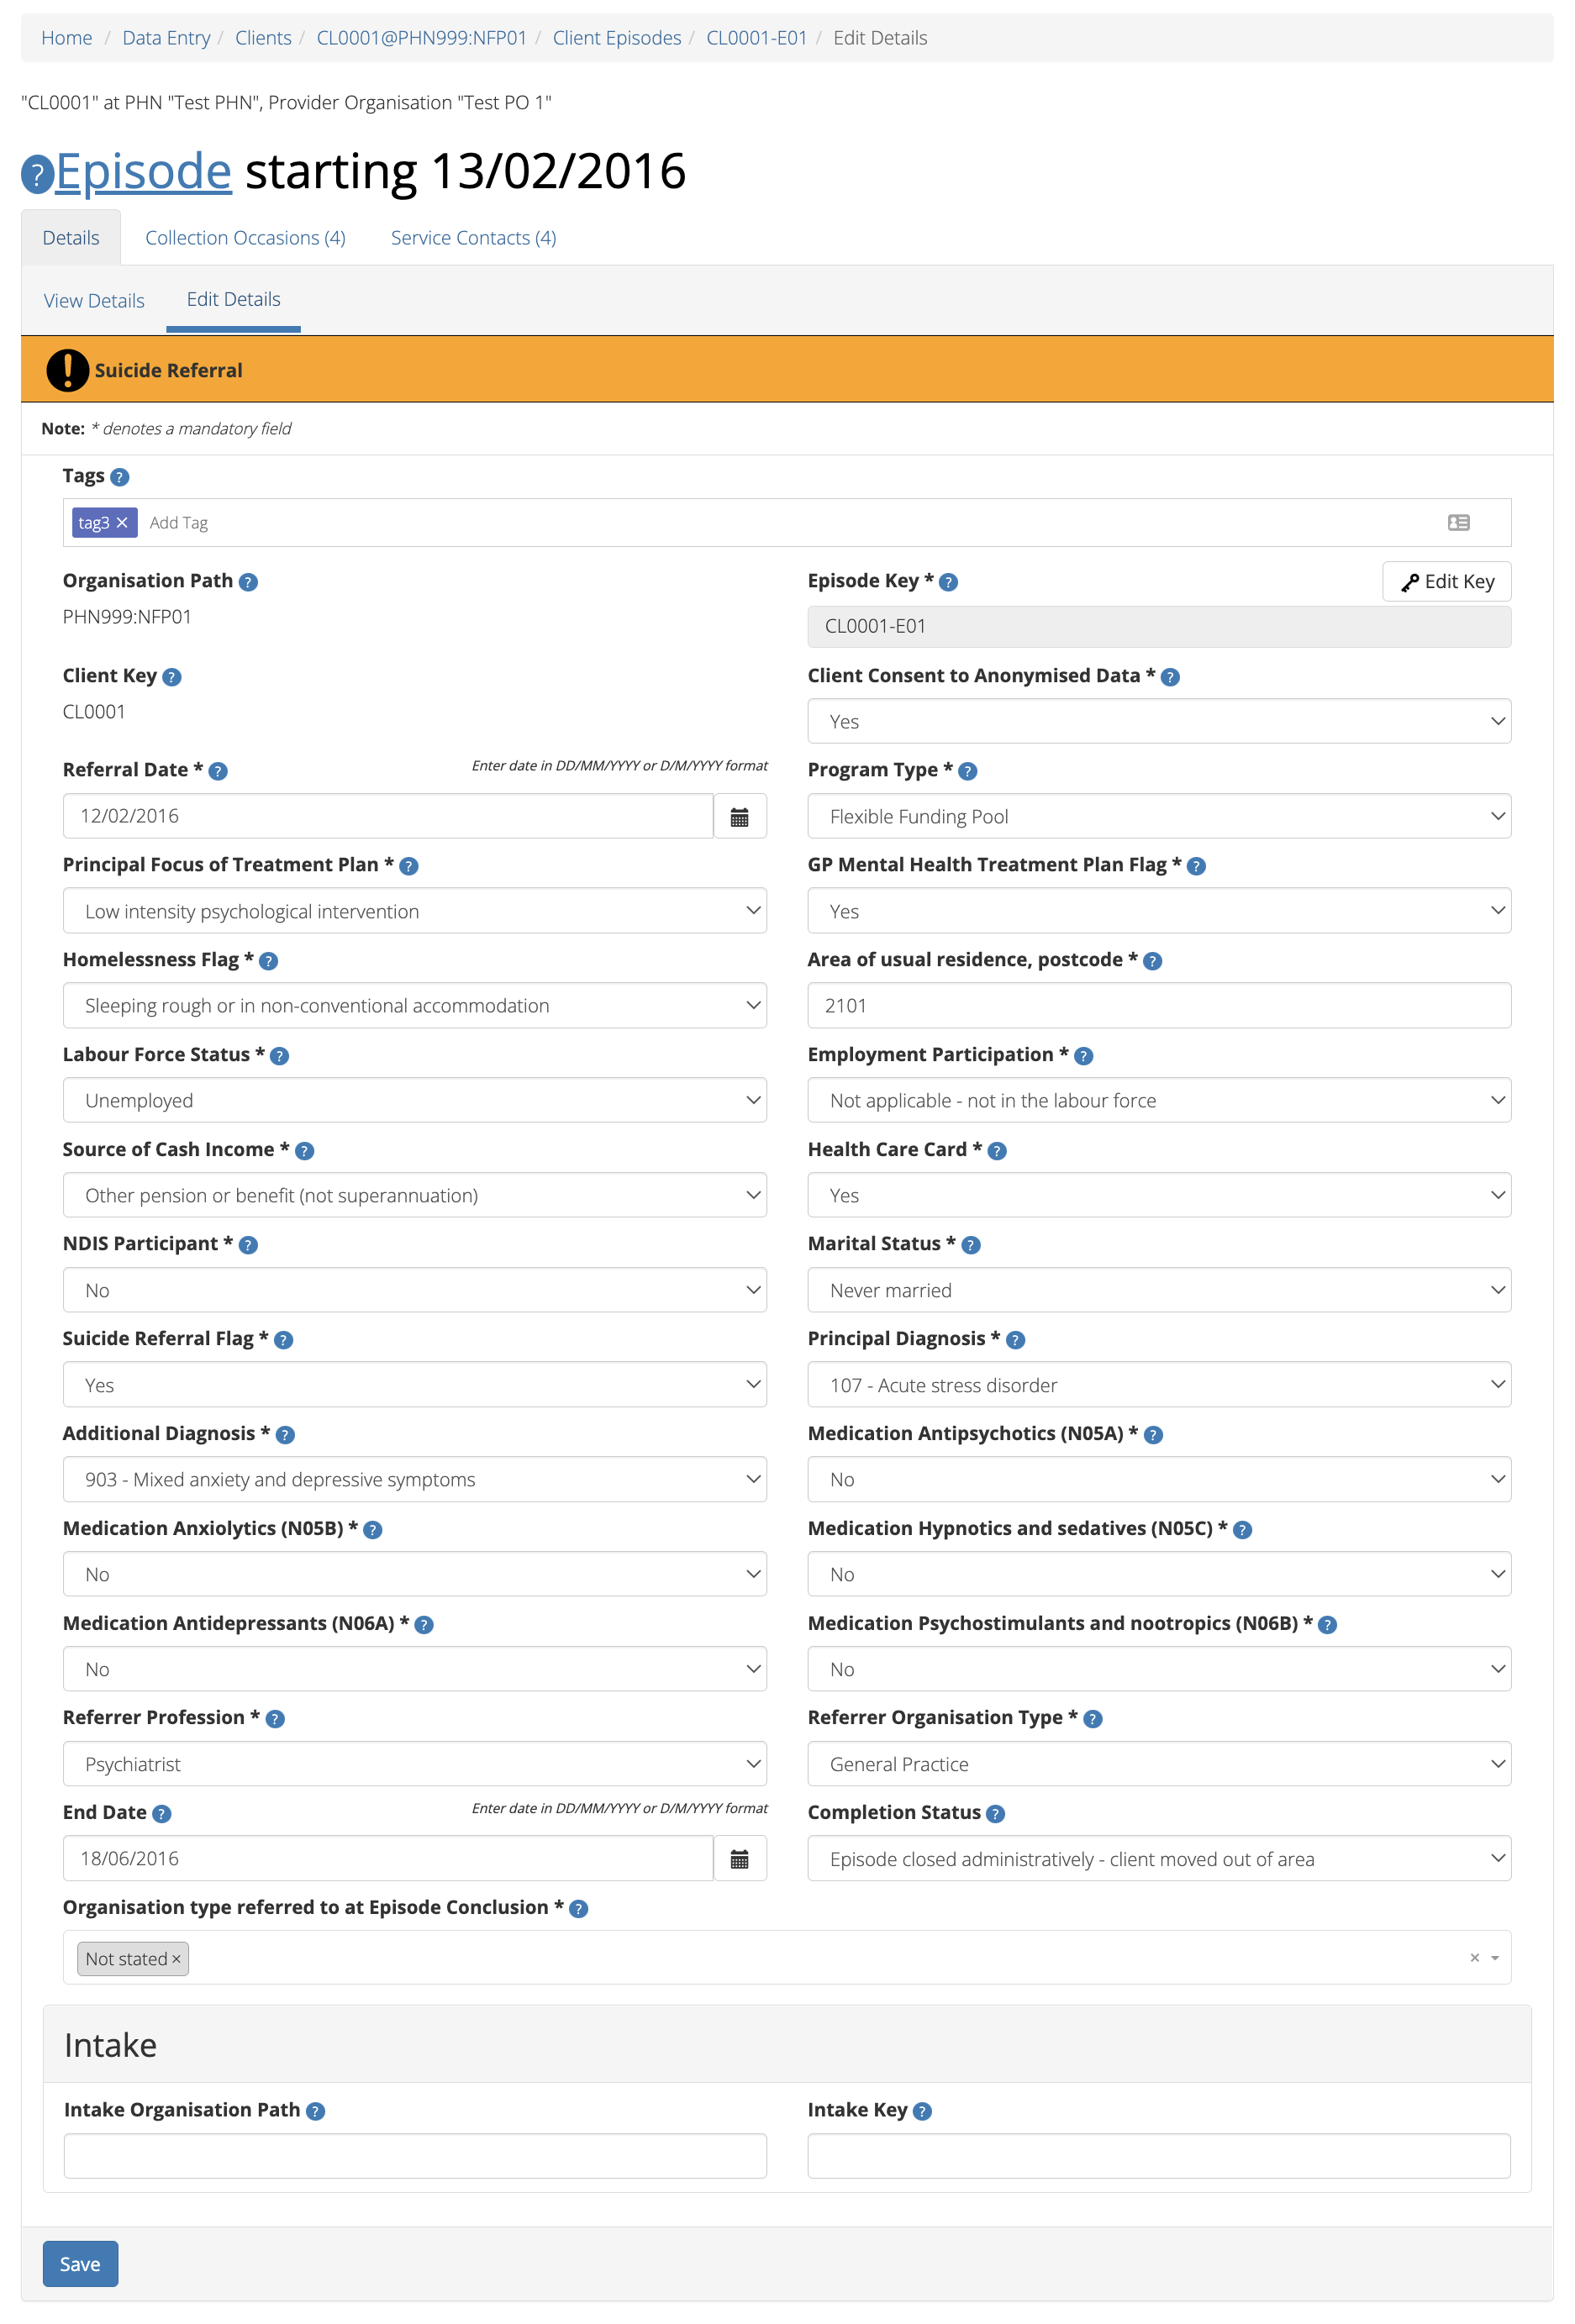
Click the Edit Details tab
Update the client’s episode details, by entering an End Date and Completion Status and Organisation type referred to at Episode Conclusion (Specification Episode Data Elements)
Click the blue Save button. (If you decide not to save changes, you can
simply navigate away from this screen)
You will receive confirmation that the client’s episode details have been saved,
and it will now be displaying these new details in the episode View Details tab.
If you receive an error message, the data will need to be corrected before the
record is saved and added to the PMHC MDS.
See Validation Rules - Episode.
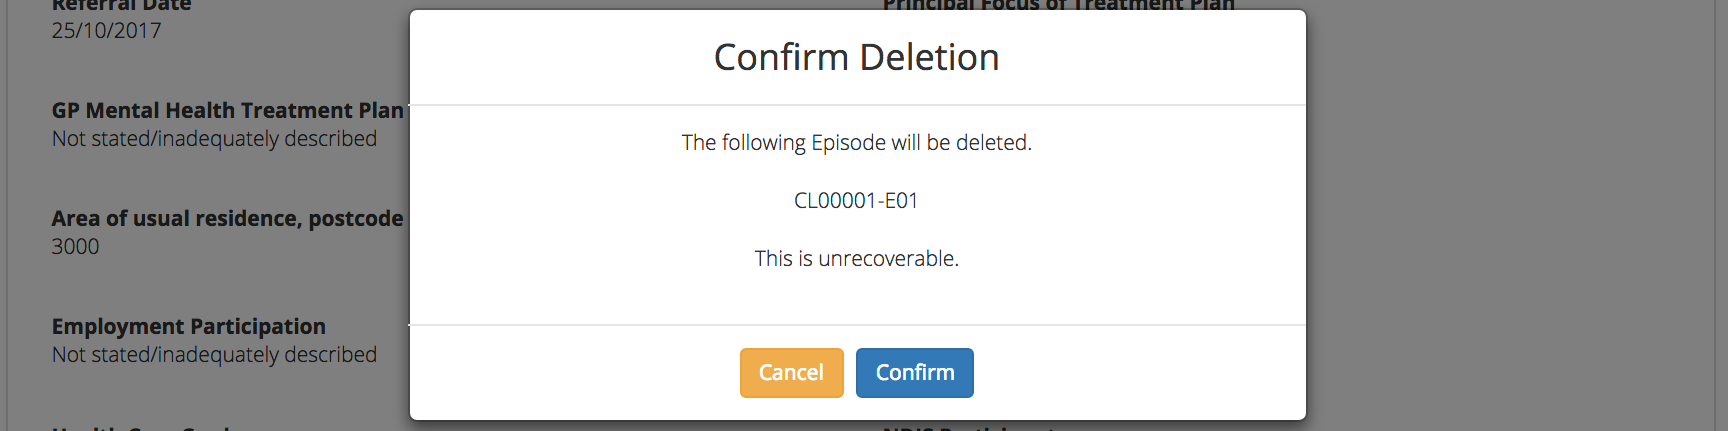
Please note: Once the episode is deleted, you will not be able to recover this episode data.
Click the blue Confirm button to delete this episode. (or click the
orange Cancel button if you decide not to delete this episode data)
After you click Confirm, you will receive confirmation that the episode has
been deleted, and you will be redirected to View Episodes where the
episode will no longer be displayed.
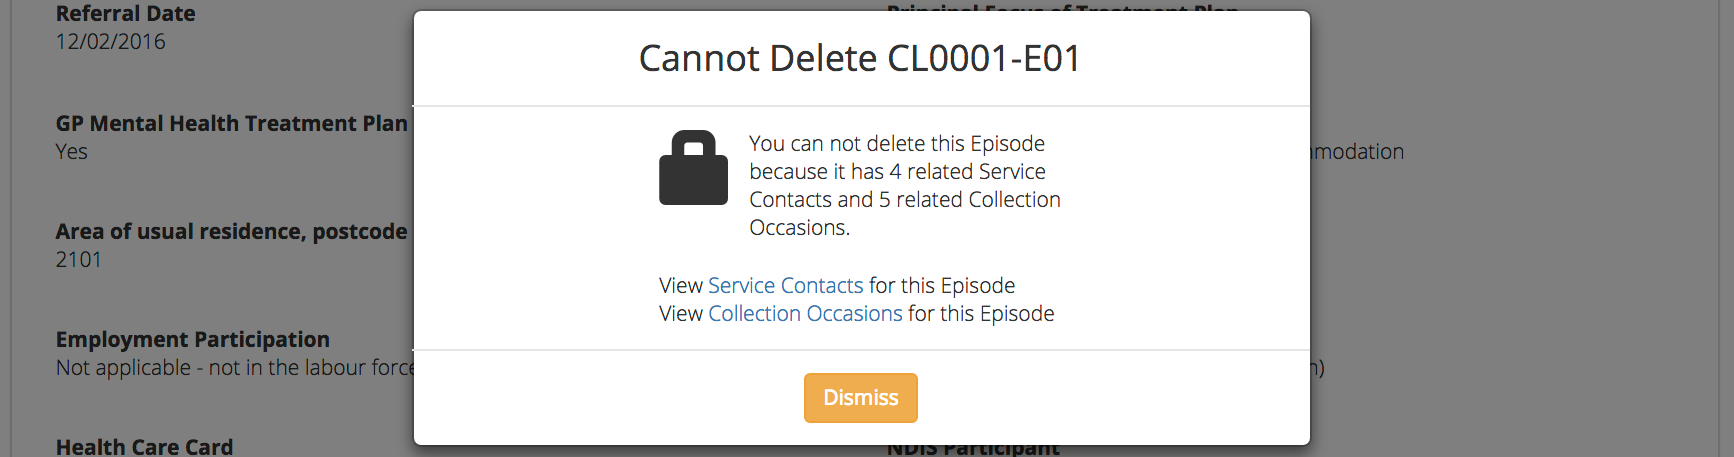
If the episode you are trying to delete has any dependant records, you will not
be able to proceed with deleting this episode until all the related records have
been deleted.
You can click on the link provided to view the client’s service contacts
and collection occasions, or click the orange Dismiss button
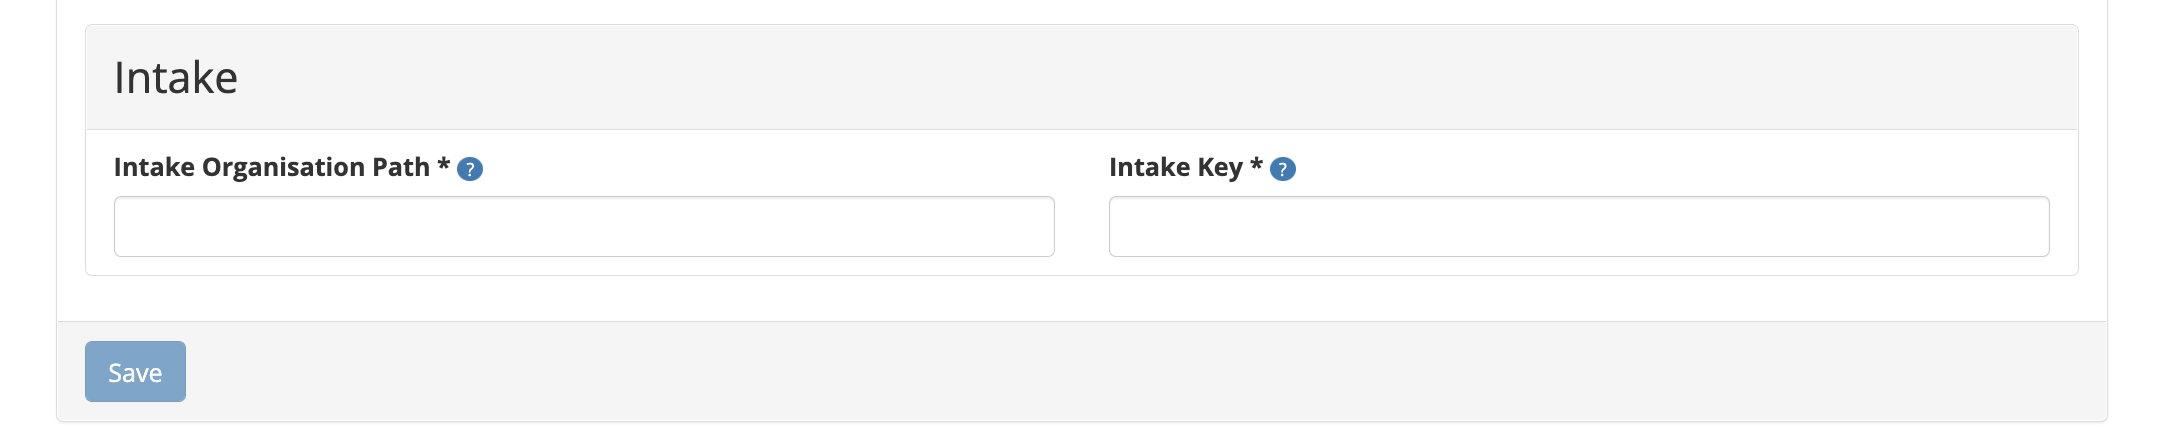
Where the client has been referred via an intake process, an additional Intake
Episode record is available on the Episode record.
The Intake Episode record links an Intake record and an Episode record. The
intake episode data must be entered by the organisation that delivers the
treatment to the client.
(Specification Intake Episode Data Elements)
You can add a client’s intake episode when you add the episode data. Follow
the steps at Adding a Client’s Episode data and complete the additional Intake Episode section
at the bottom of the form before clicking save.
If you didn’t have the intake data available when the episode data was entered,
follow the steps at Editing a Client’s Episode data and complete the additional Intake Episode
section at the bottom of the form before clicking save.
You can delete a client’s intake episode data without deleting the entire episode
record.
Simply remove the data in the client’s intake episode fields on the episode record,
follow the steps at Editing a Client’s Episode data and scroll to the bottom of the episode form.
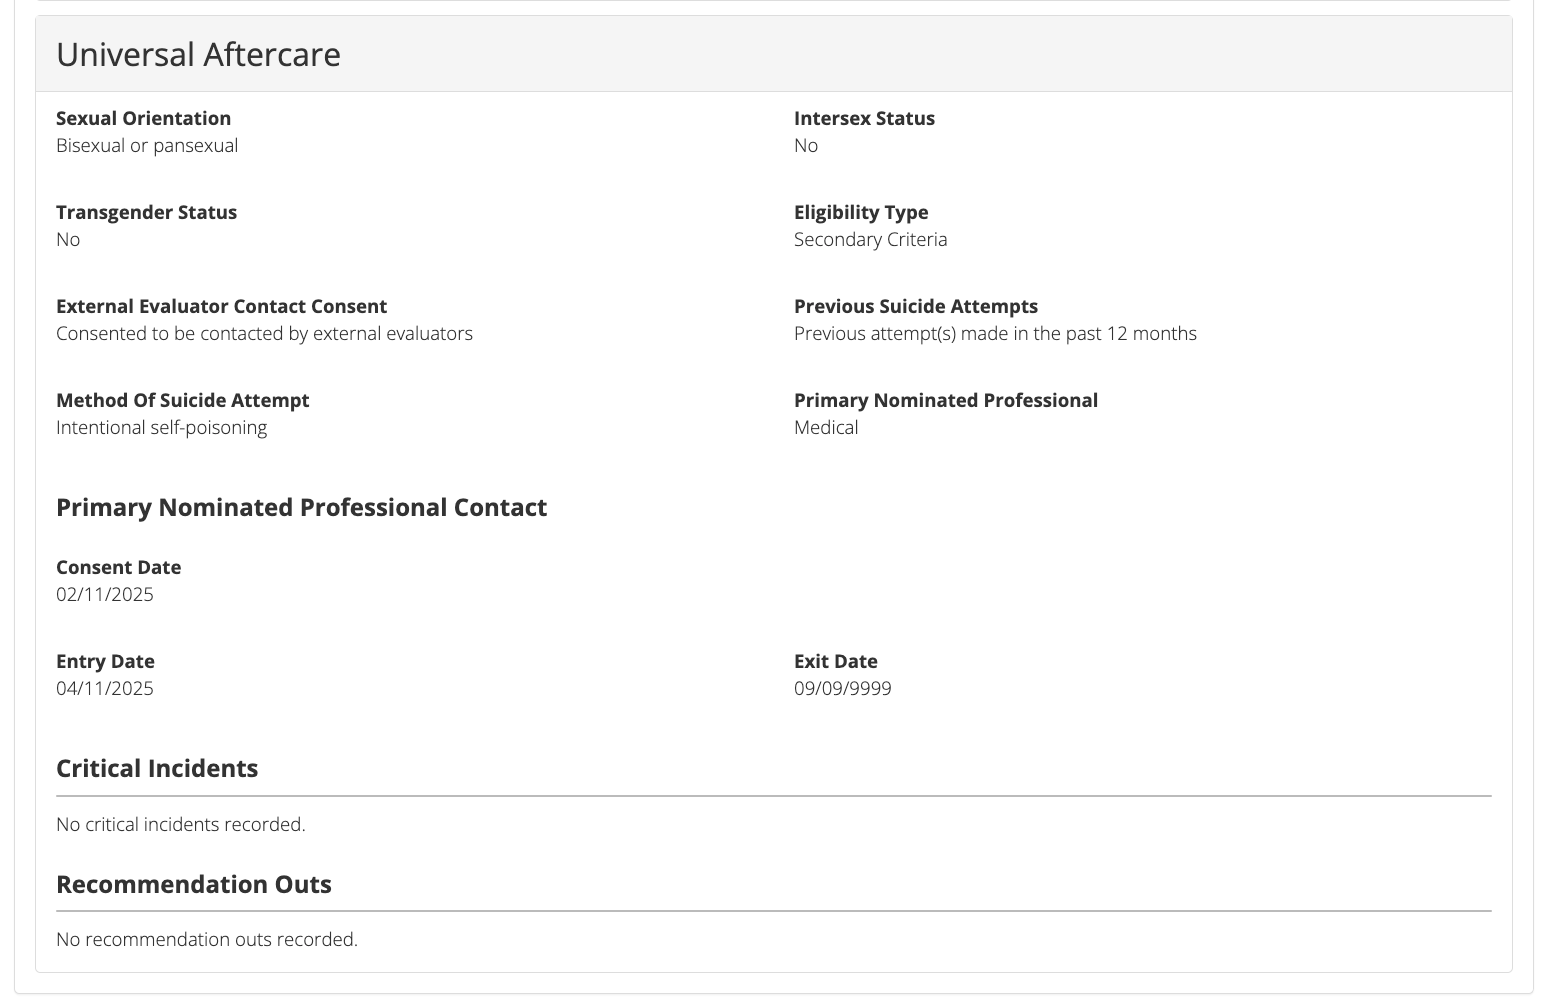
Episodes with Program Type Universal Aftercare have extra information associated with them. The
extra Universal After information is shown underneath the general Episode information
when viewing or editing an Episode.
You can view the Universal Aftercare data associated with an episode that has the Universal Aftercare Program Type
by following the steps at Viewing a Client’s Episodes and scrolling to the bottom of the tab.
You can edit a Client’s PMHC Episode details through Viewing a Client’s Episodes
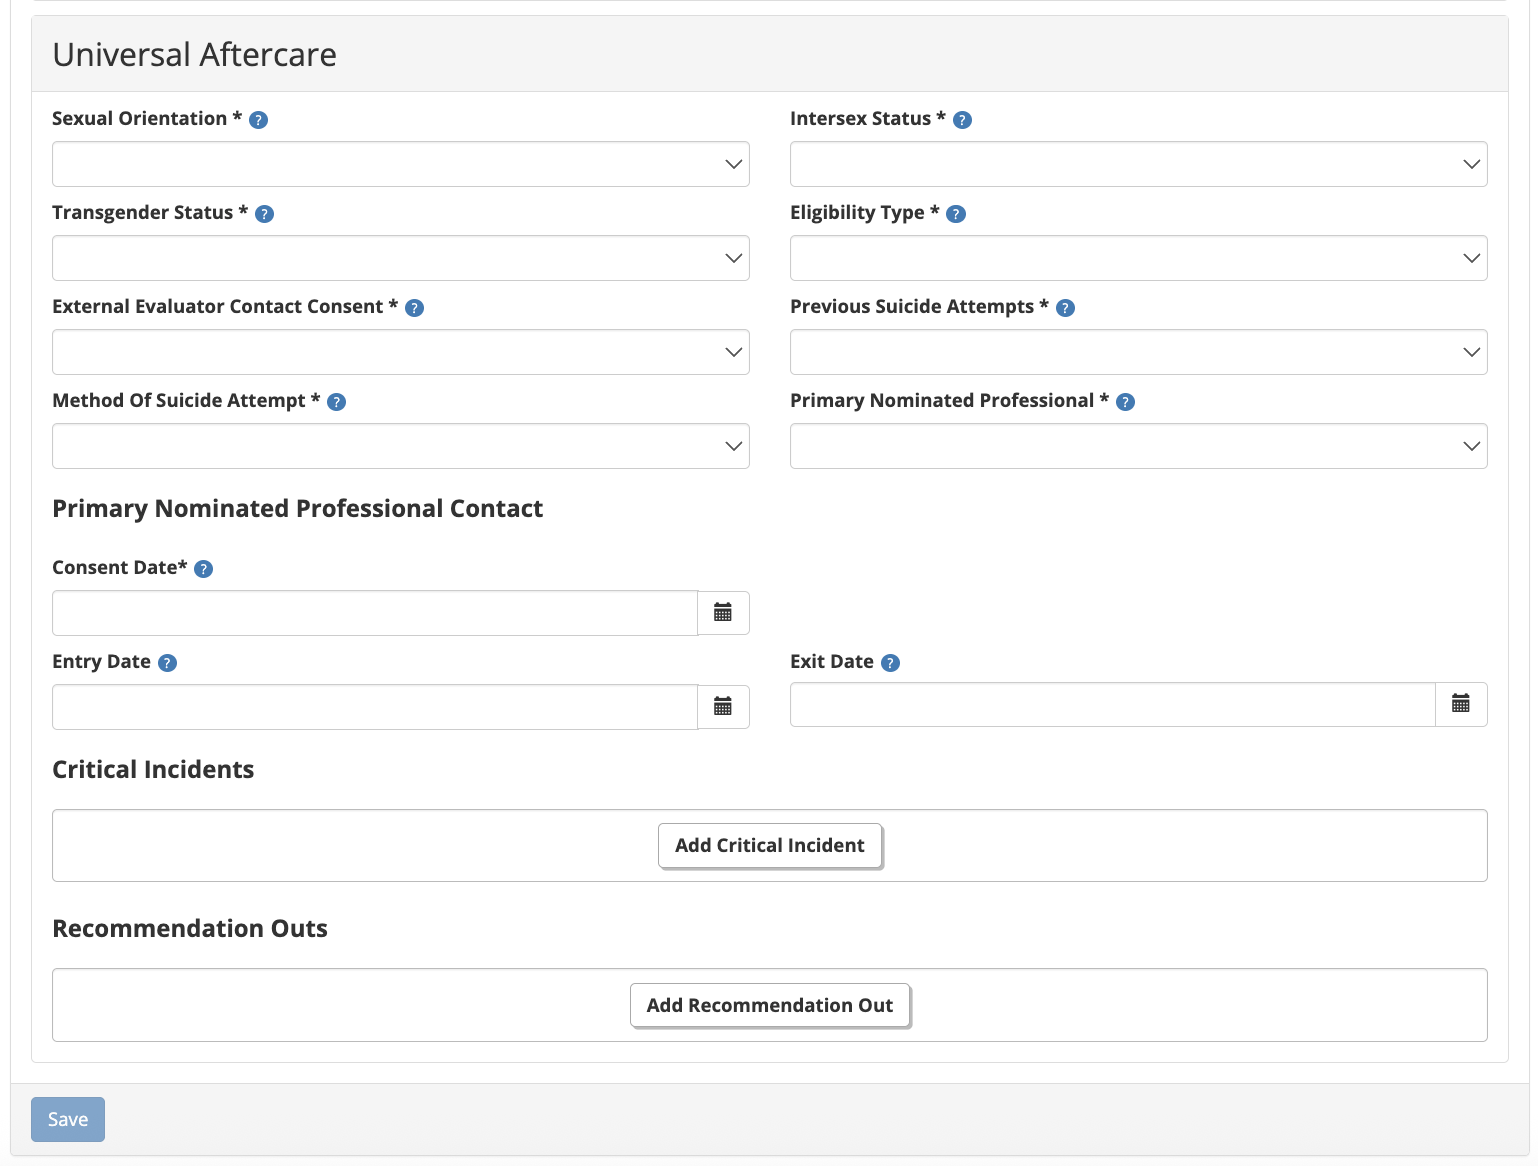
available on the Data Entry tab to add a Client’s UA Episode data, by following these steps:
Click the blue ‘Save’ button. (If you decide not to add UA data, you can simply navigate away from this screen)
You will receive confirmation that the Client’s Episode details have been saved,
and it will now be displaying.
If you receive an error message, the data will need to be corrected before the
record is saved and added to the PMHC MDS.
See Validation Rules - UA Episode
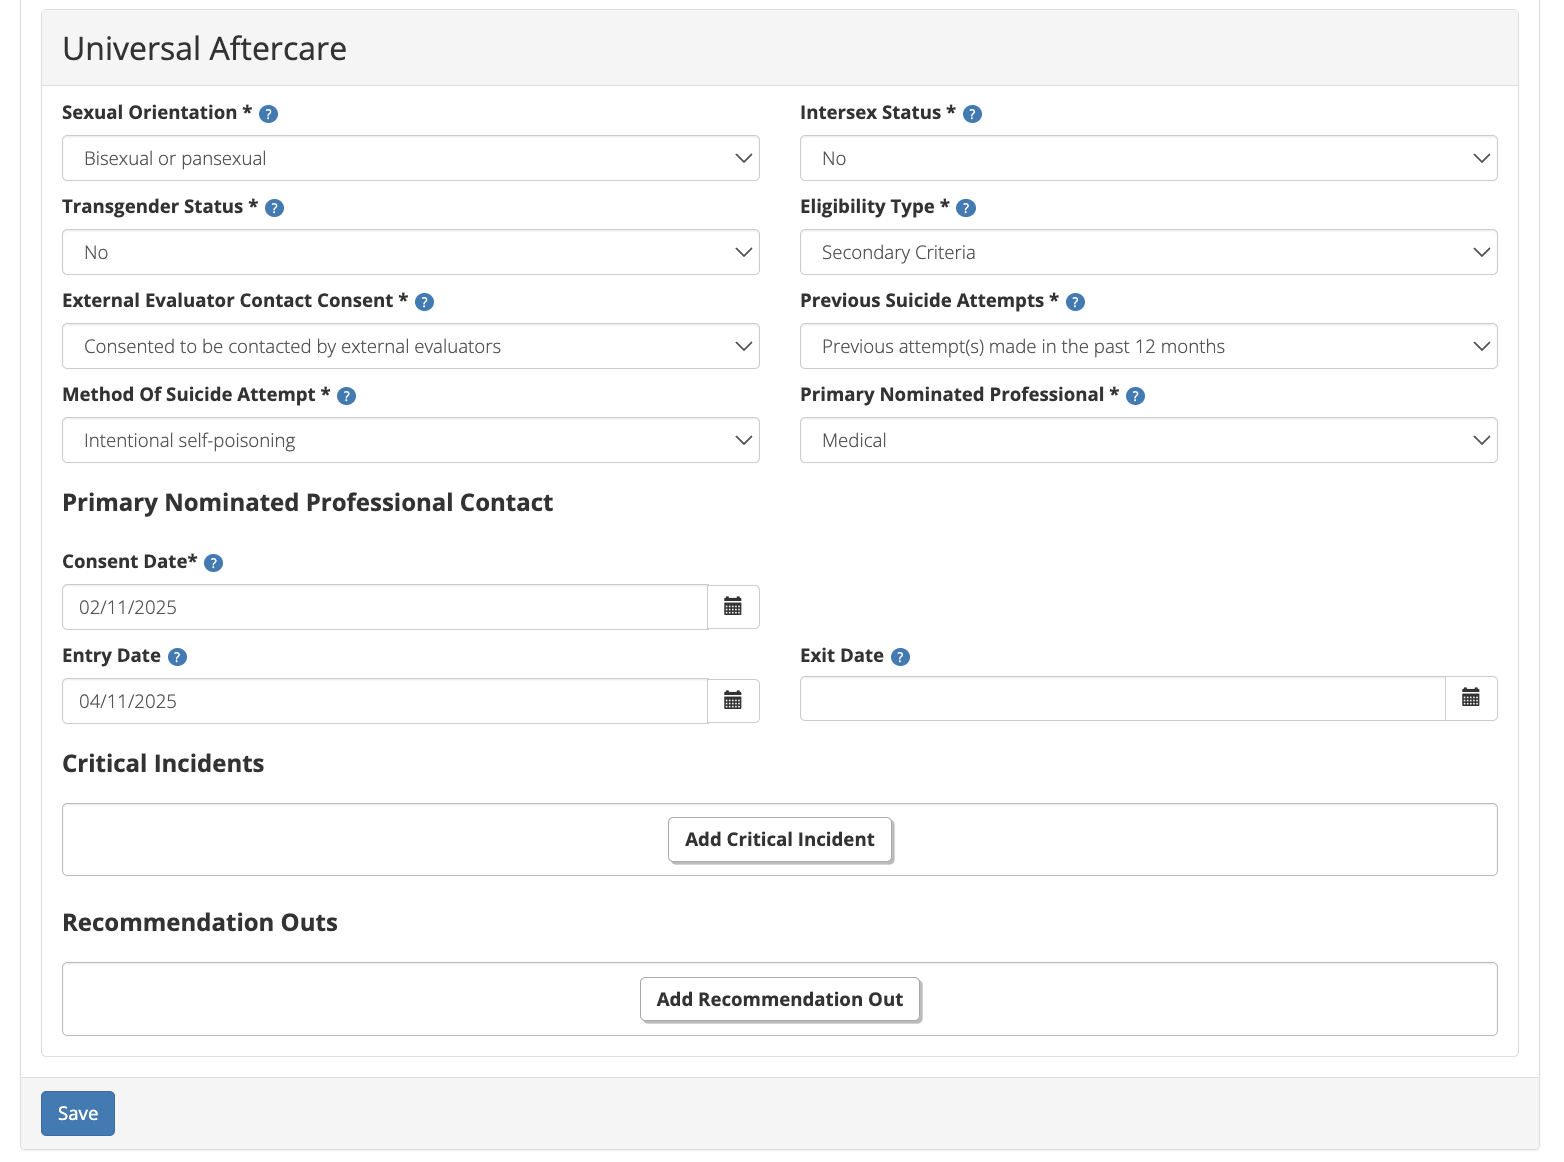
From the Client’s Episode table, click the Episode Key.
Click Edit Details tab.
Scroll to the bottom of the PMHC Episode.
Update the Client’s UA Episode details. Mandatory fields are marked with an * . (Specification UA Episode Data Elements)
Click the blue ‘Save’ button. (If you decide not to save changes, you can simply navigate away from this screen)
You will receive confirmation that the Client’s UA Episode details have been saved,
and it will now be displaying these new details in the Episode View Details tab.
If you receive an error message, the data will need to be corrected before the
record is saved and added to the PMHC MDS.
See Validation Rules - UA Episode
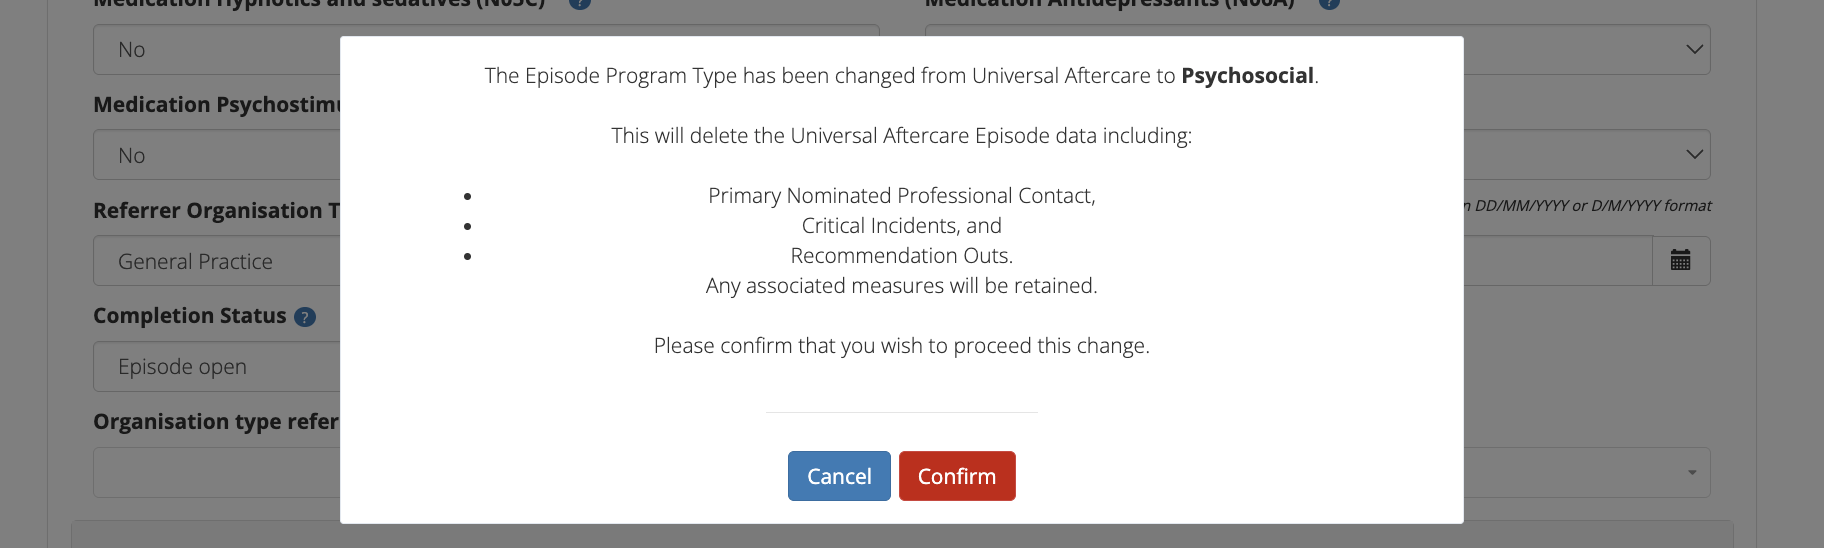
Removing ‘Universal Aftercare’ from the Program Type field will delete an UA Episode,
through Viewing a Client’s Episodes available on the Data Entry tab, by following these steps:
A new system tag (!uaooh) has been introduced to distinguish episodes under the
Universal Aftercare Outside of Hospital/Expanded Referral Pathway Trial. The
!uaooh tag will only be allowed on Episode records where the Program Type is
‘9: Universal Aftercare’. This tag should be applied to all episodes delivered
under the Universal Aftercare Outside of Hospital/Expanded Referral Pathway Trial.
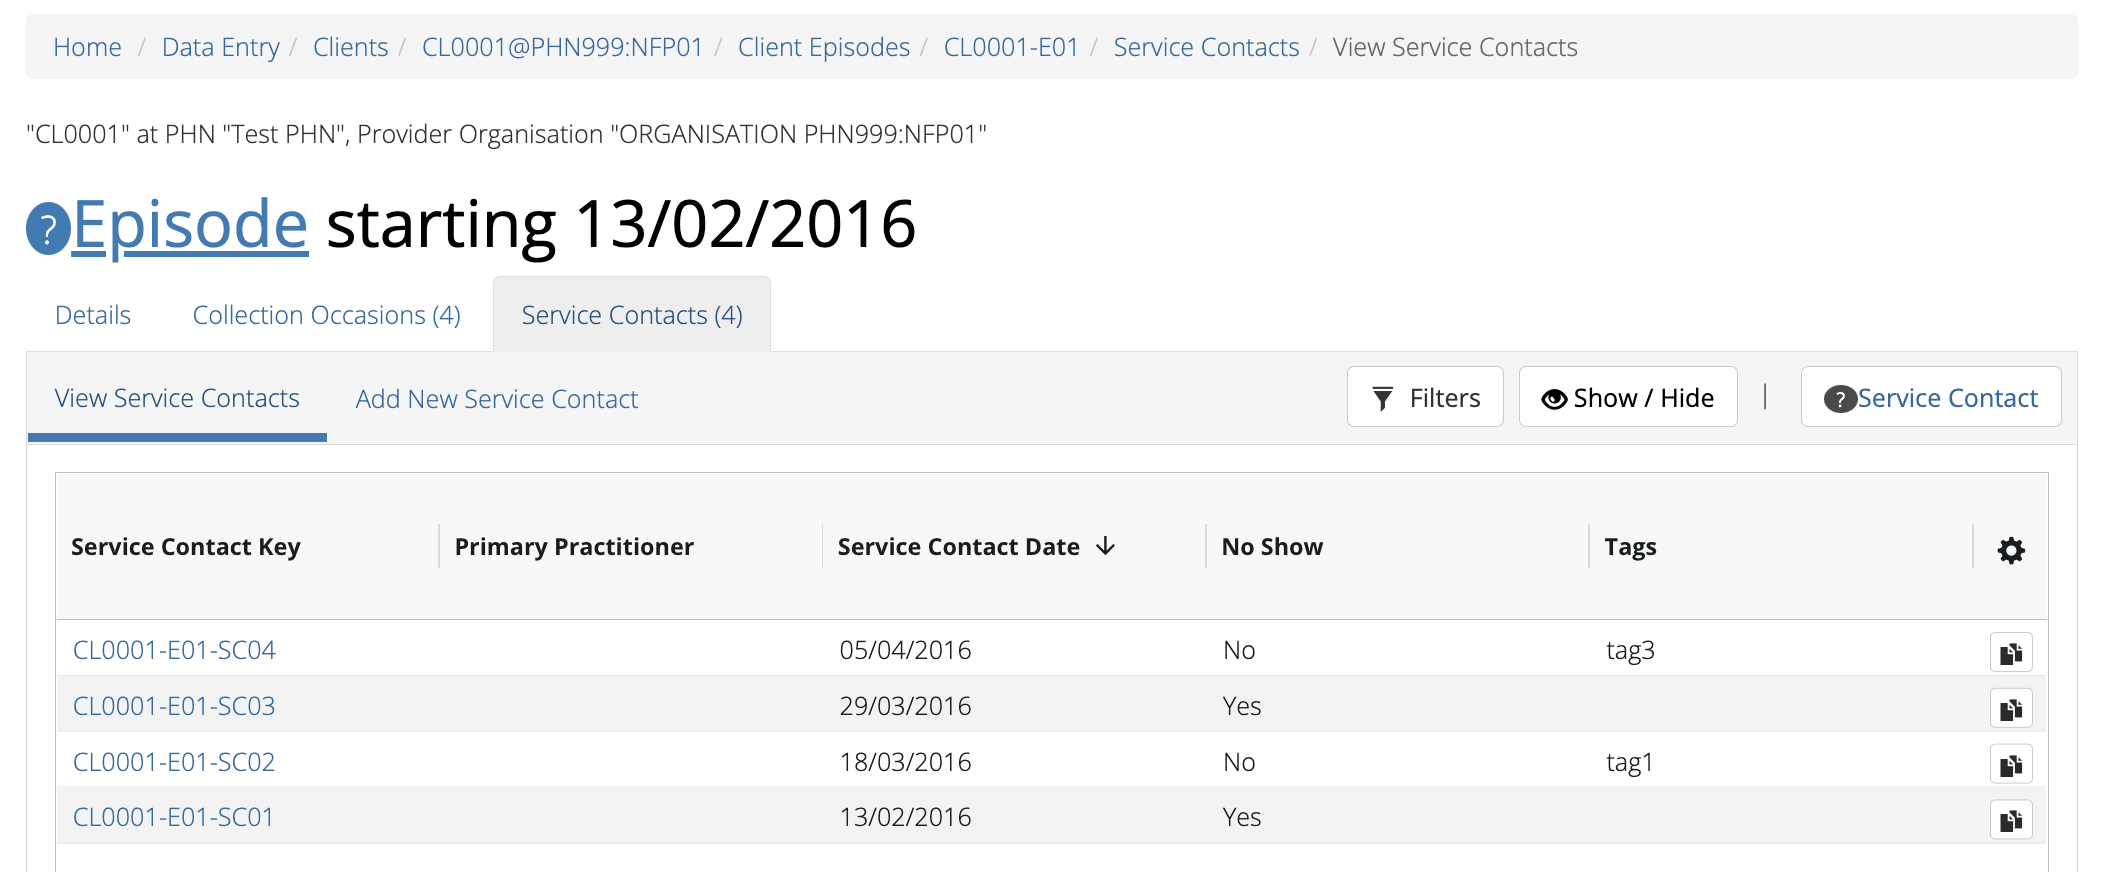
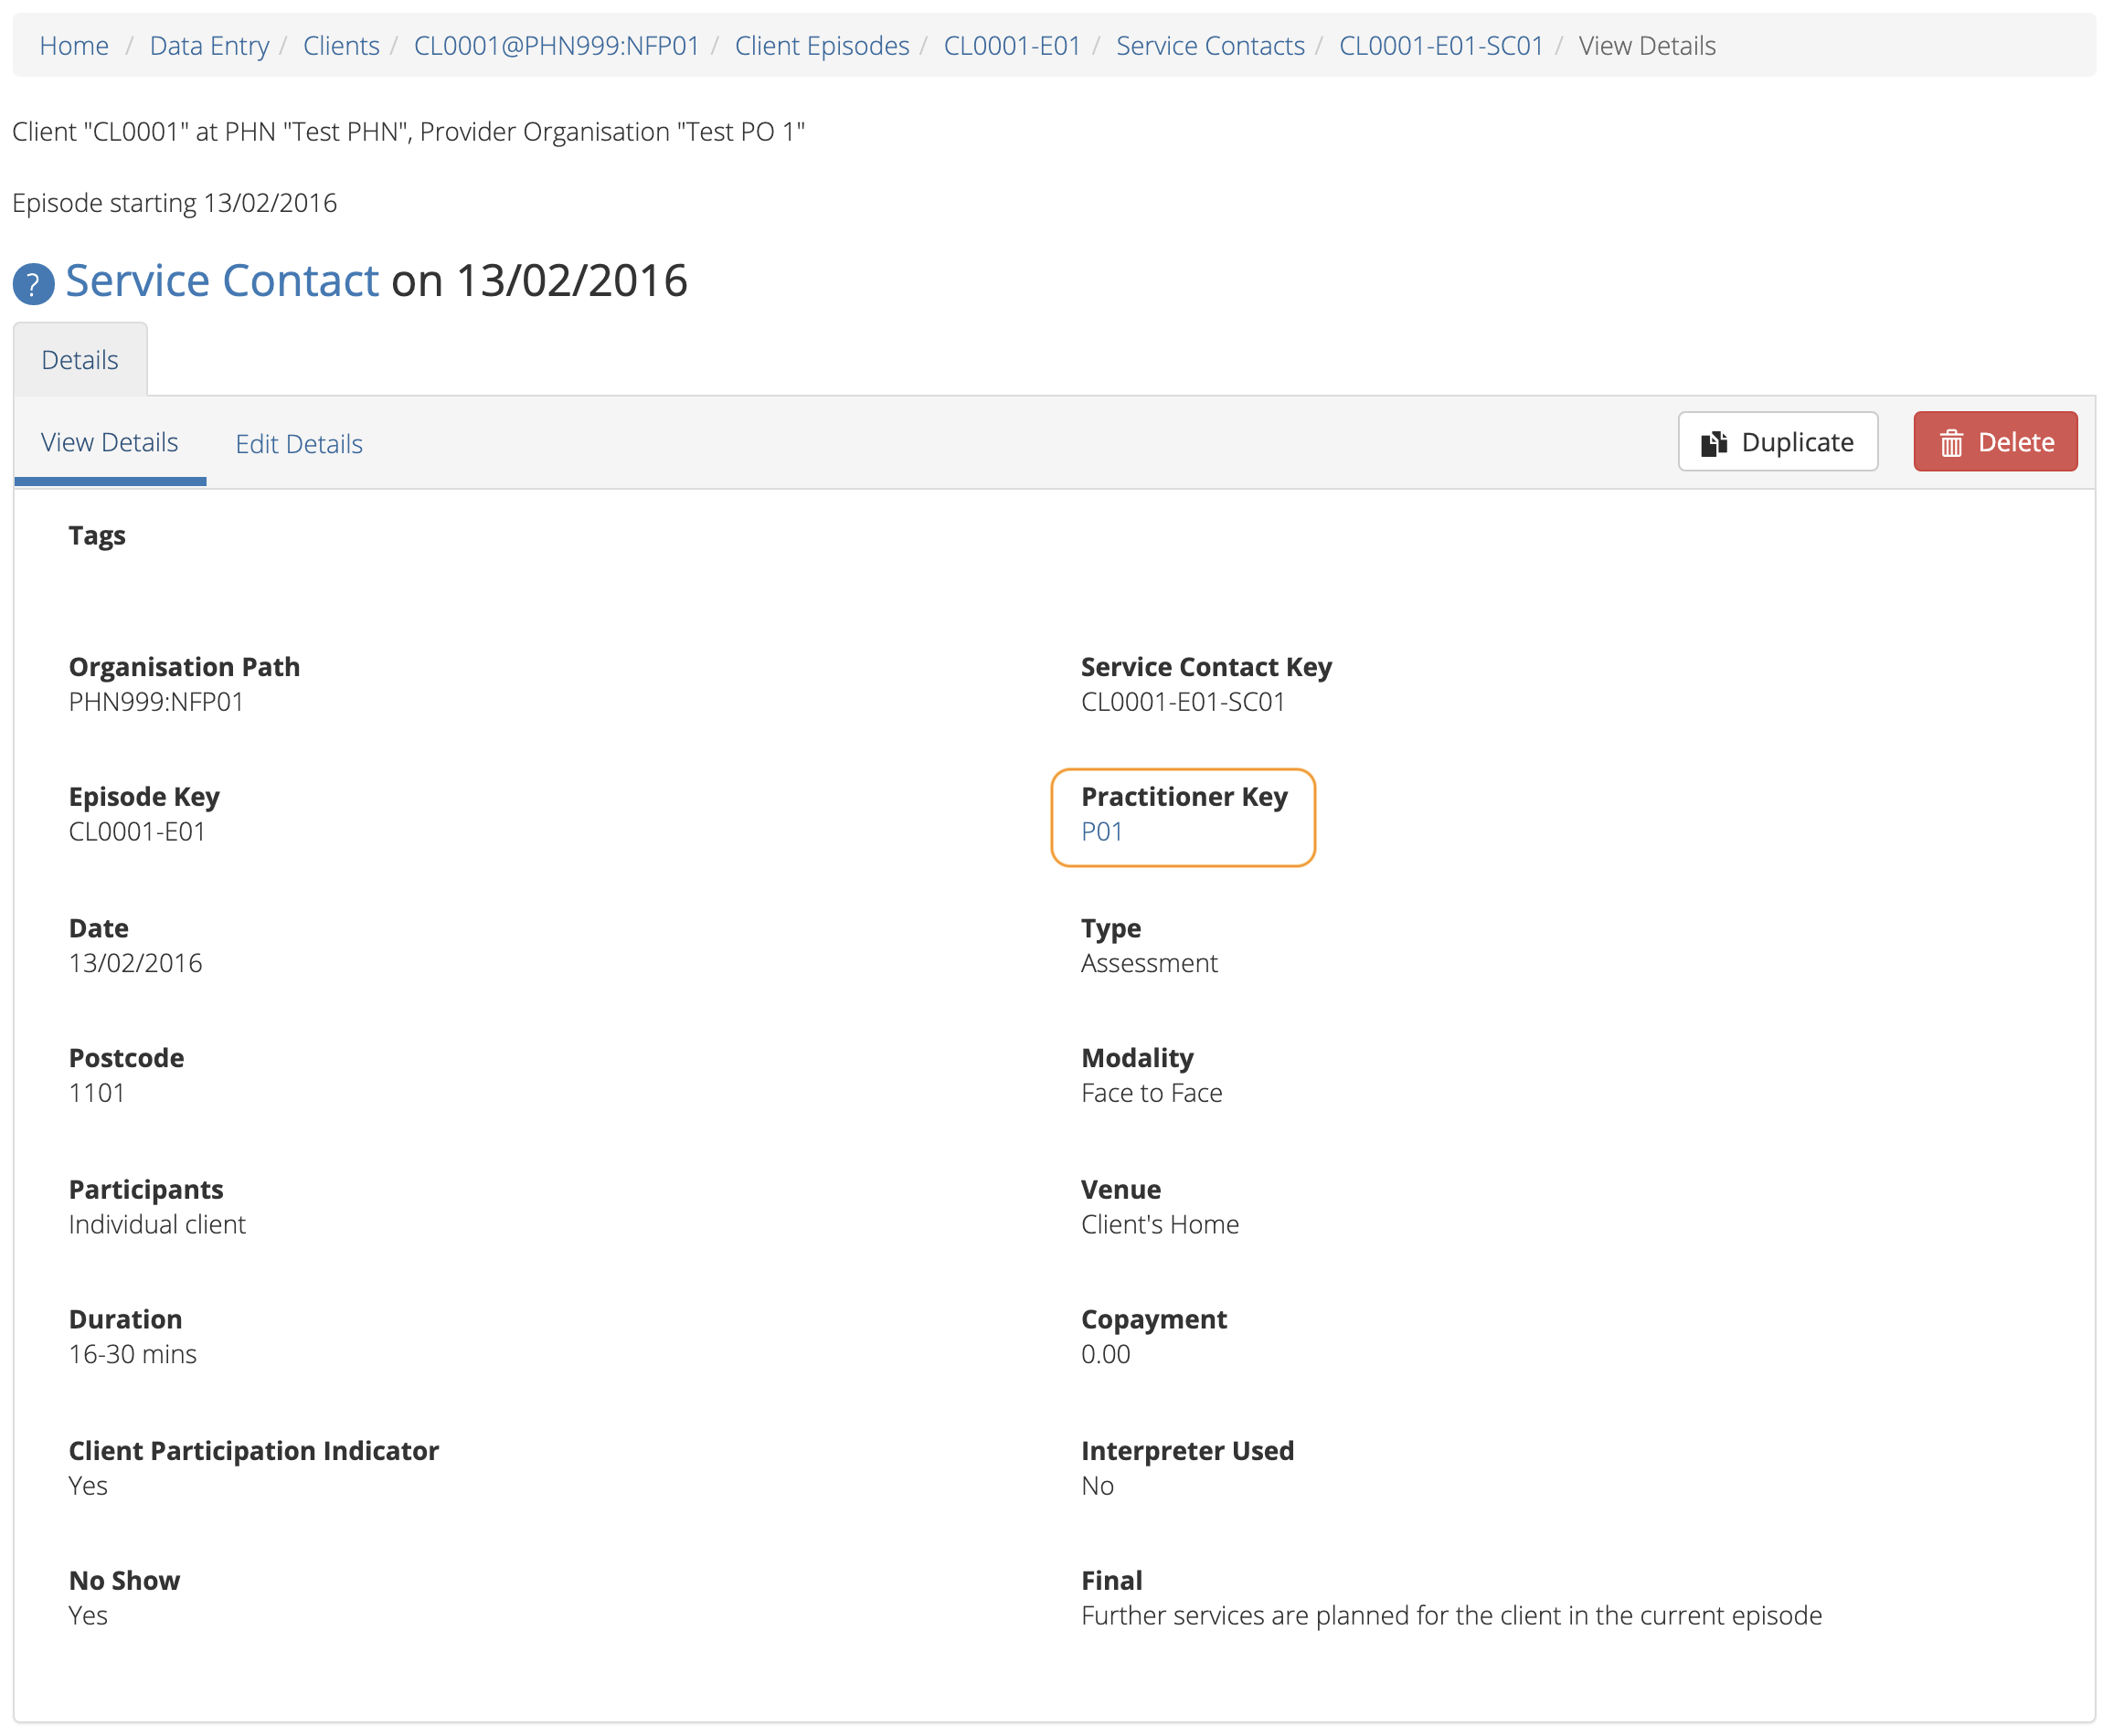
From the client’s Episode Details tab, click the Service Contacts tab.
The heading for this tab displays in brackets the total number of service contacts recorded
in the PMHC MDS for this episode
A table will display all the Service Contacts linked to this client’s Episode
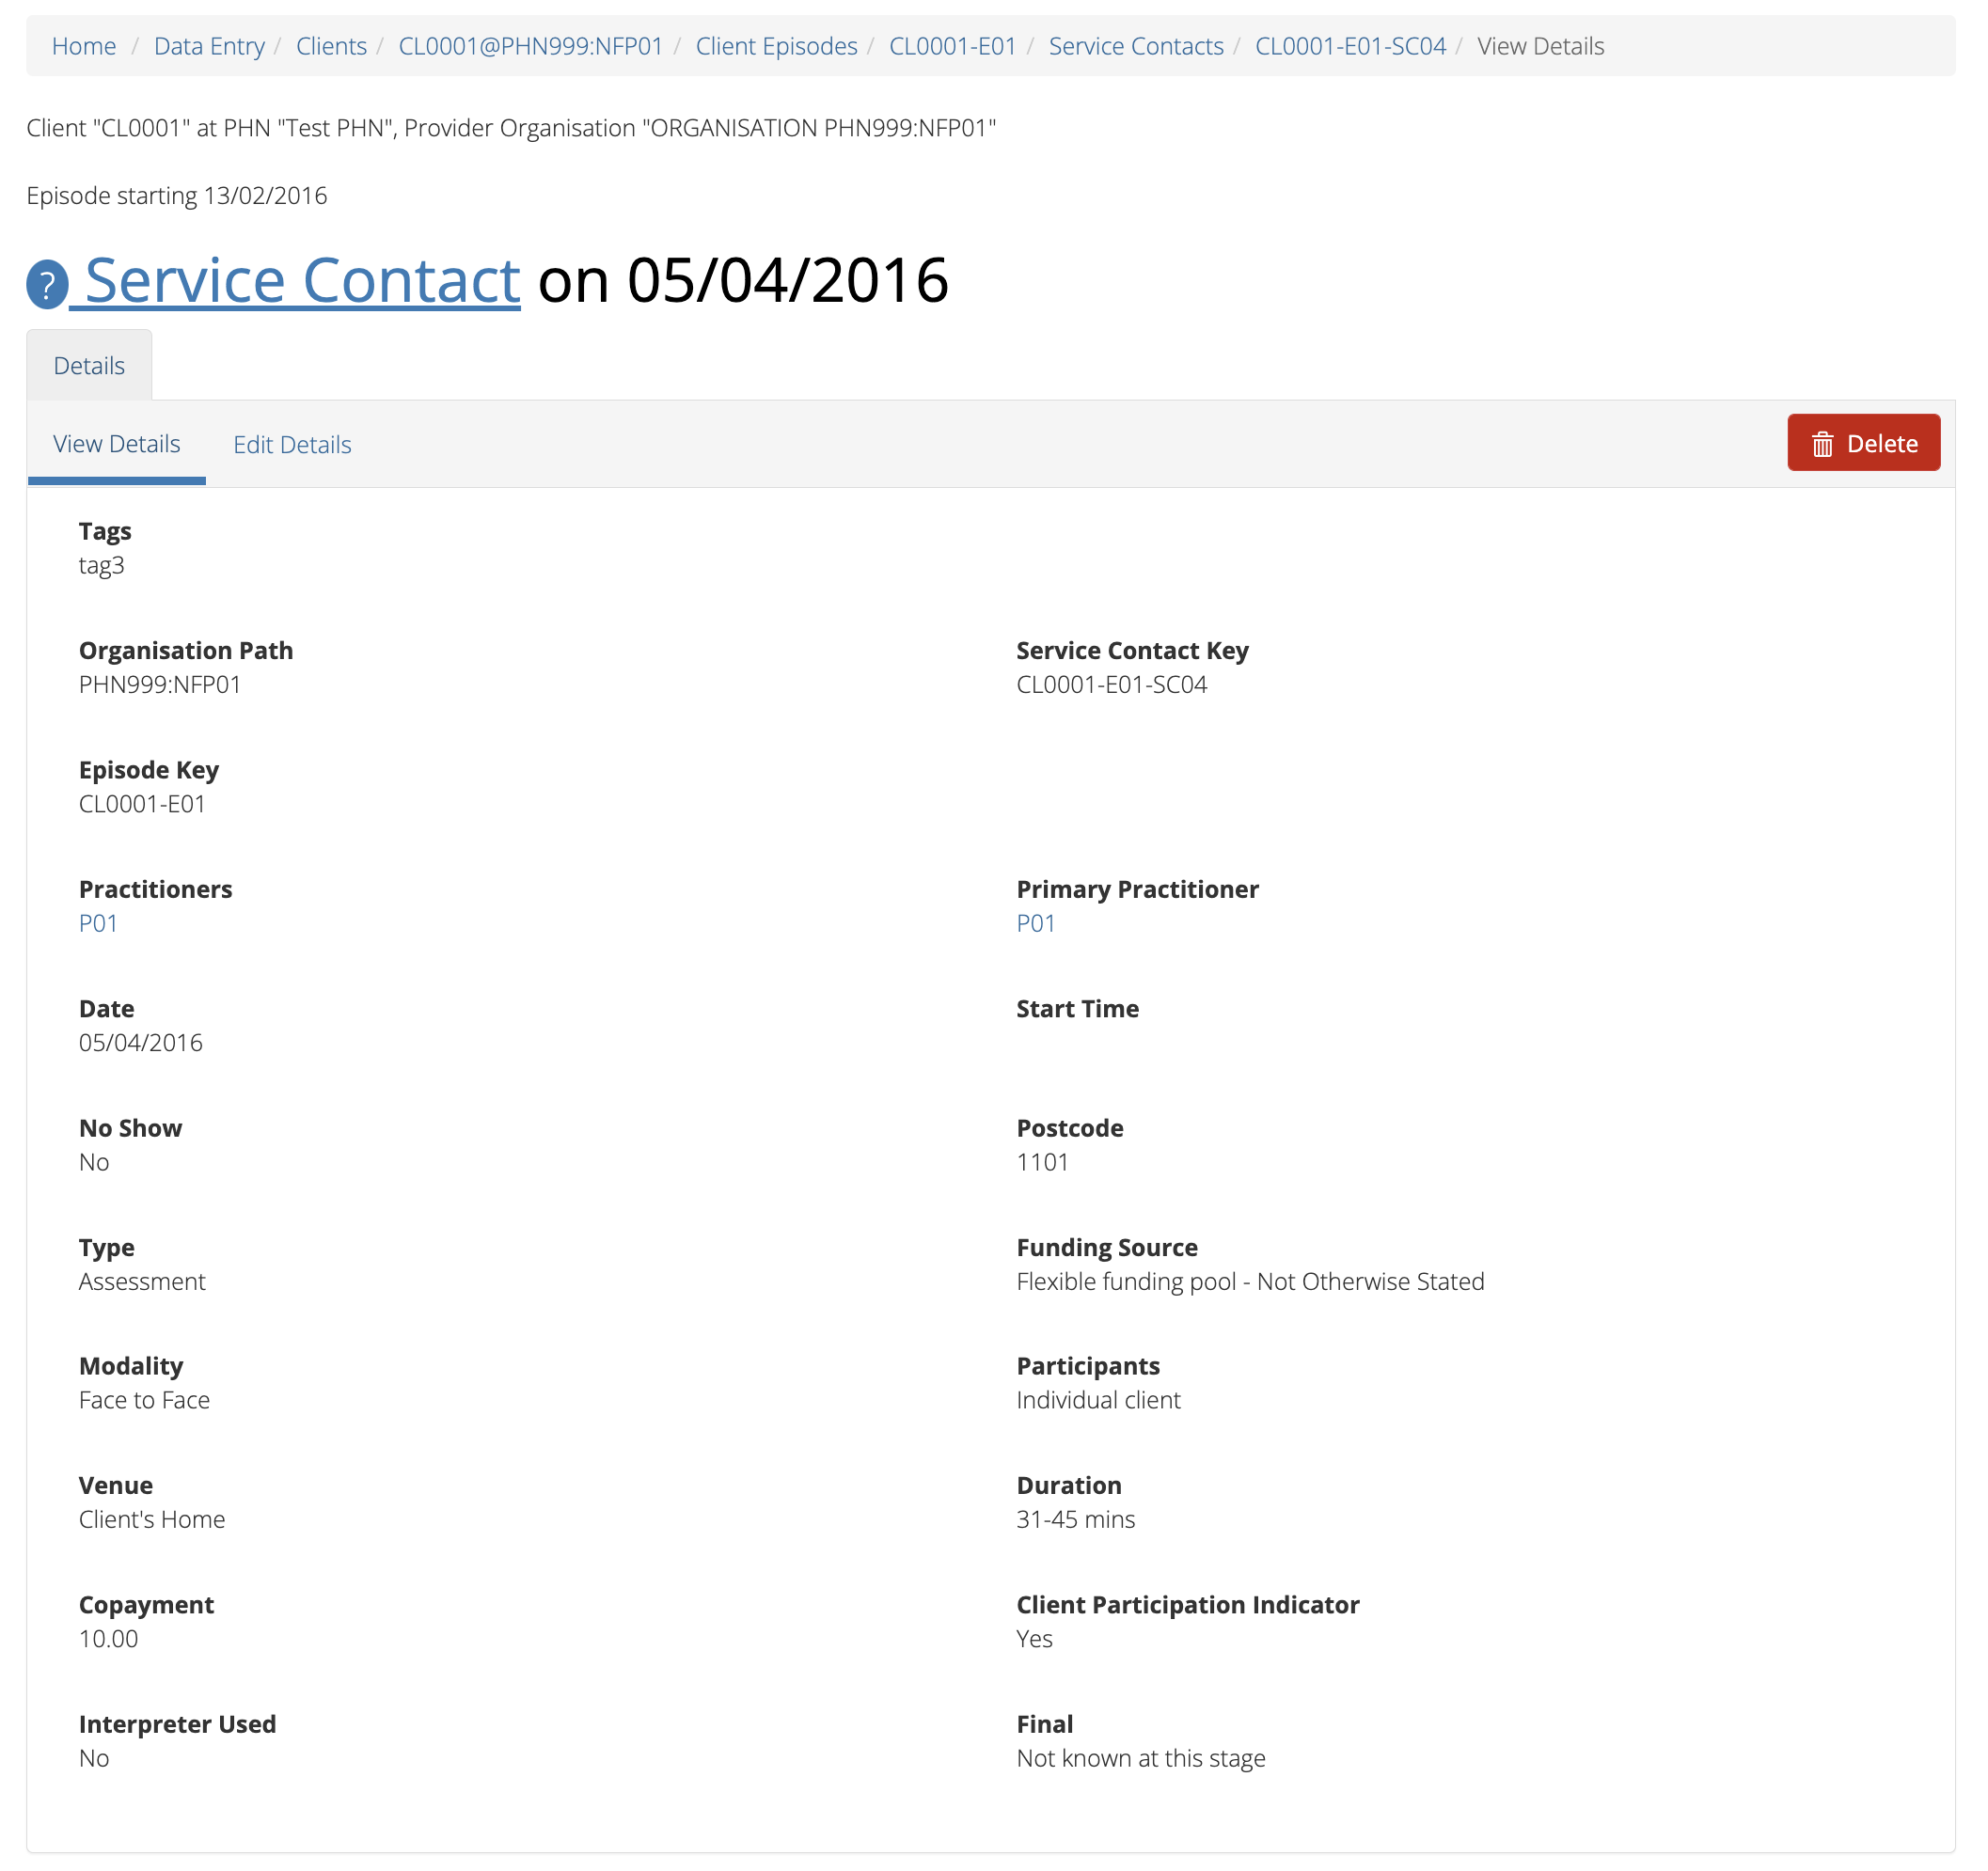
To view the Service Contact’s details, click the blue Service Contact Key
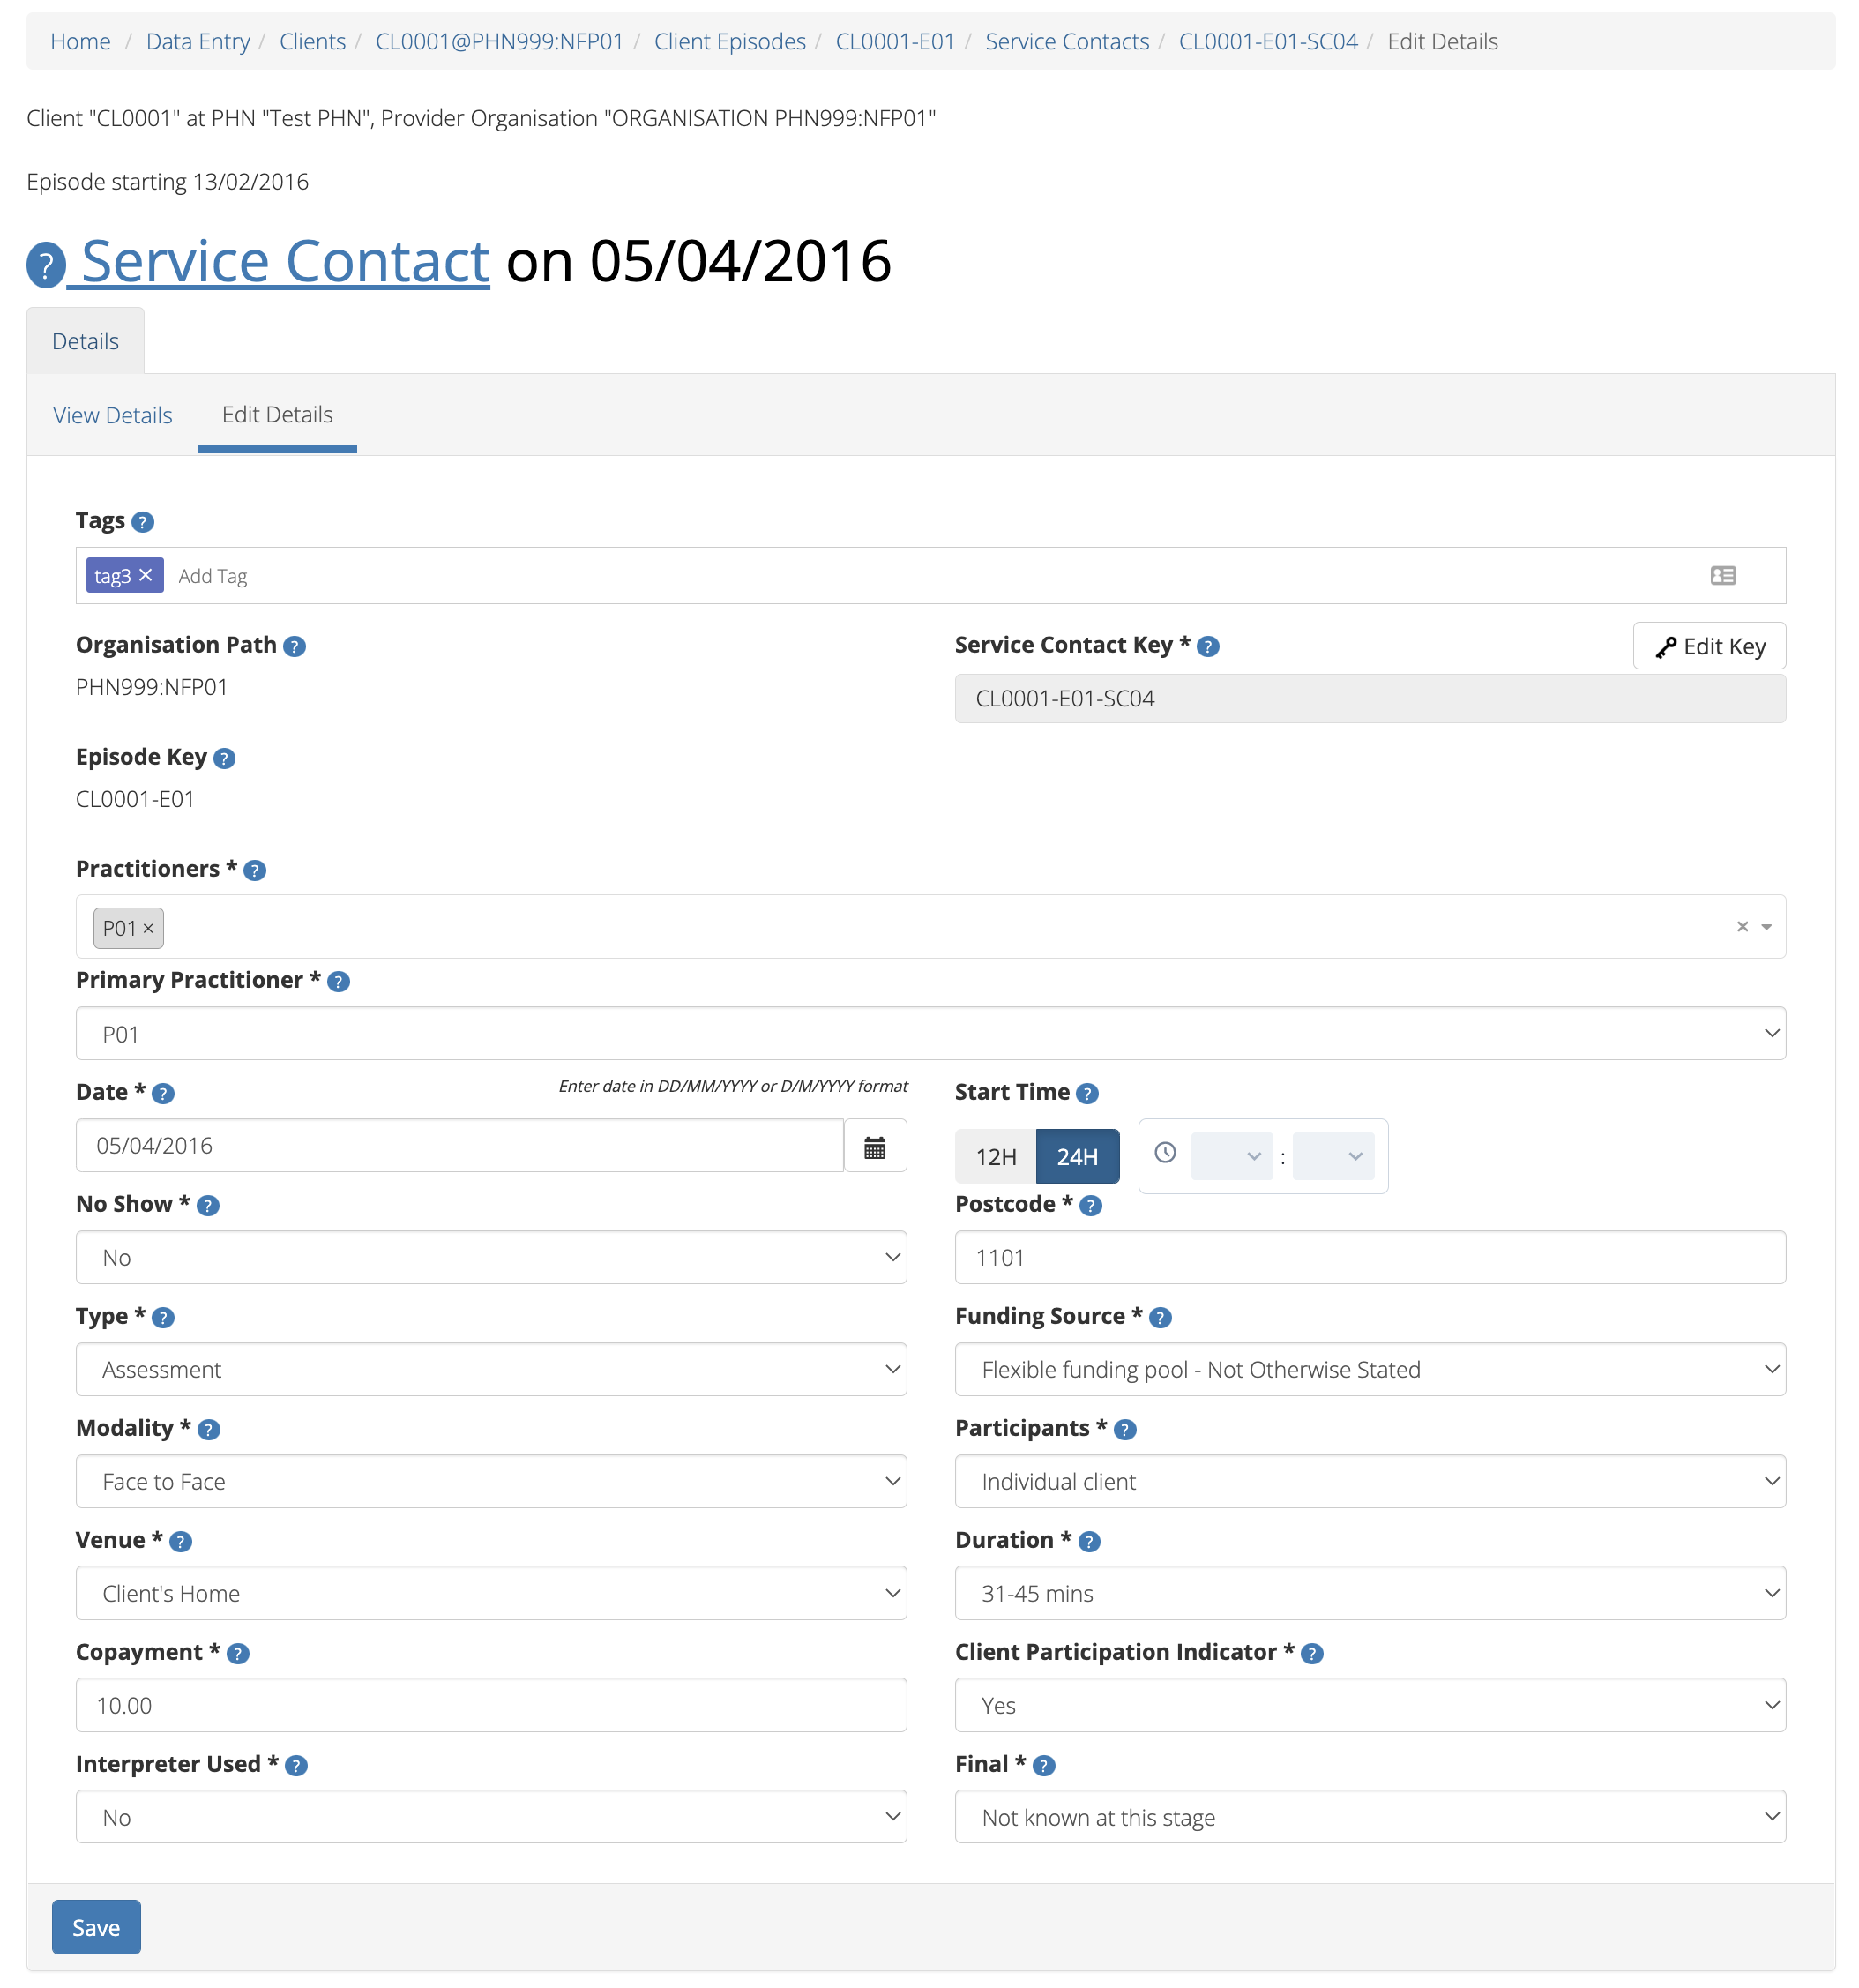
From the Service Contacts table, click the Service Contact Key
Click the Edit Service Contact tab
Update the client’s service contact details for that service contact.
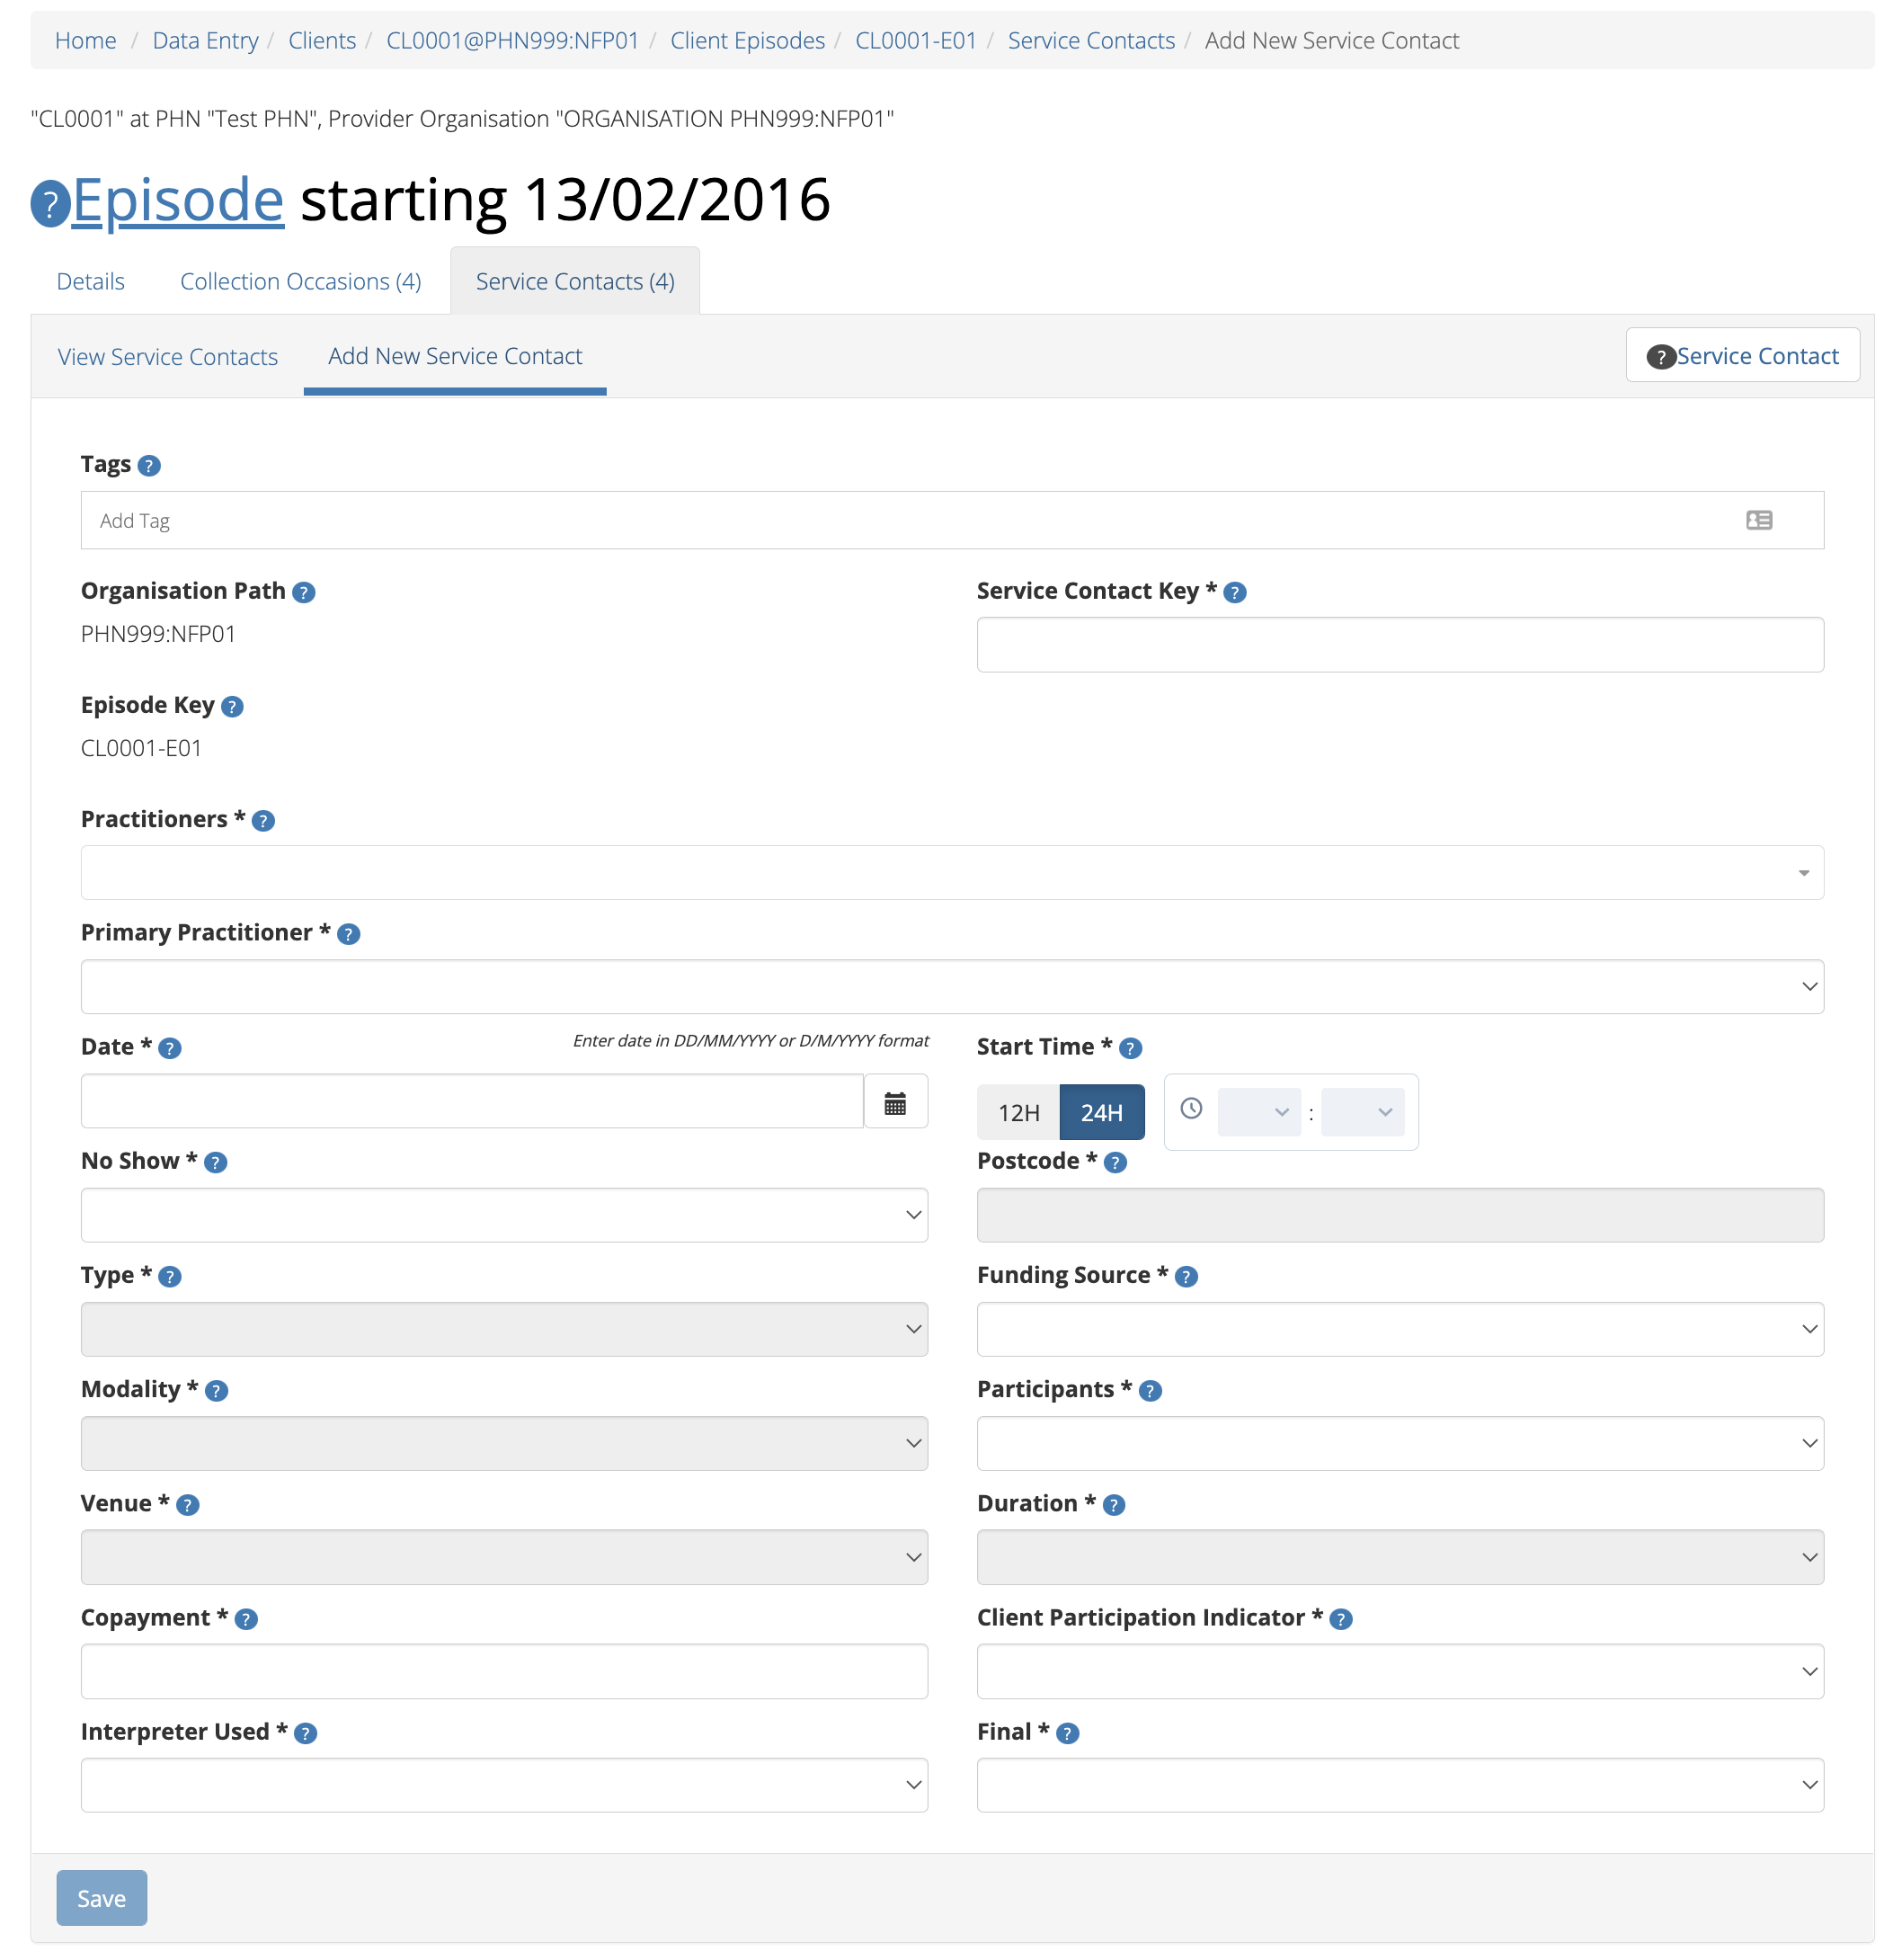
Mandatory fields are marked with an * (Specification Service Contact Data Elements)
Click the blue Save button. (If you decide not to save changes, you can
simply navigate away from this screen)
You will receive confirmation that the client’s service contact details have been saved,
and it will now be displaying these new details in the View Service Contact Details tab.
If you receive an error message, the data will need to be corrected before the
record is saved and added to the PMHC MDS.
See Validation Rules - Service Contact.
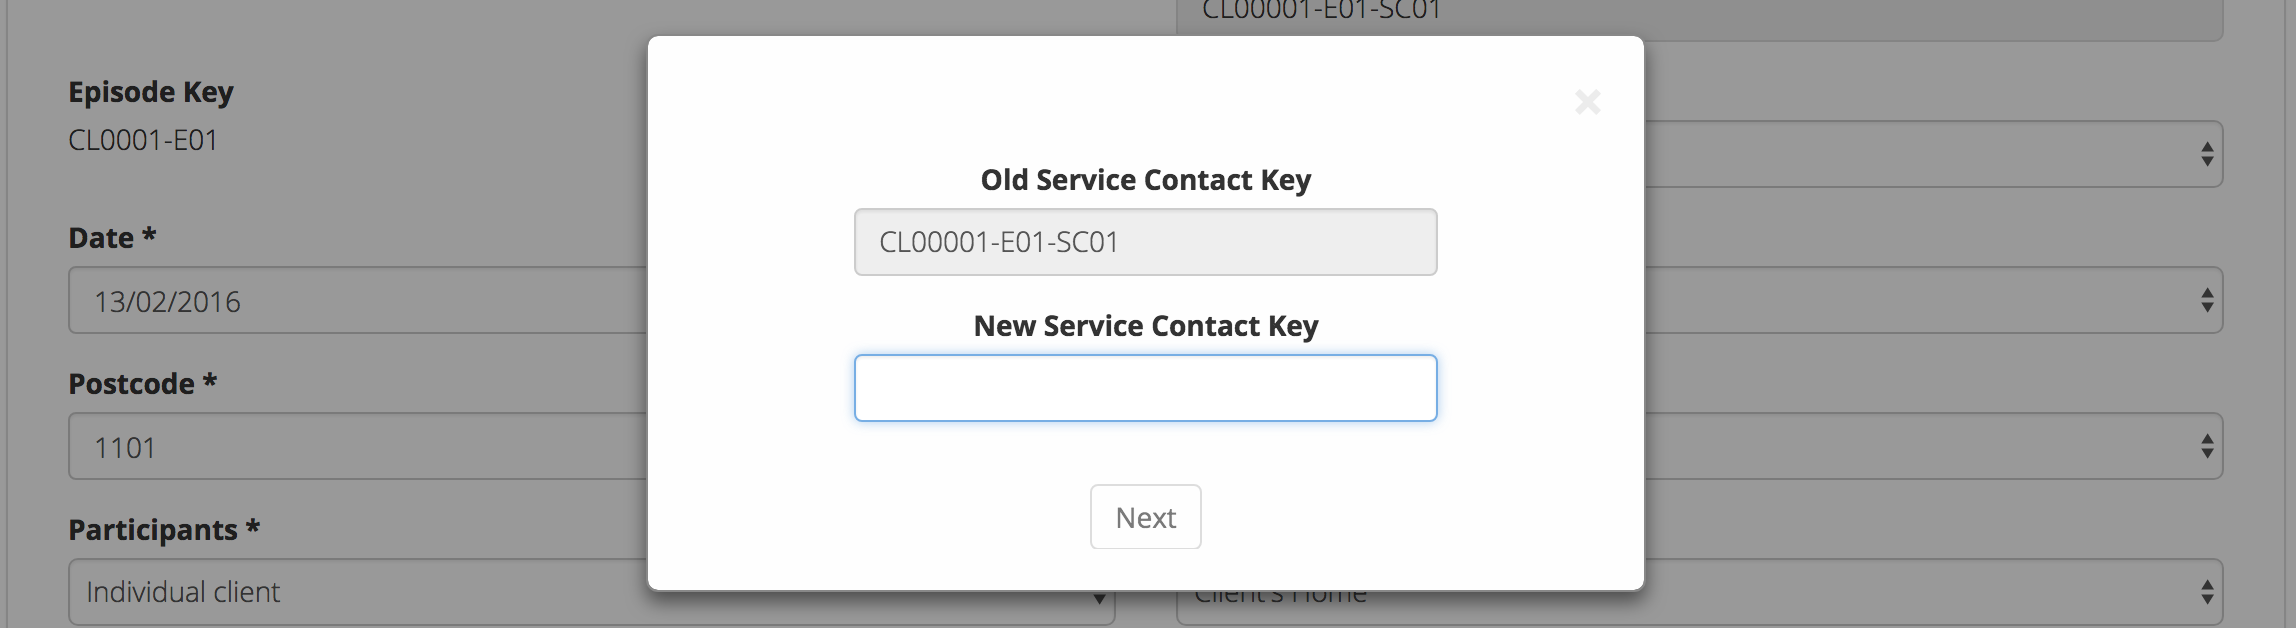
From the Service Contact Edit Details tab, click the Edit Key button
Type in the new service contact key and click Next
Ensure the new key is correct and click save. (If it is incorrect, click
back to re-enter the key or click the ‘cross’ in the top right to cancel
this key change request)
You will receive confirmation that the Service Contact’s key has been saved, and the screen
will now be displaying the updated service contact key details in the
service contact’s View Details tab.
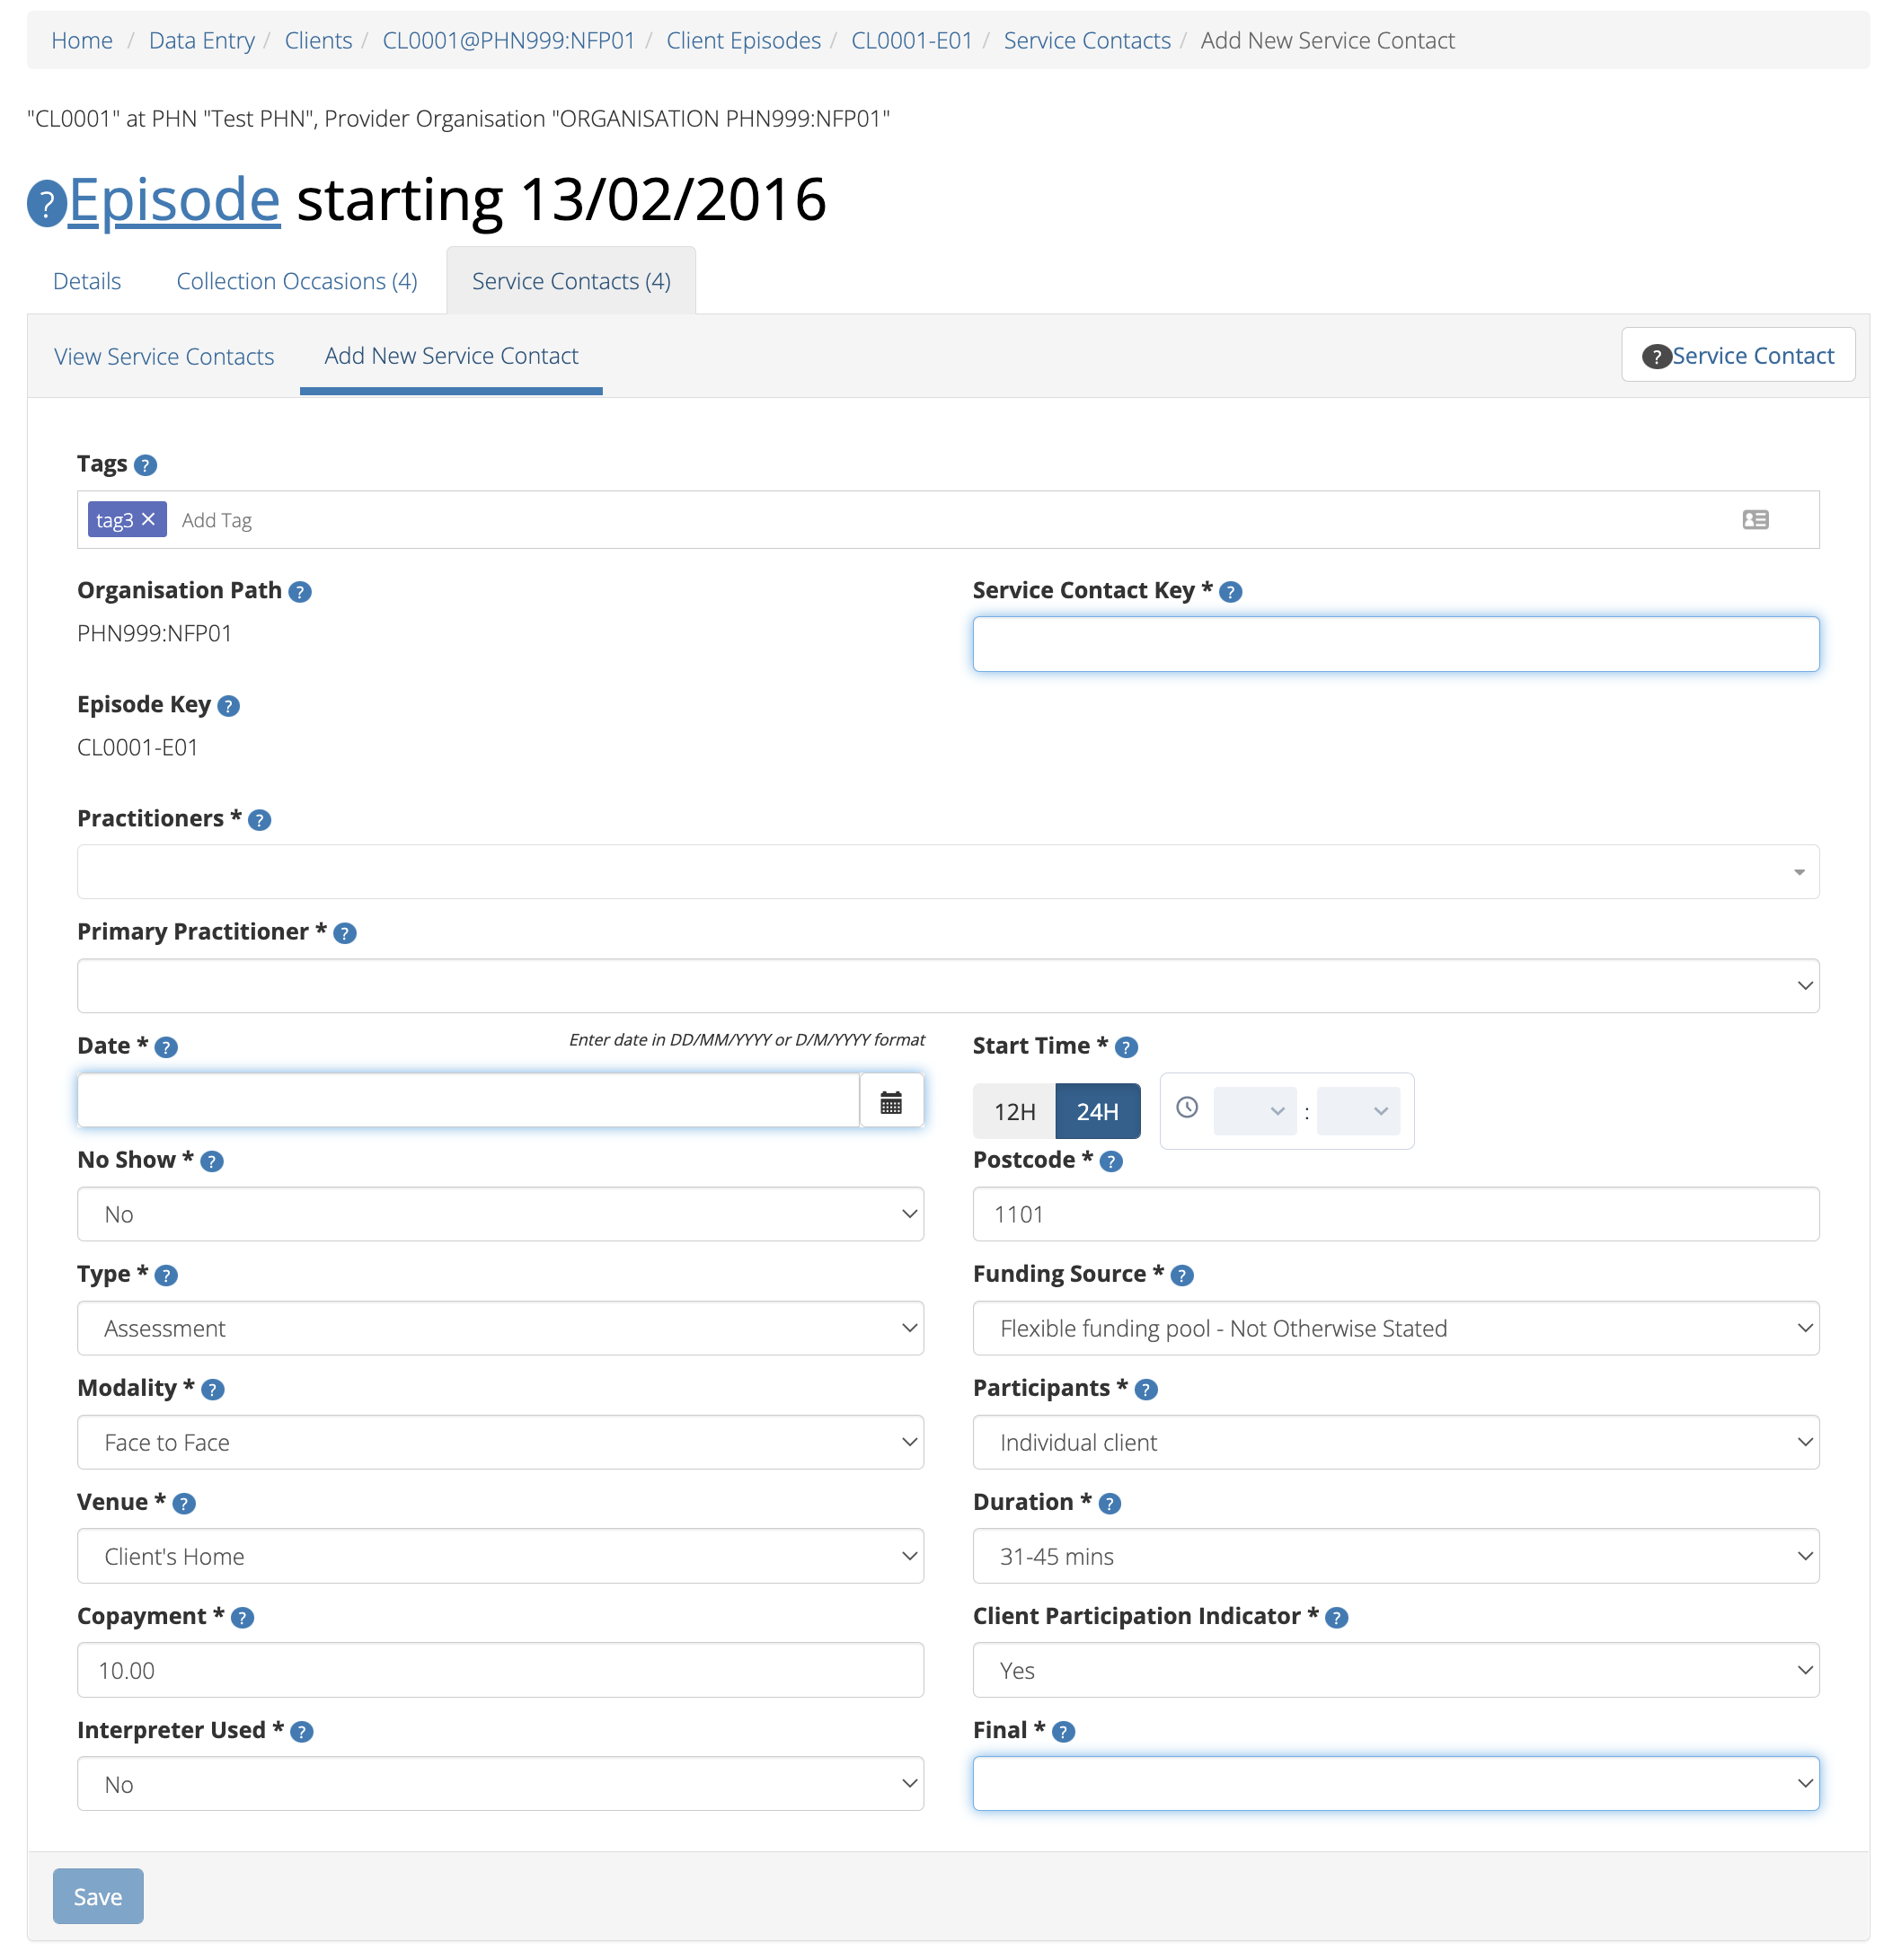
Enter the client’s service contact details for that episode.
Mandatory fields are marked with an * (Specification Service Contact Data Elements)
Click the blue Save button. (If you decide not to add this client’s
episode, you can simply navigate away from this screen)
You will receive confirmation that the client’s service contact details have been added,
and it will now be displaying these new details in the View Service Contact Details tab.
If you receive an error message, the data will need to be corrected before the
record is saved and added to the PMHC MDS.
See Validation Rules - Service Contact.
To improve the speed of data entry, users can can now duplicate a previously
recorded service contact. This process creates a new record with a copy of the
fields recorded in the existing service contact record you have duplicated.
Click the Duplicate this Service Contact icon next to a record, or
open the service contact record and click the Duplicate button
Complete the mandatory fields marked with an * and review the pre-filled values
(Specification Service Contact Data Elements)
Click the blue Save button. (If you decide not to duplicate this
client’s service contact, you can simply navigate away from this screen)
You will receive confirmation that the client’s service contact details have been added,
and it will now be displaying these new details in the View Service Contact Details tab.
If you receive an error message, the data will need to be corrected before the
record is saved and added to the PMHC MDS.
See Validation Rules - Service Contact.
Please note: You are not able to recover the data for a deleted service contact.
Click the blue Confirm button to delete this service contact. (or click
the orange Cancel button if you decide not to delete this service contact data)
After you click Confirm, you will receive confirmation that the service contact has
been deleted, and you will be redirected to the View Service Contacts where the
service contact will no longer be displayed.
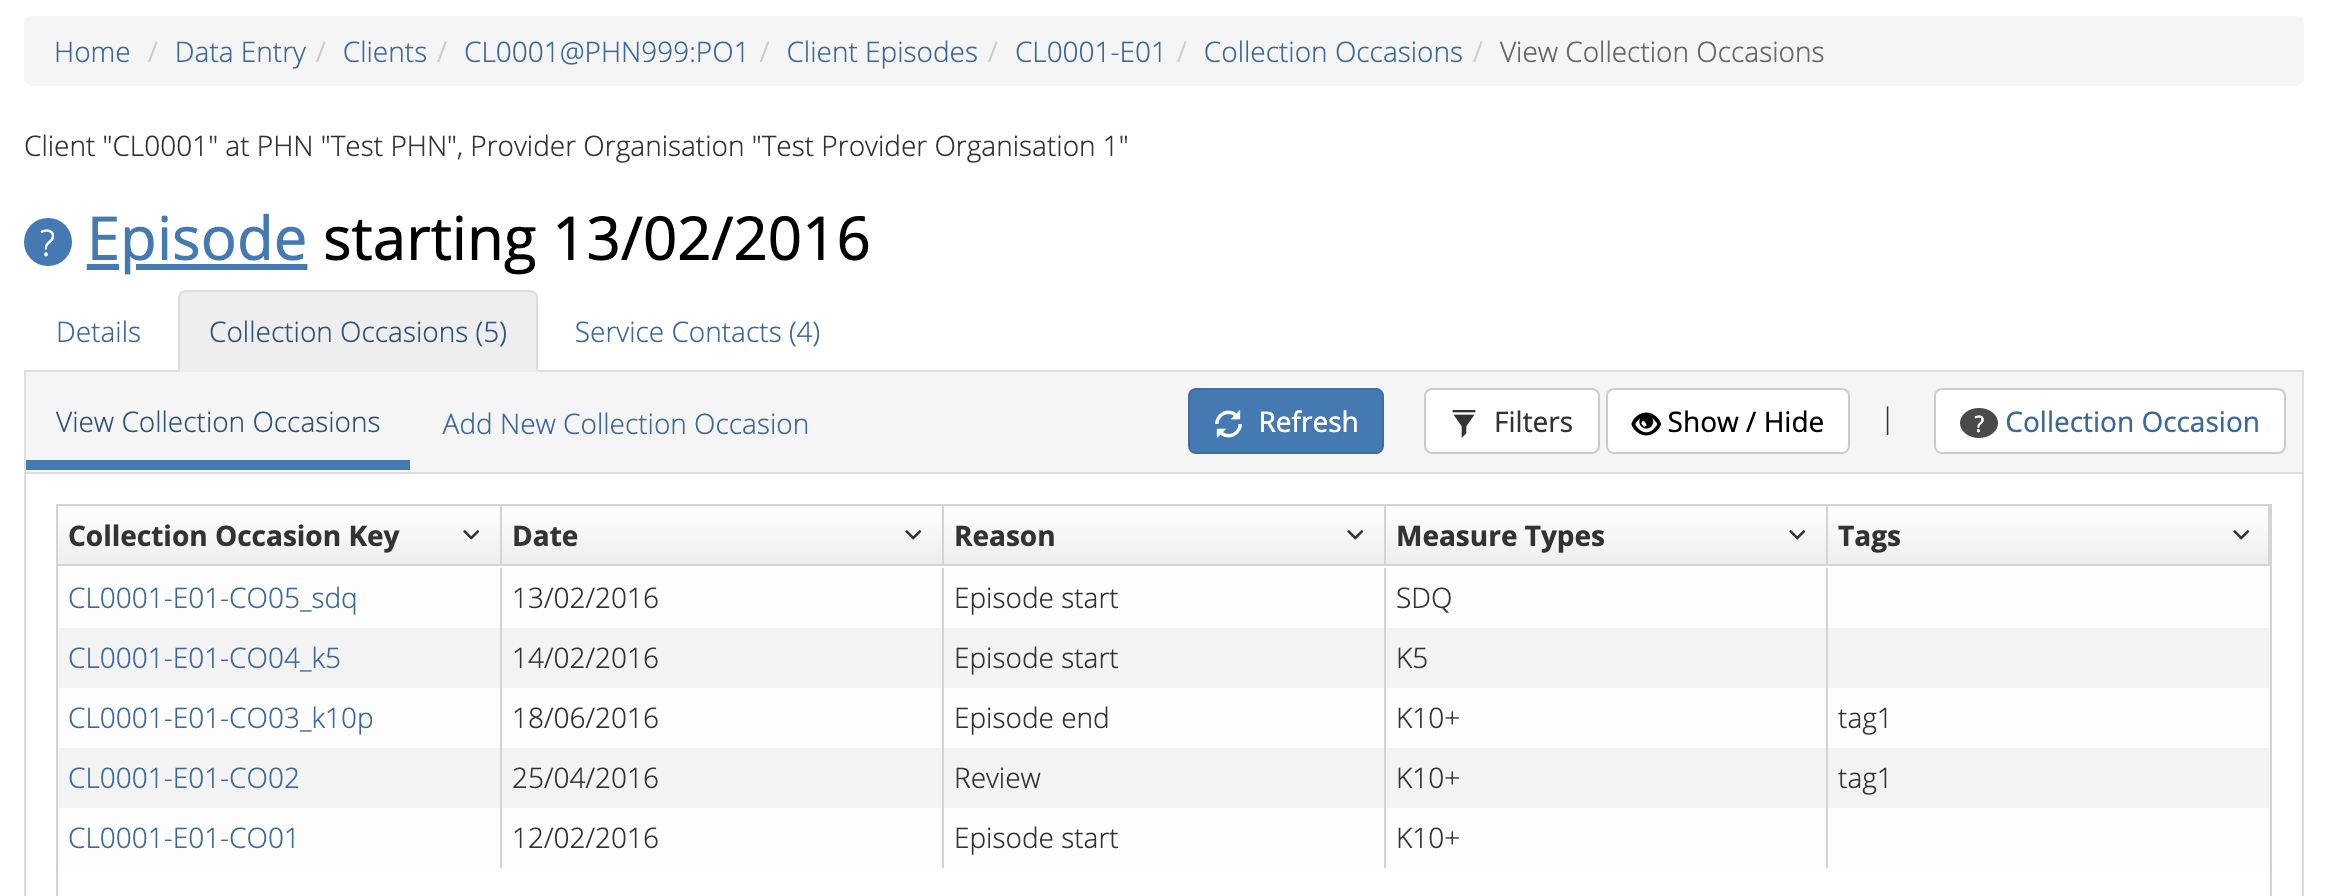
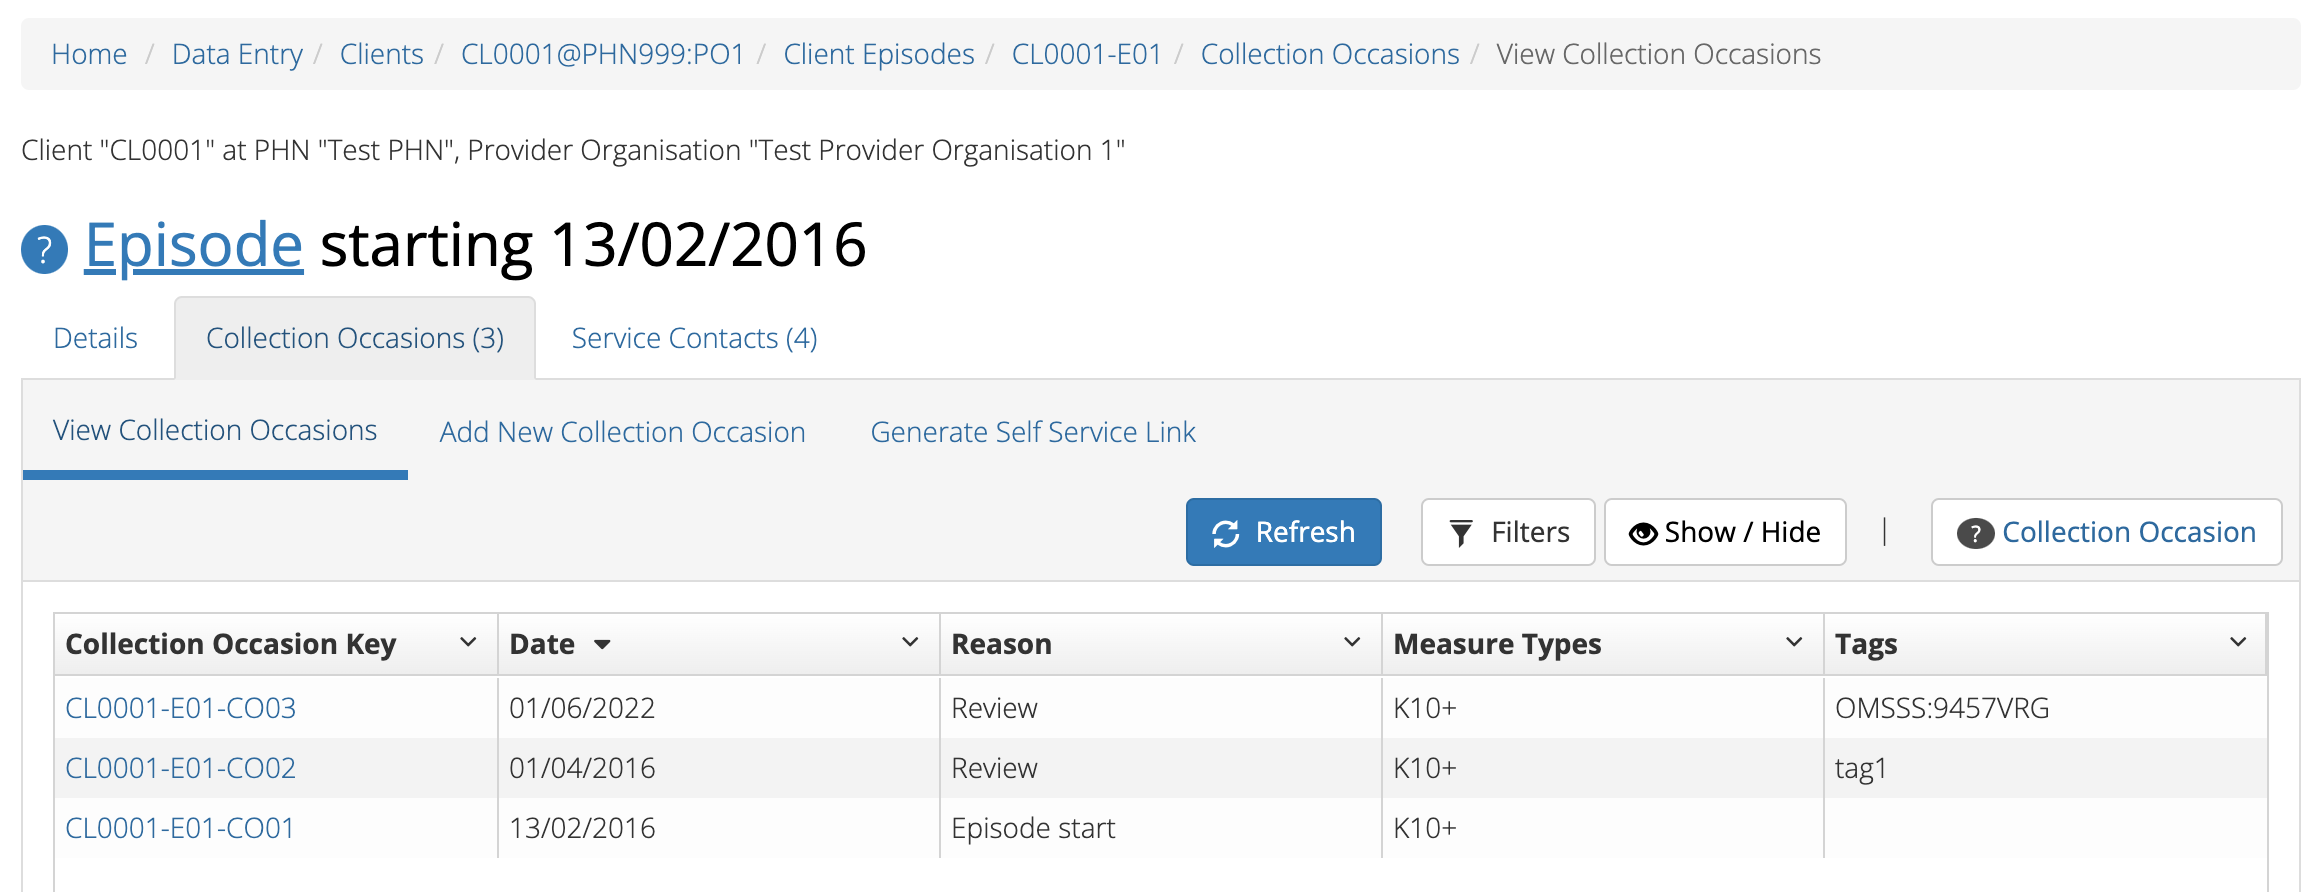
Click the Episode Collection Occasions tab
This tab displays in brackets the total number of collection occasions recorded
in the PMHC MDS for this episode.
A table will display all the collection occasions linked to this client’s episode.
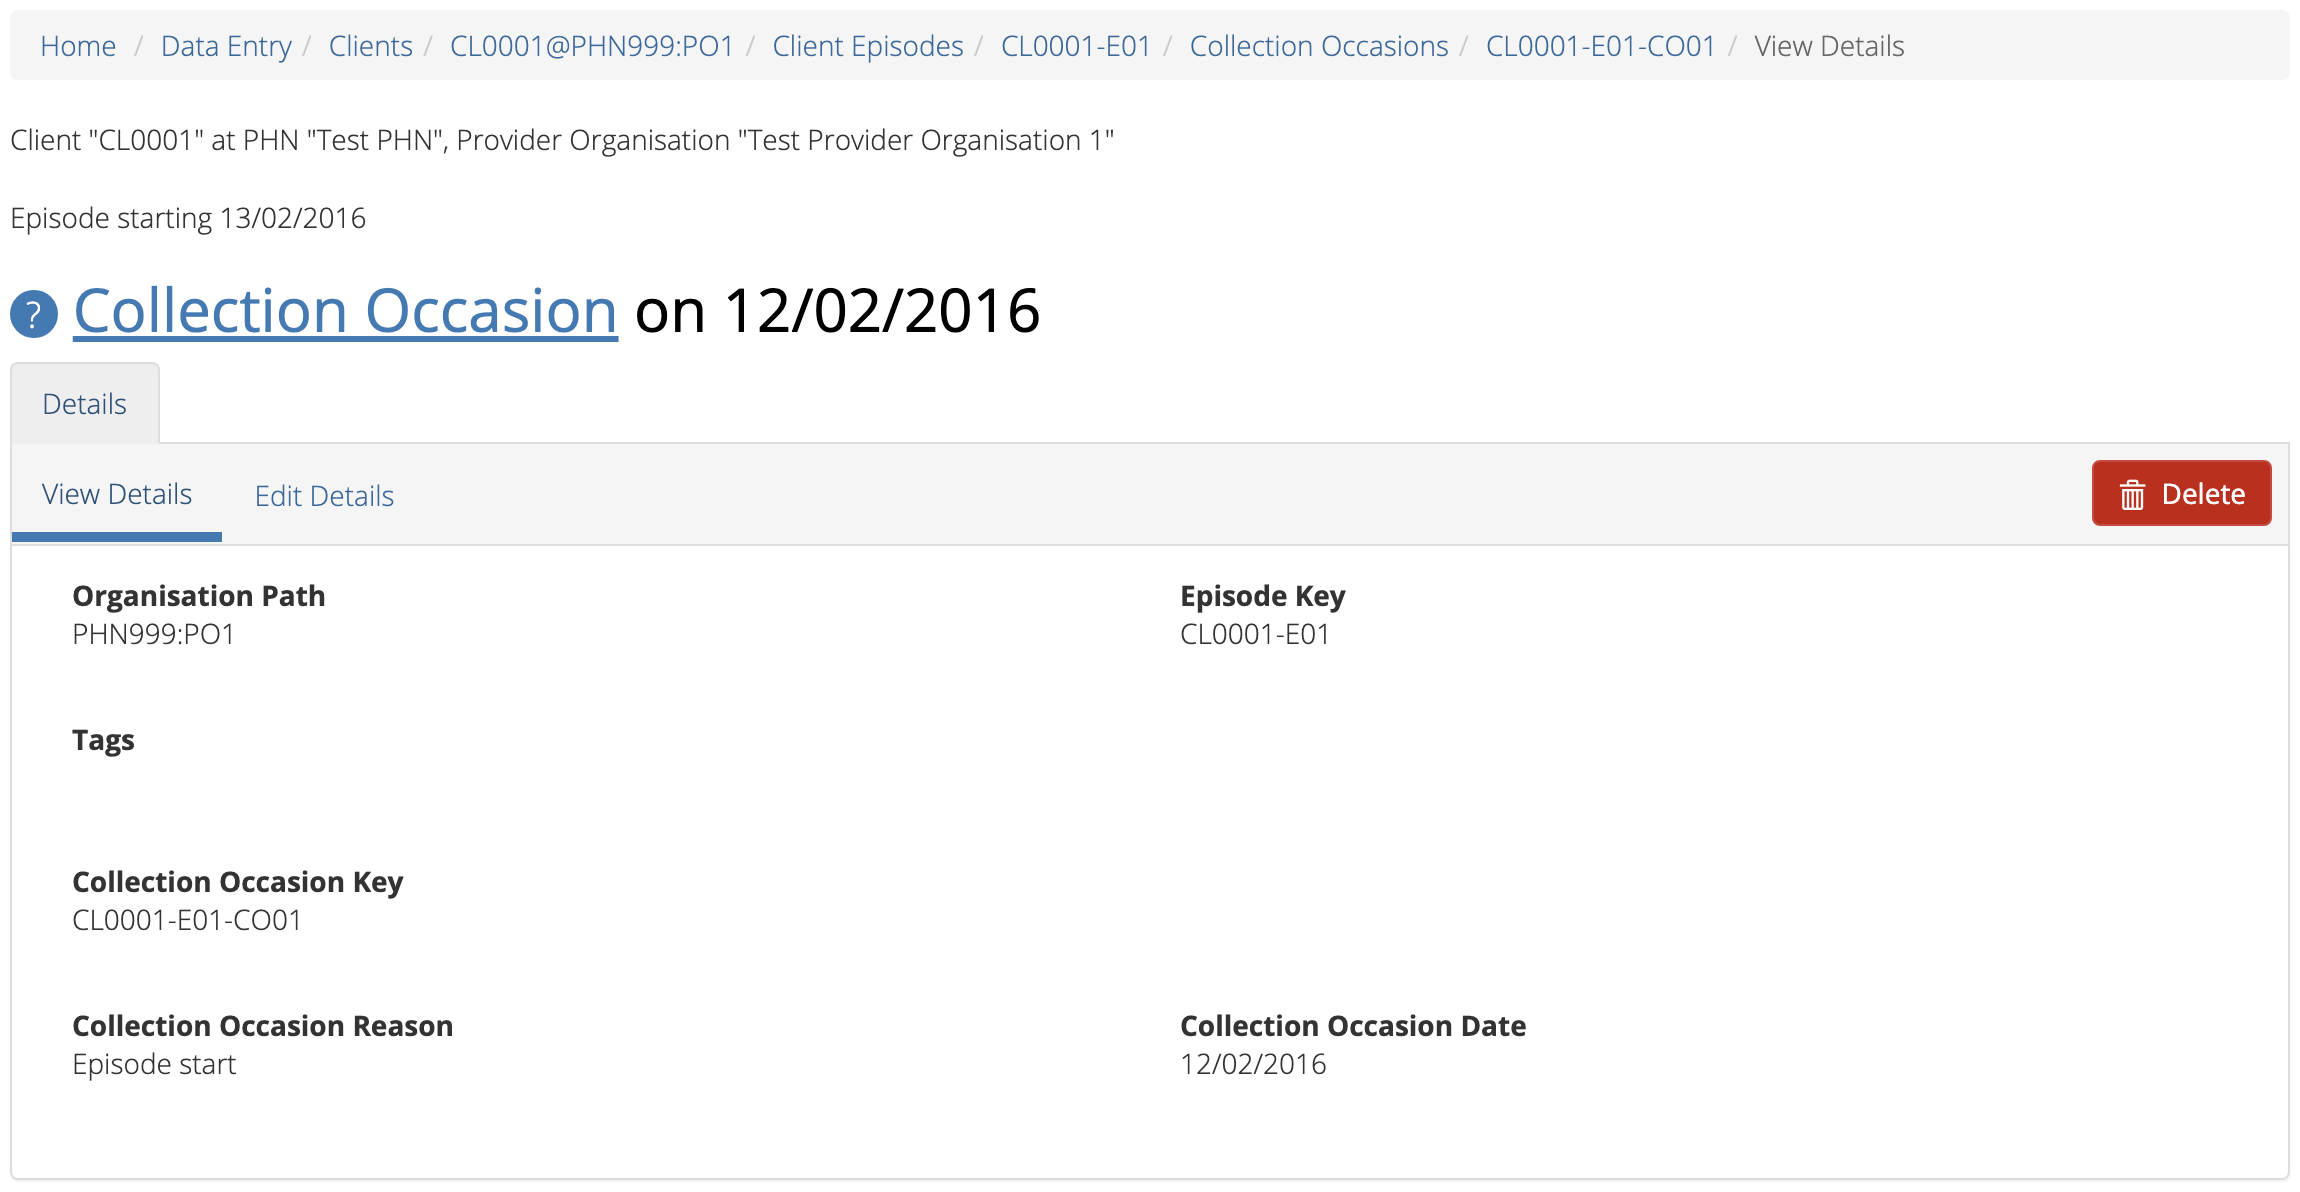
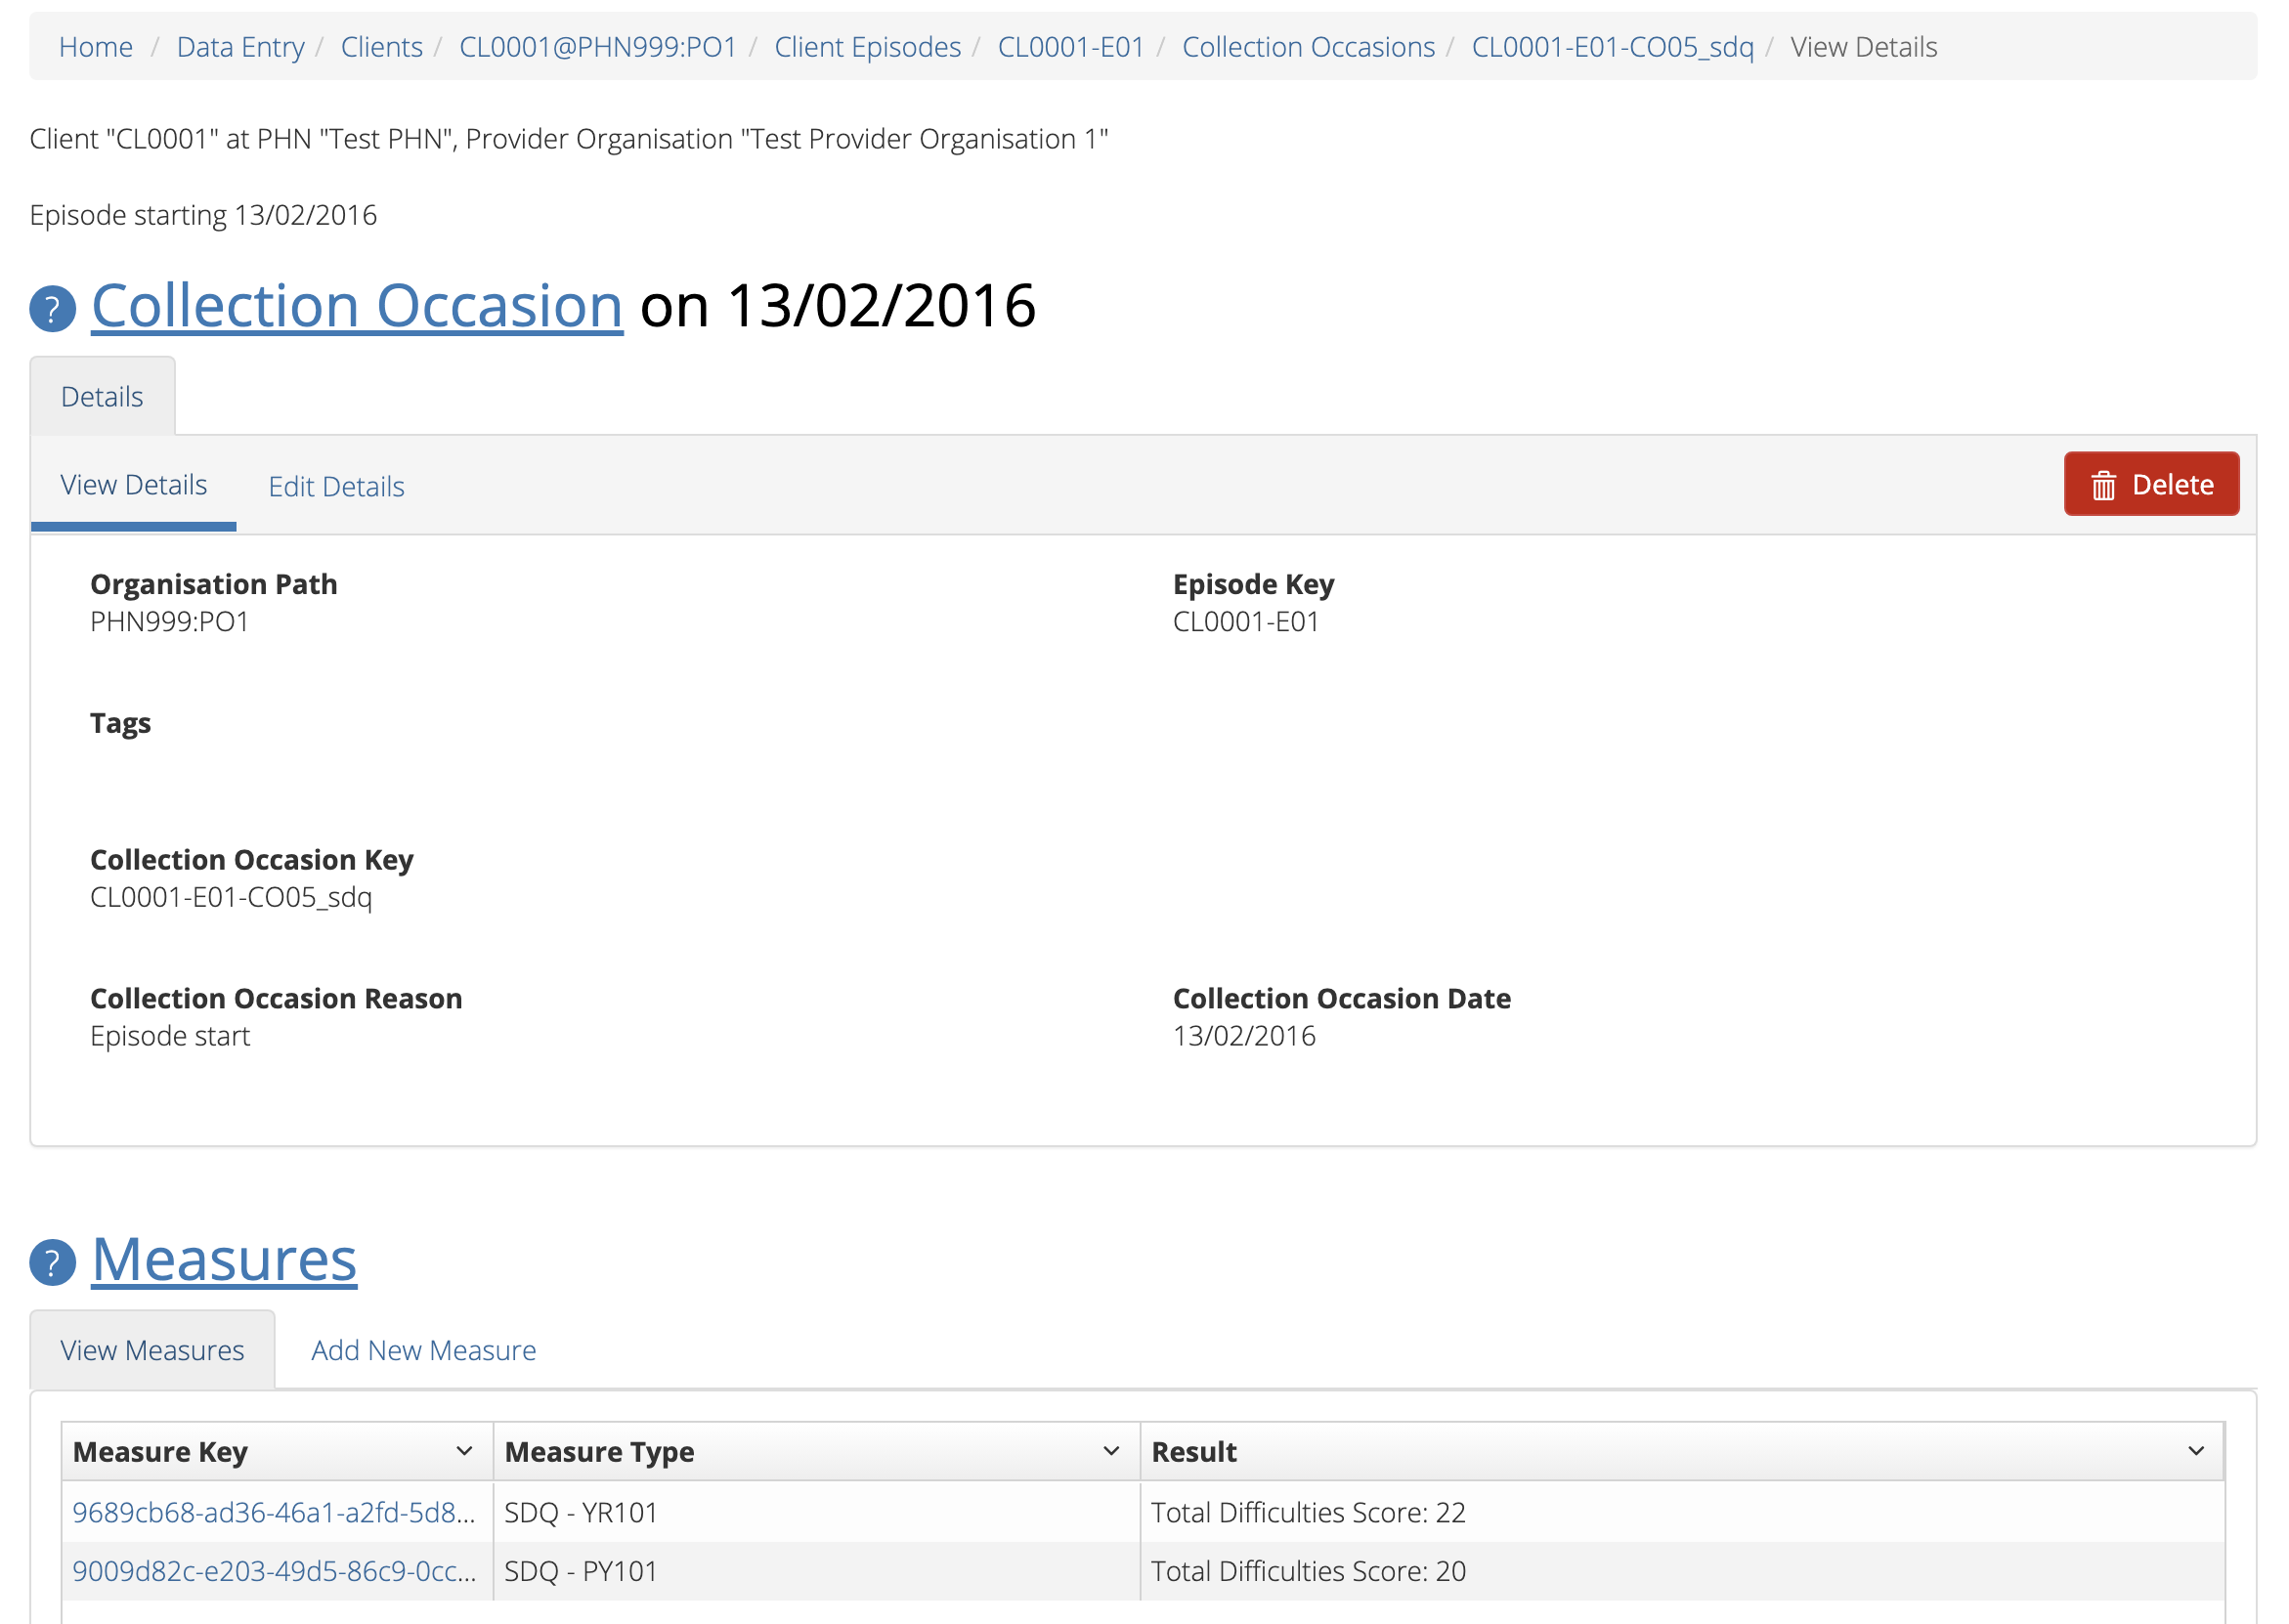
To view the collection occasion’s details, click the blue Collection Occasion Key
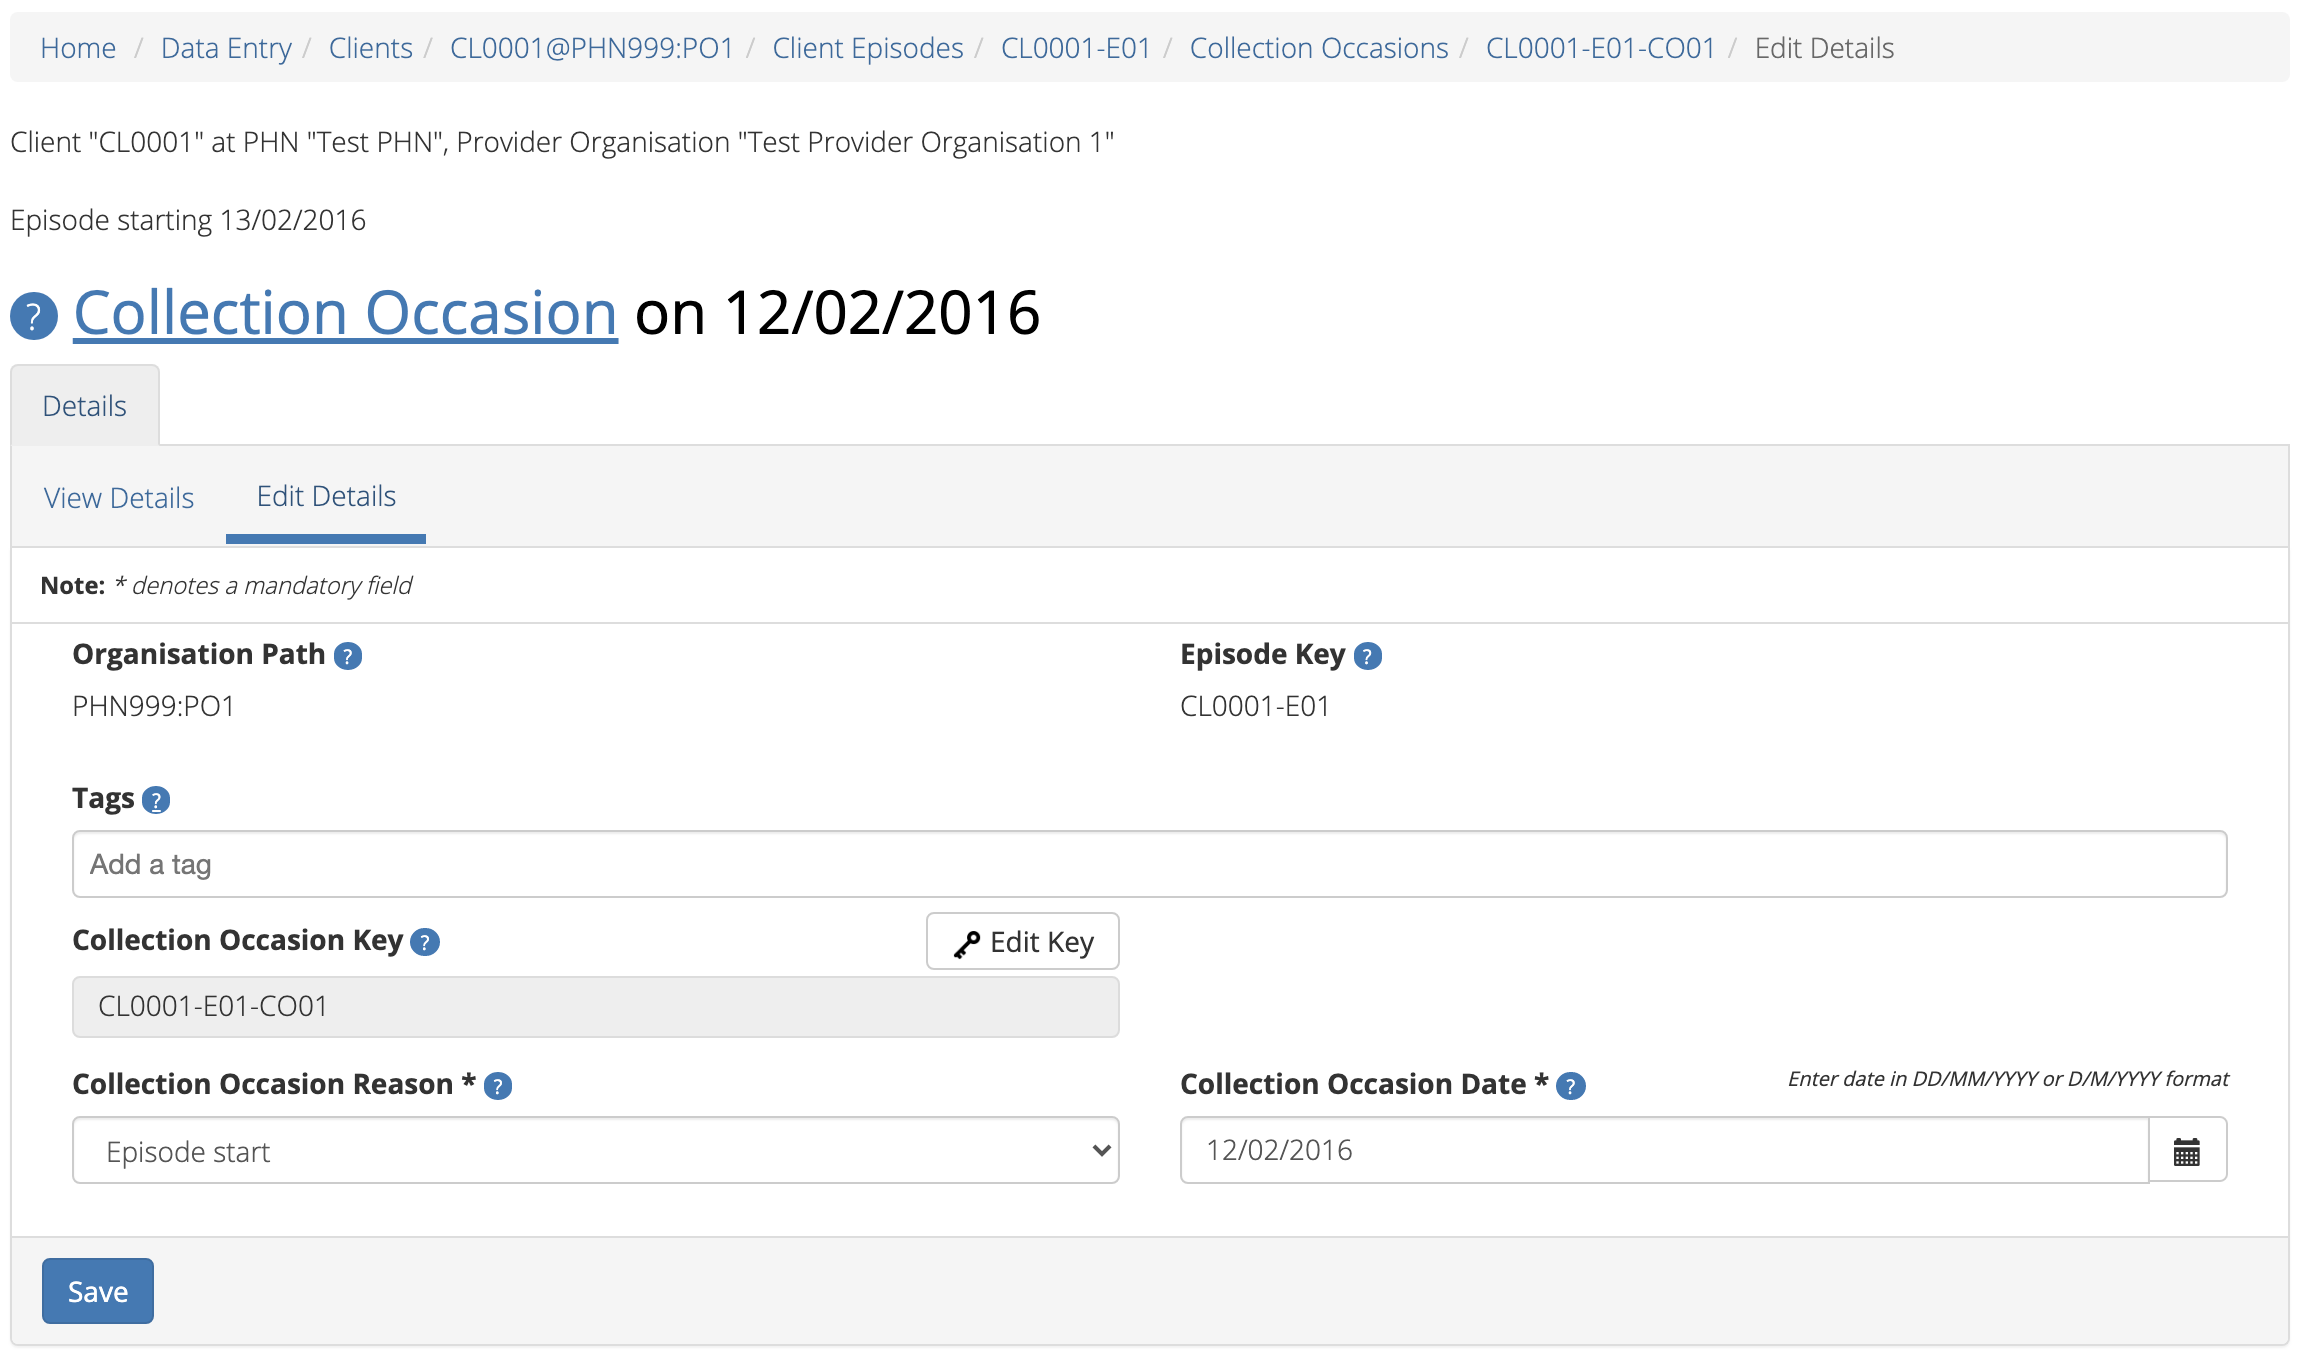
Click the blue Save button. (If you decide not to save changes, you can
navigate away from this screen)
You will receive confirmation that the client’s collection occasion’s details have been saved,
and it will now be displaying these new details in the View Collection Occasion Details tab.
If you receive an error message, the data will need to be corrected before the
record is saved and added to the PMHC MDS.
See Validation Rules - Outcome Collection Occasion Validations
From the Collection Occasion Edit Details tab, click the Edit Key button
Type in the new collection occasion key and click Next
Ensure the new key is correct and click Save. (If it is incorrect, click
back to re-enter the key or click the ‘cross’ in the top right to cancel
this key change request)
You will receive confirmation that the collection occasion’s key has been saved, and the screen
will now be displaying the updated collection occasion key details in the Collection Occasion View Details tab.
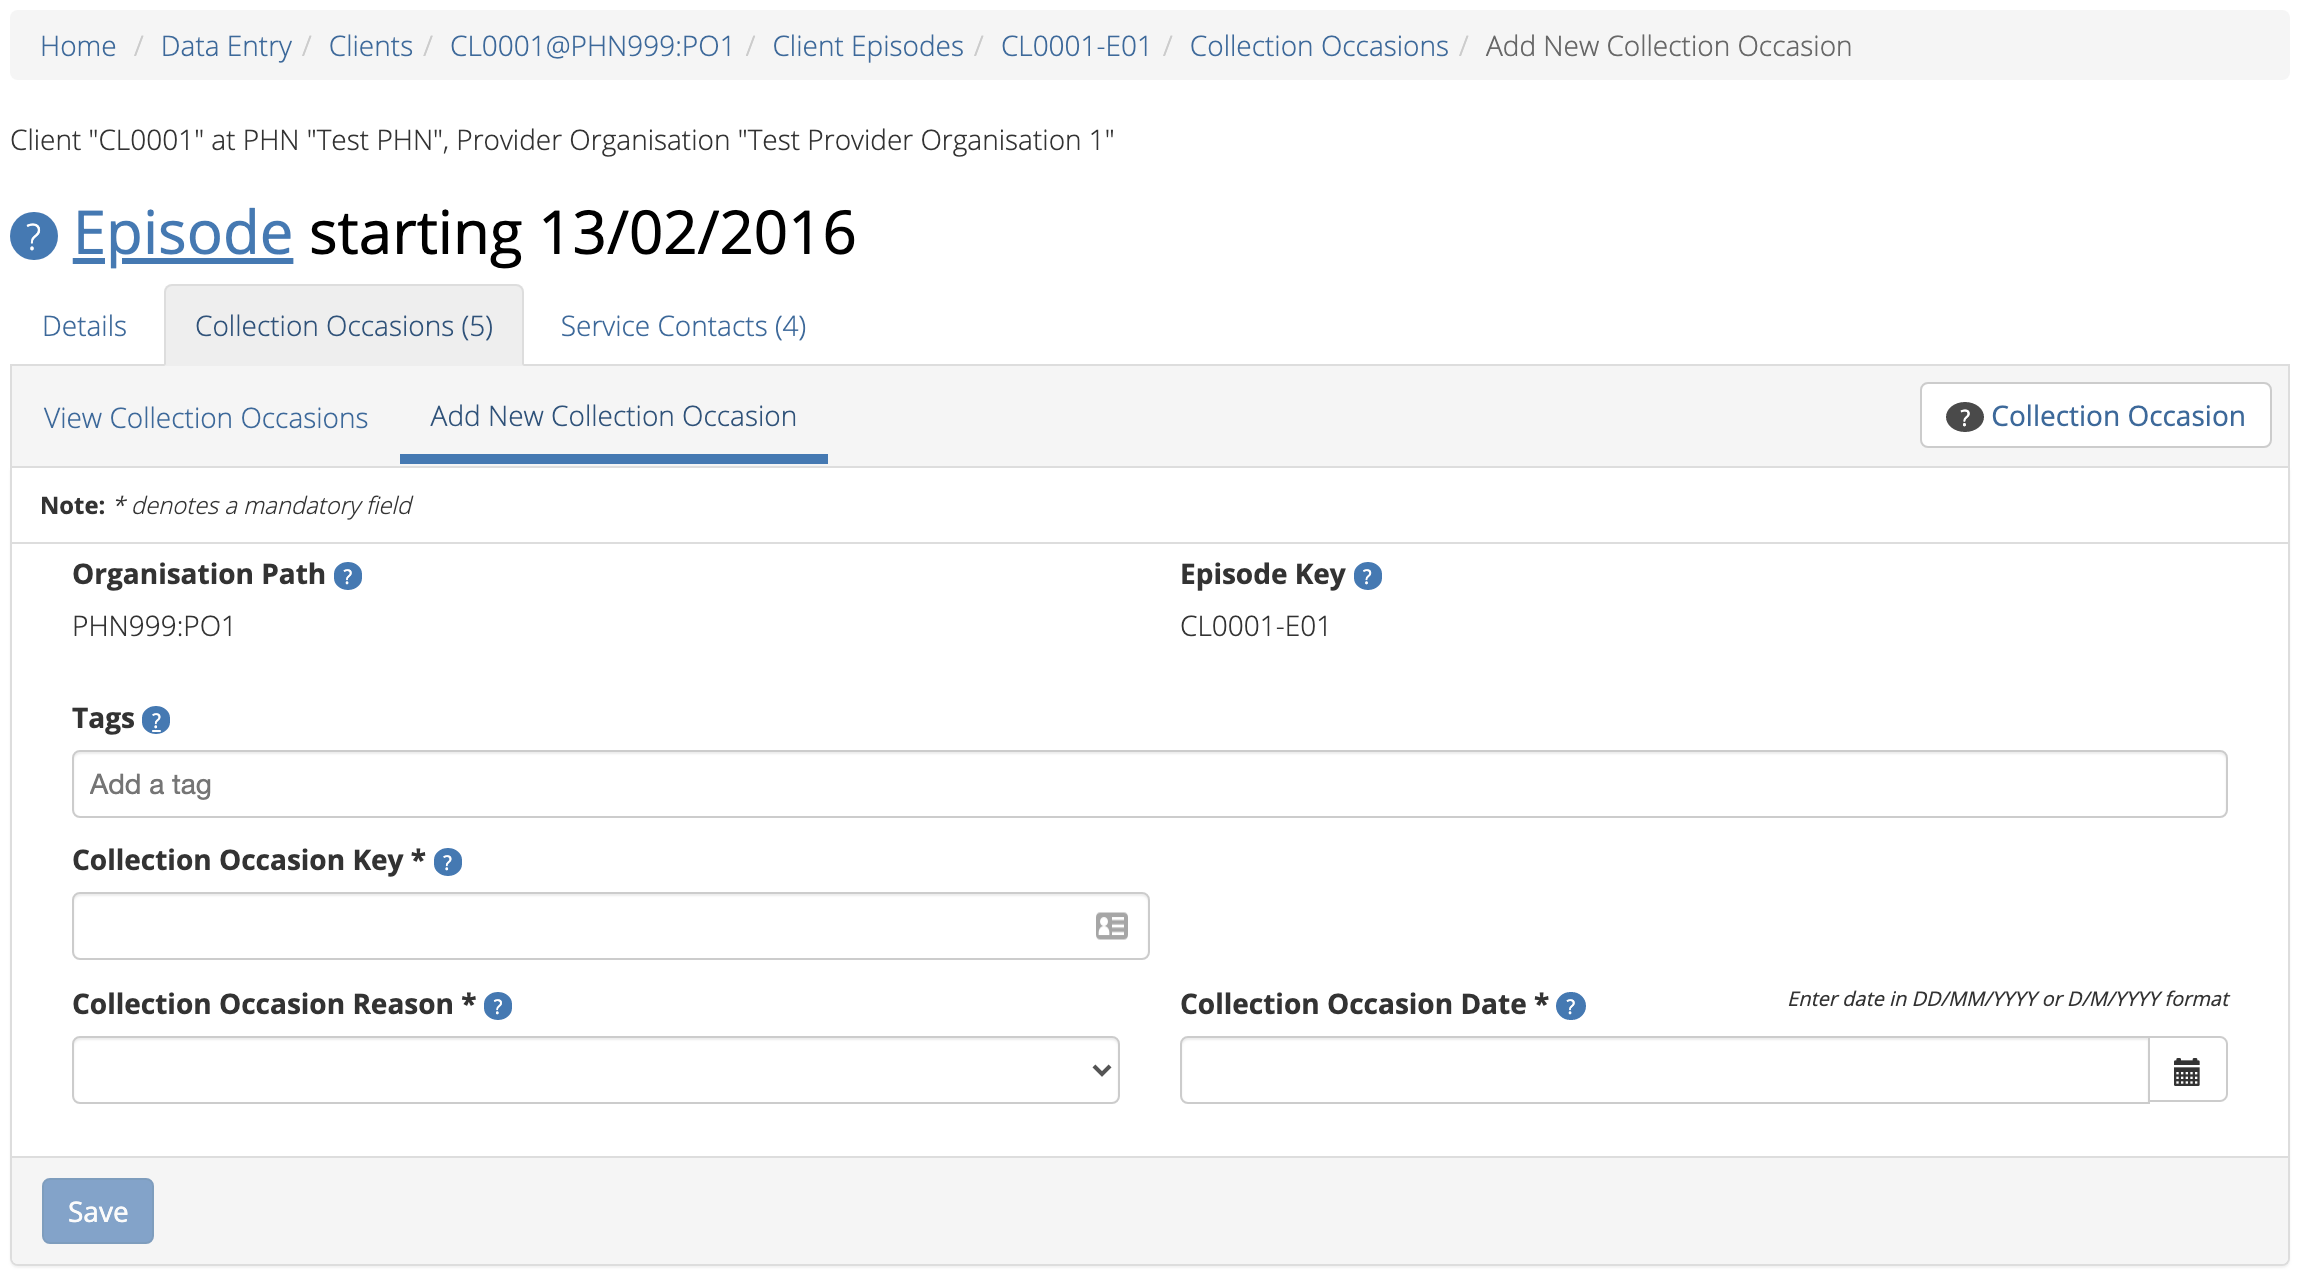
Click the blue Save button. (If you decide not to add this collection
occasion, you can navigate away from this screen)
You will receive confirmation that the client’s collection occasion’s details have been added,
and it will now be displaying these new details in the View Collection Occasion Details tab.
If you receive an error message, the data will need to be corrected before the
record is saved and added to the PMHC MDS.
See Validation Rules - Outcome Collection Occasion Validations
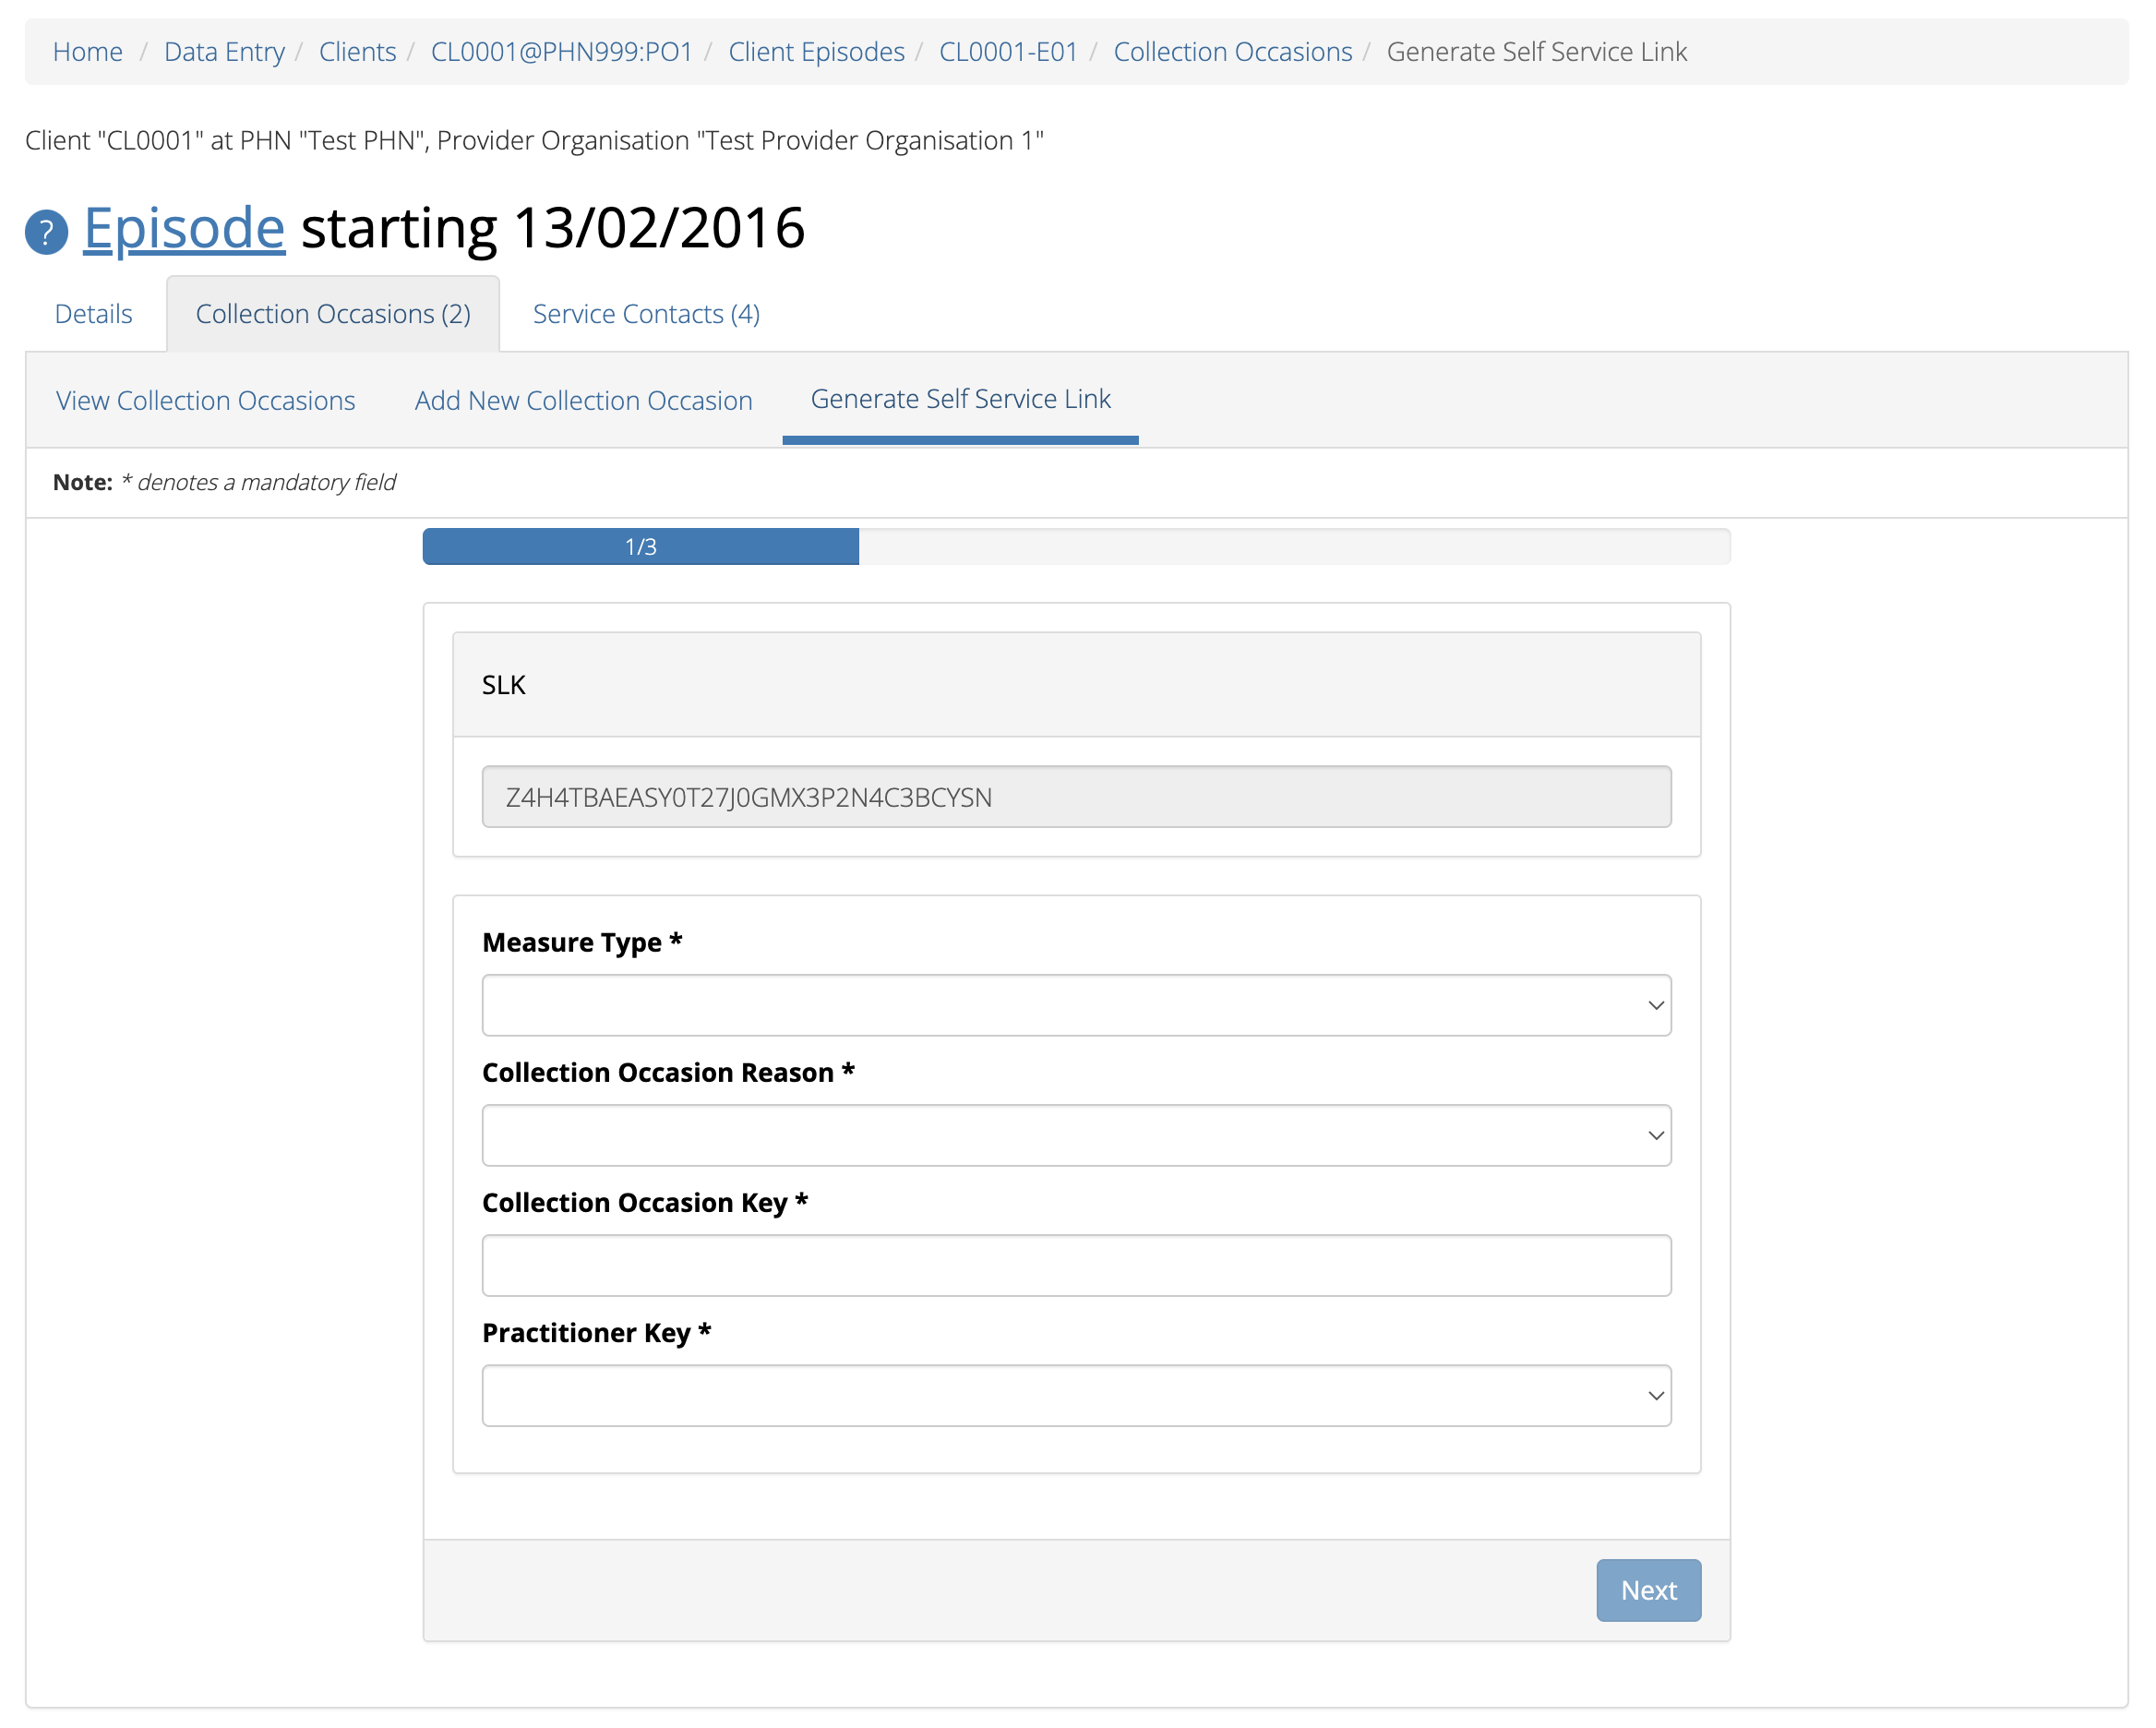
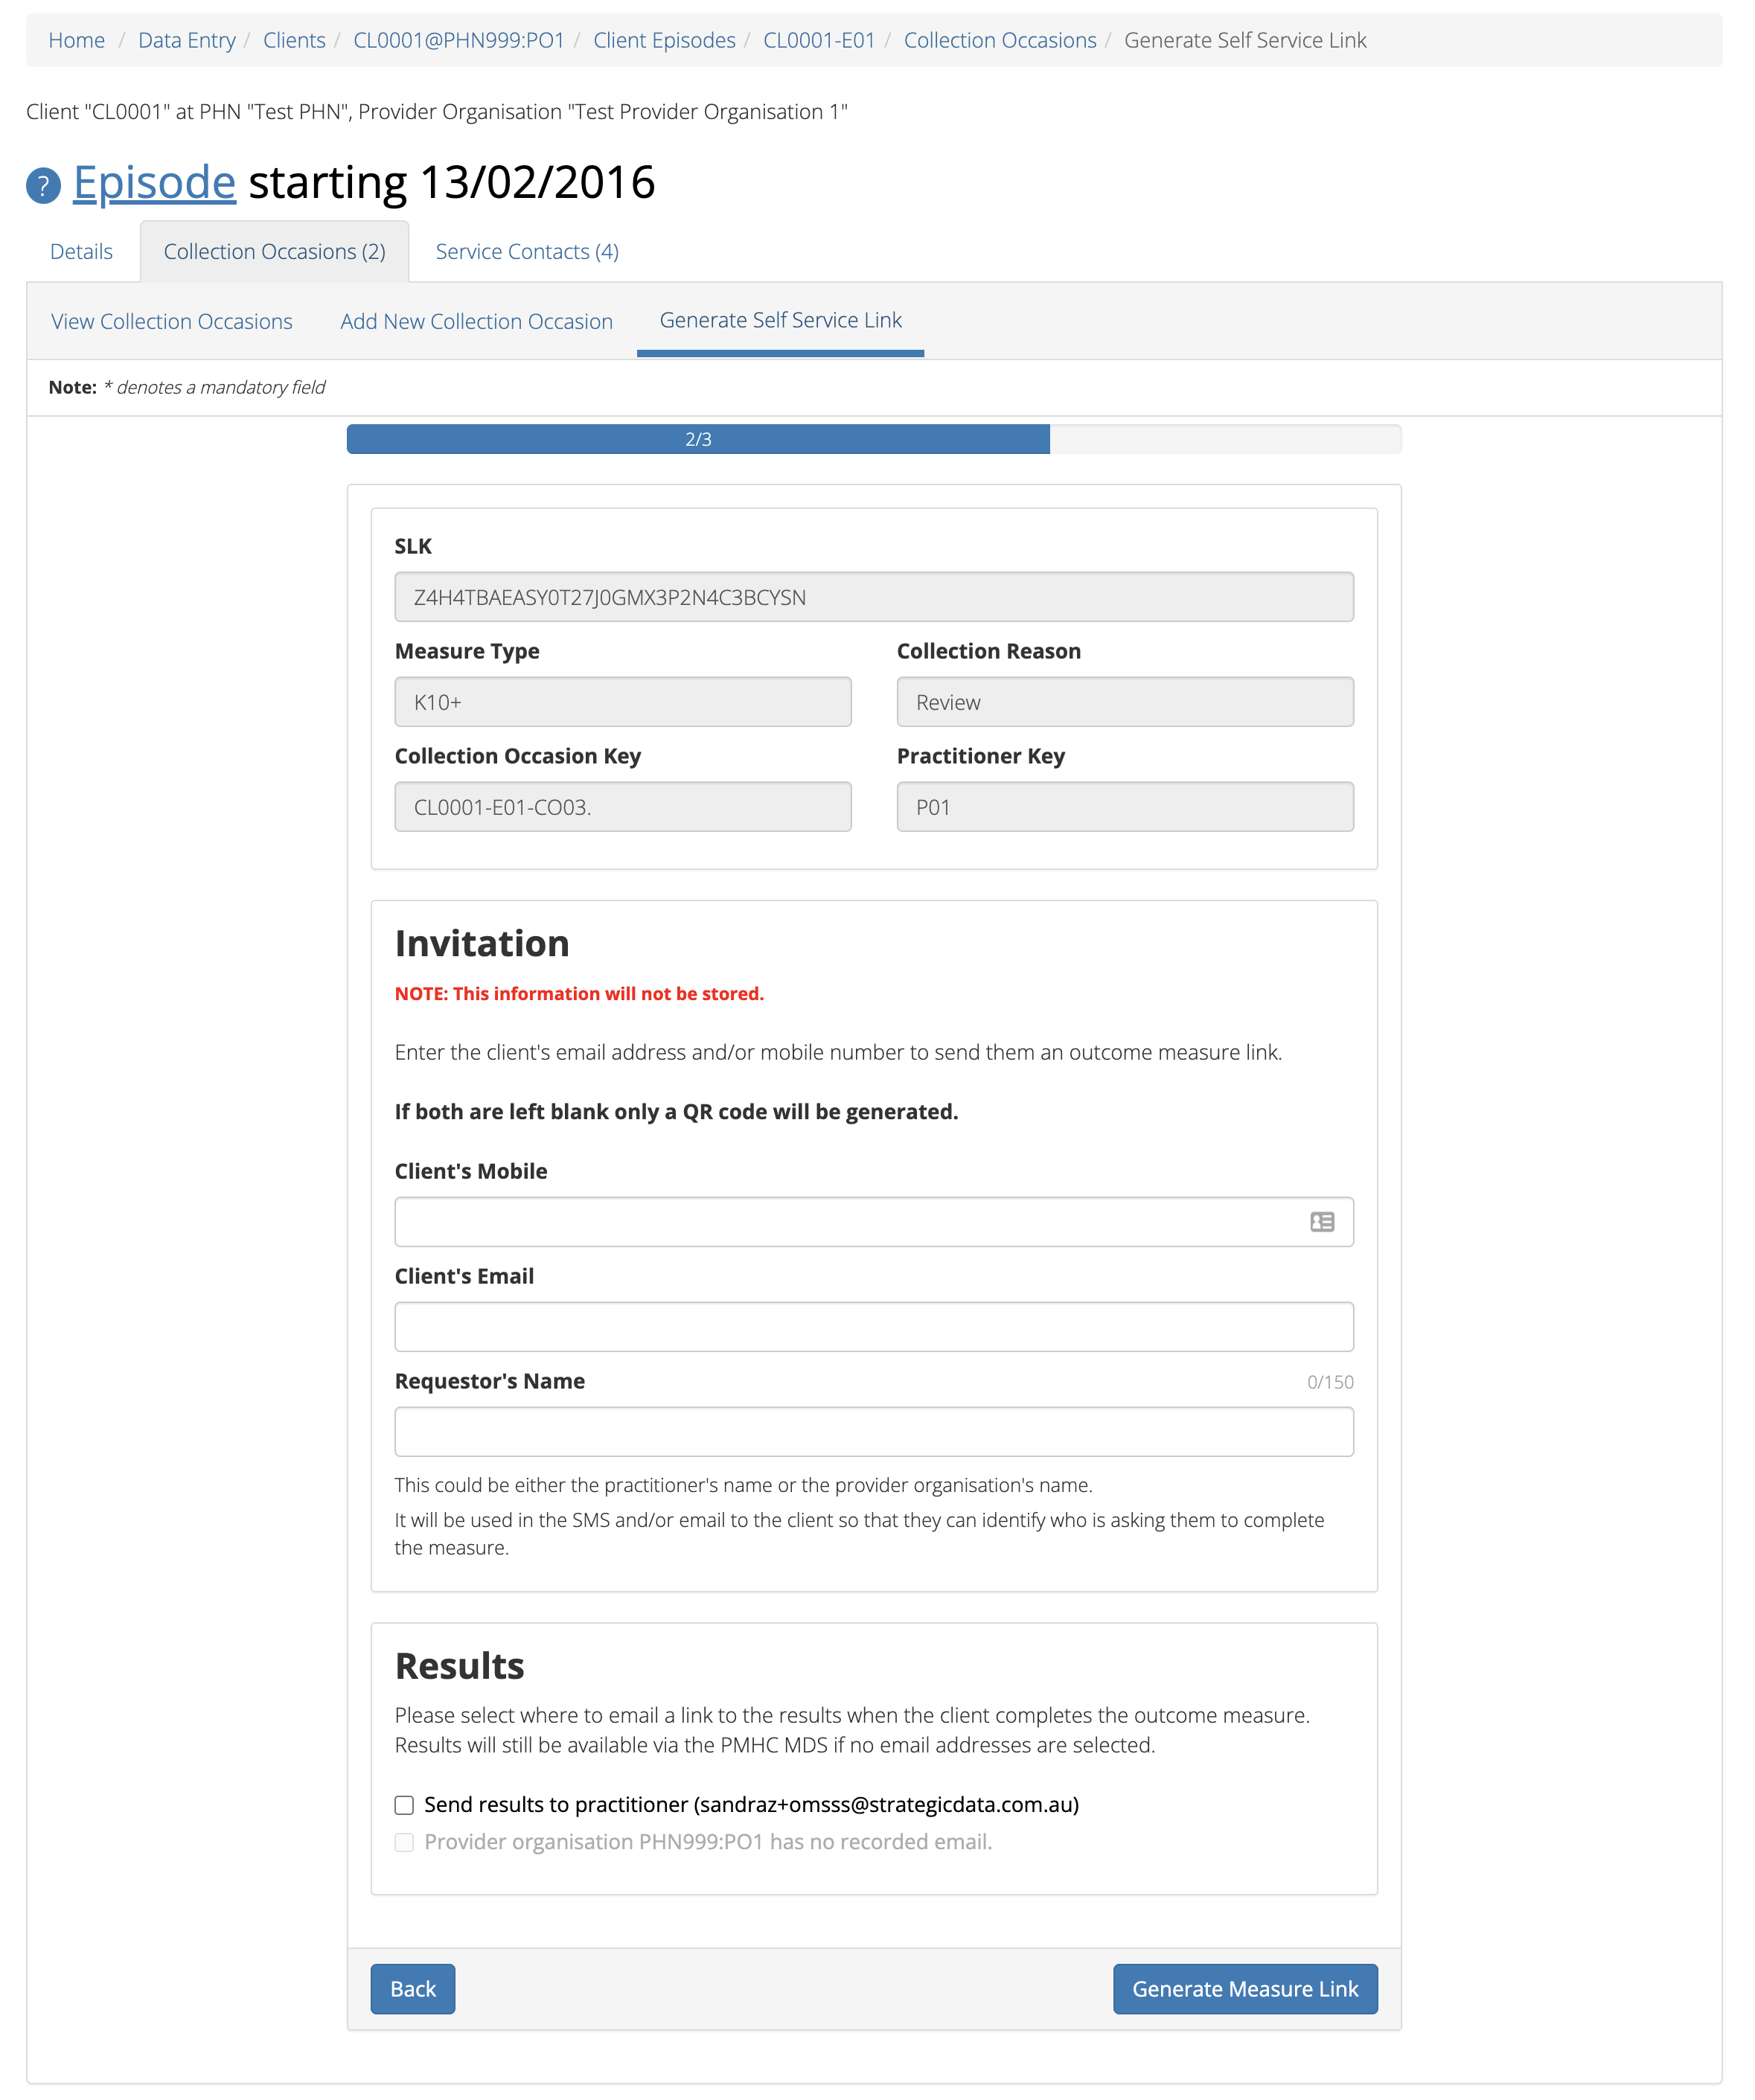
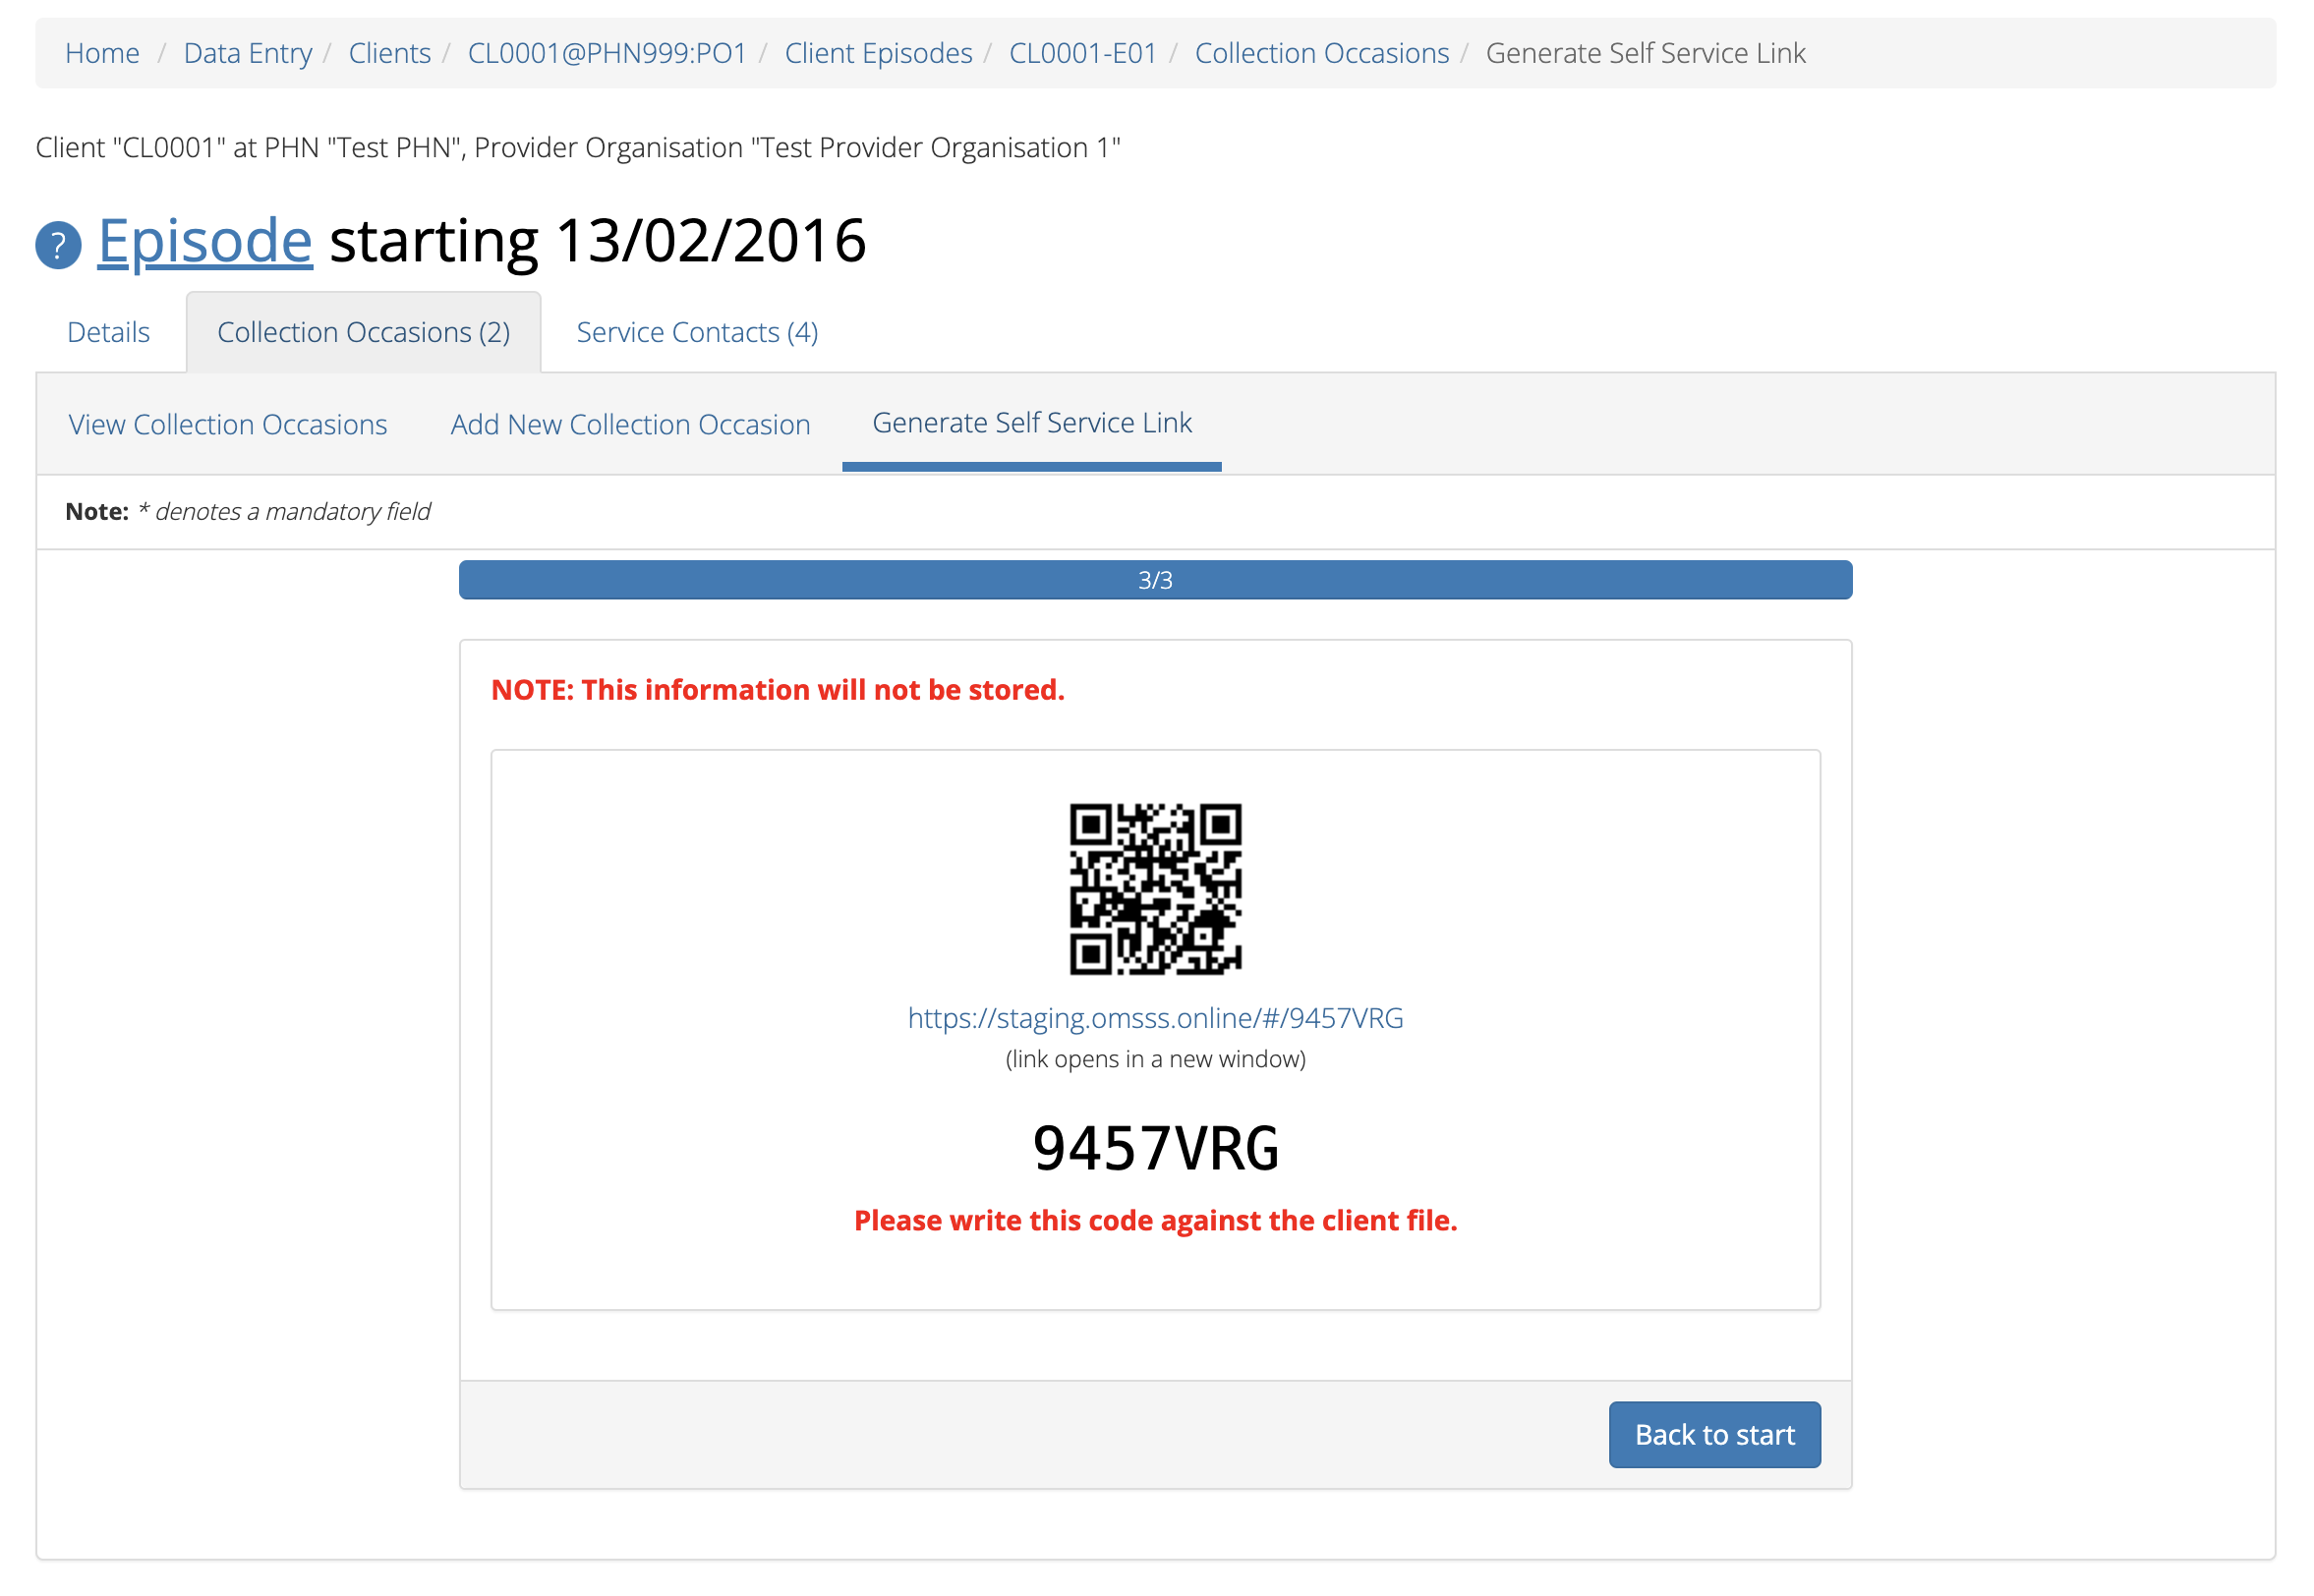
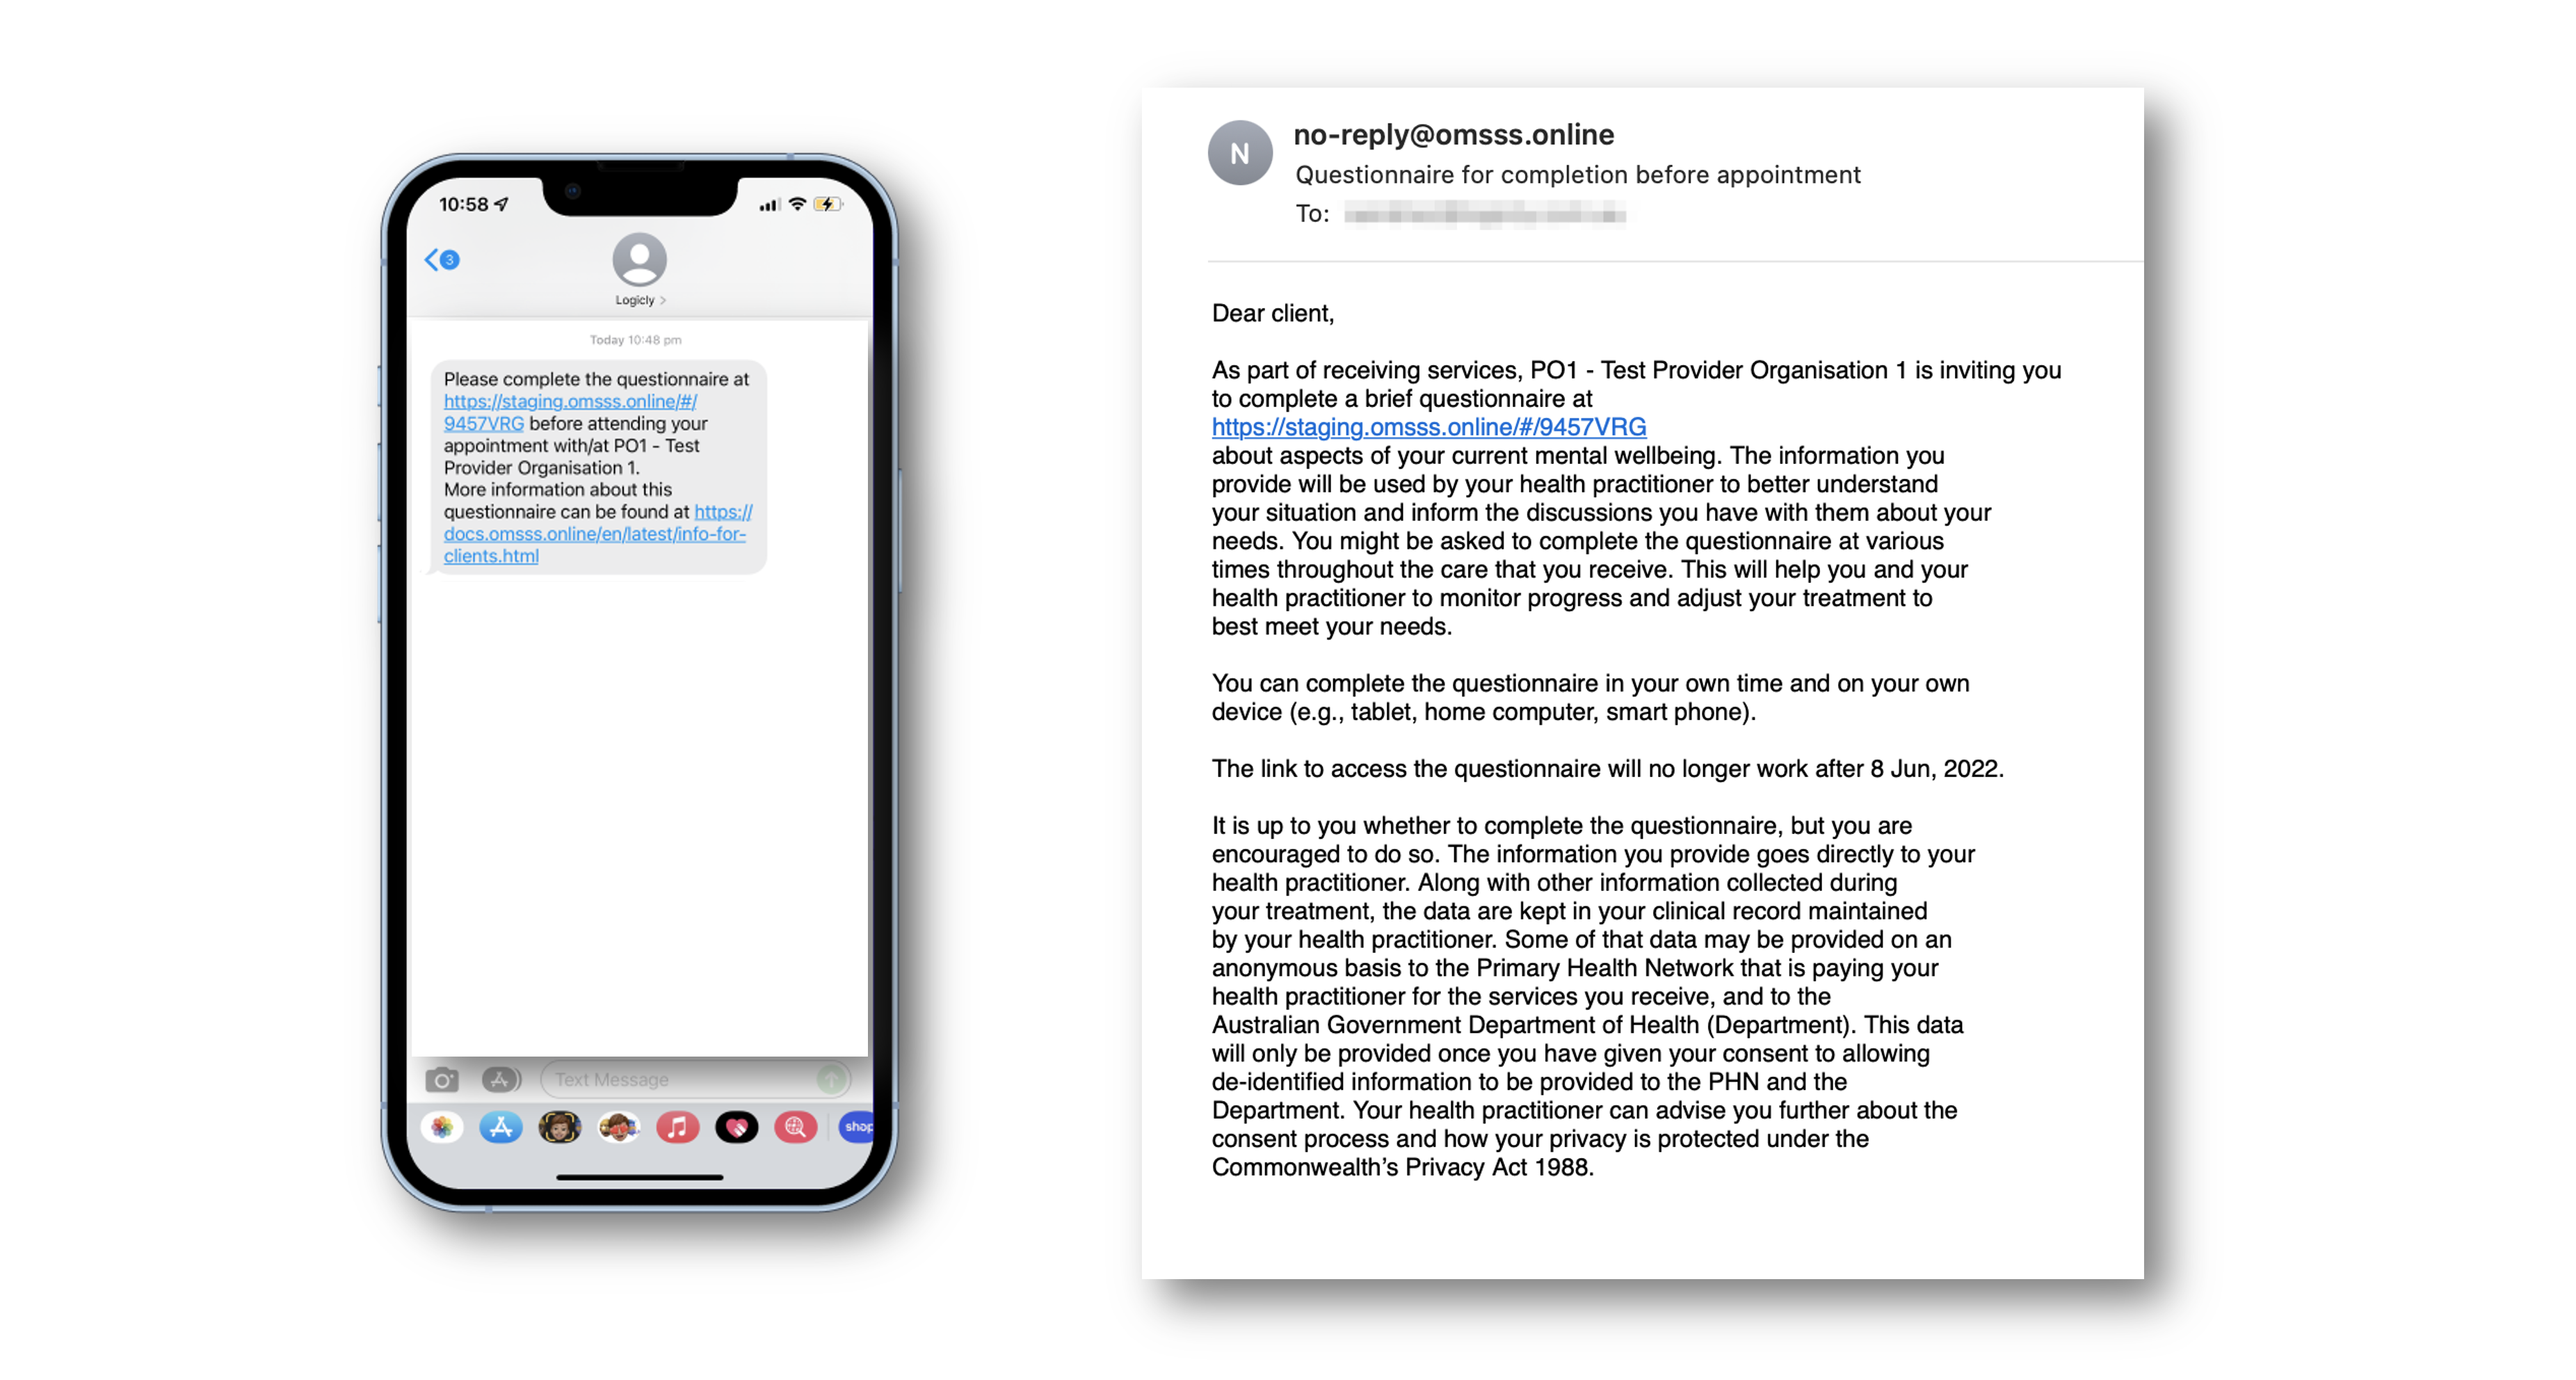
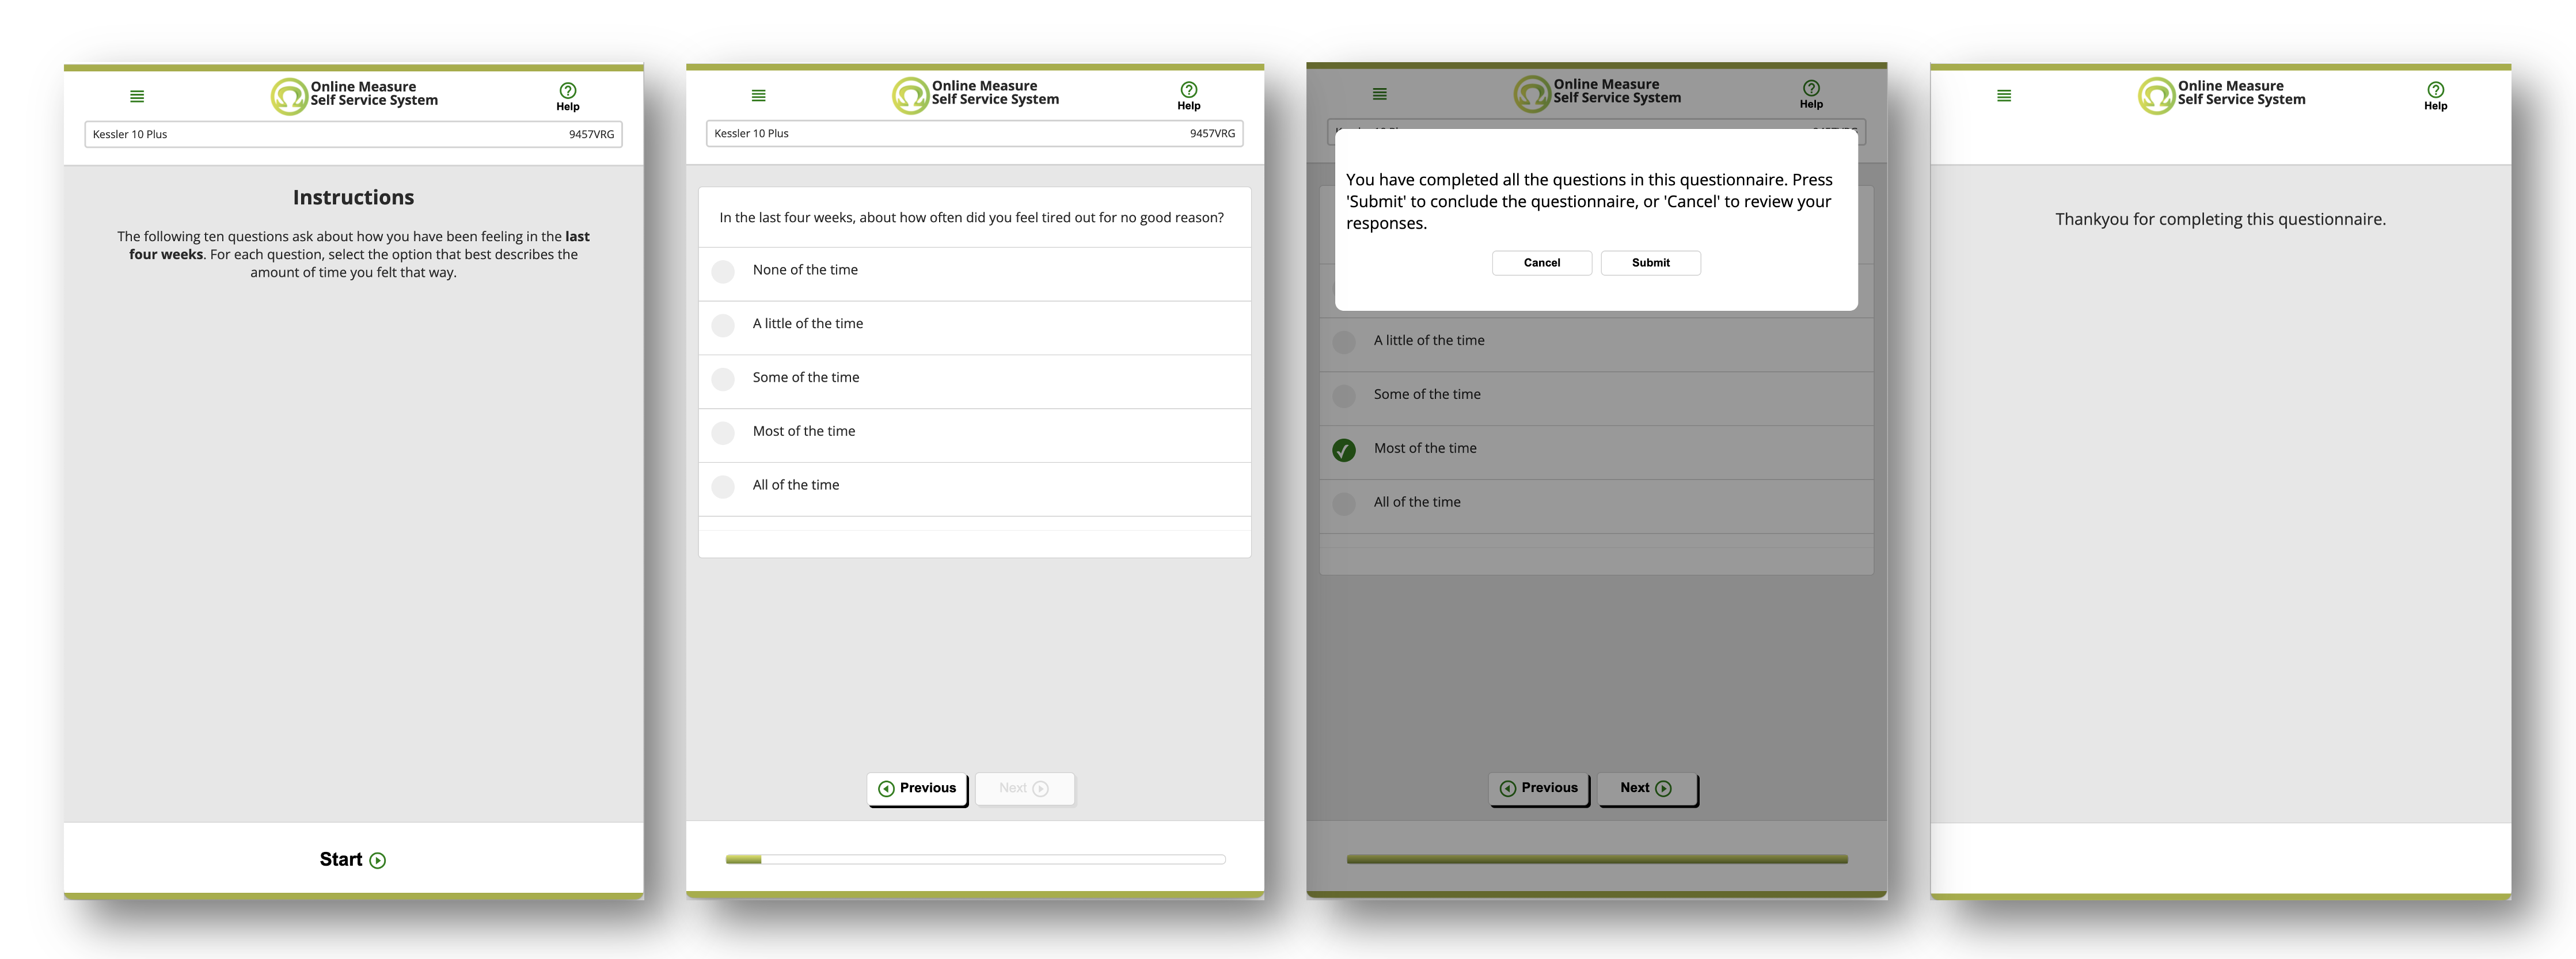
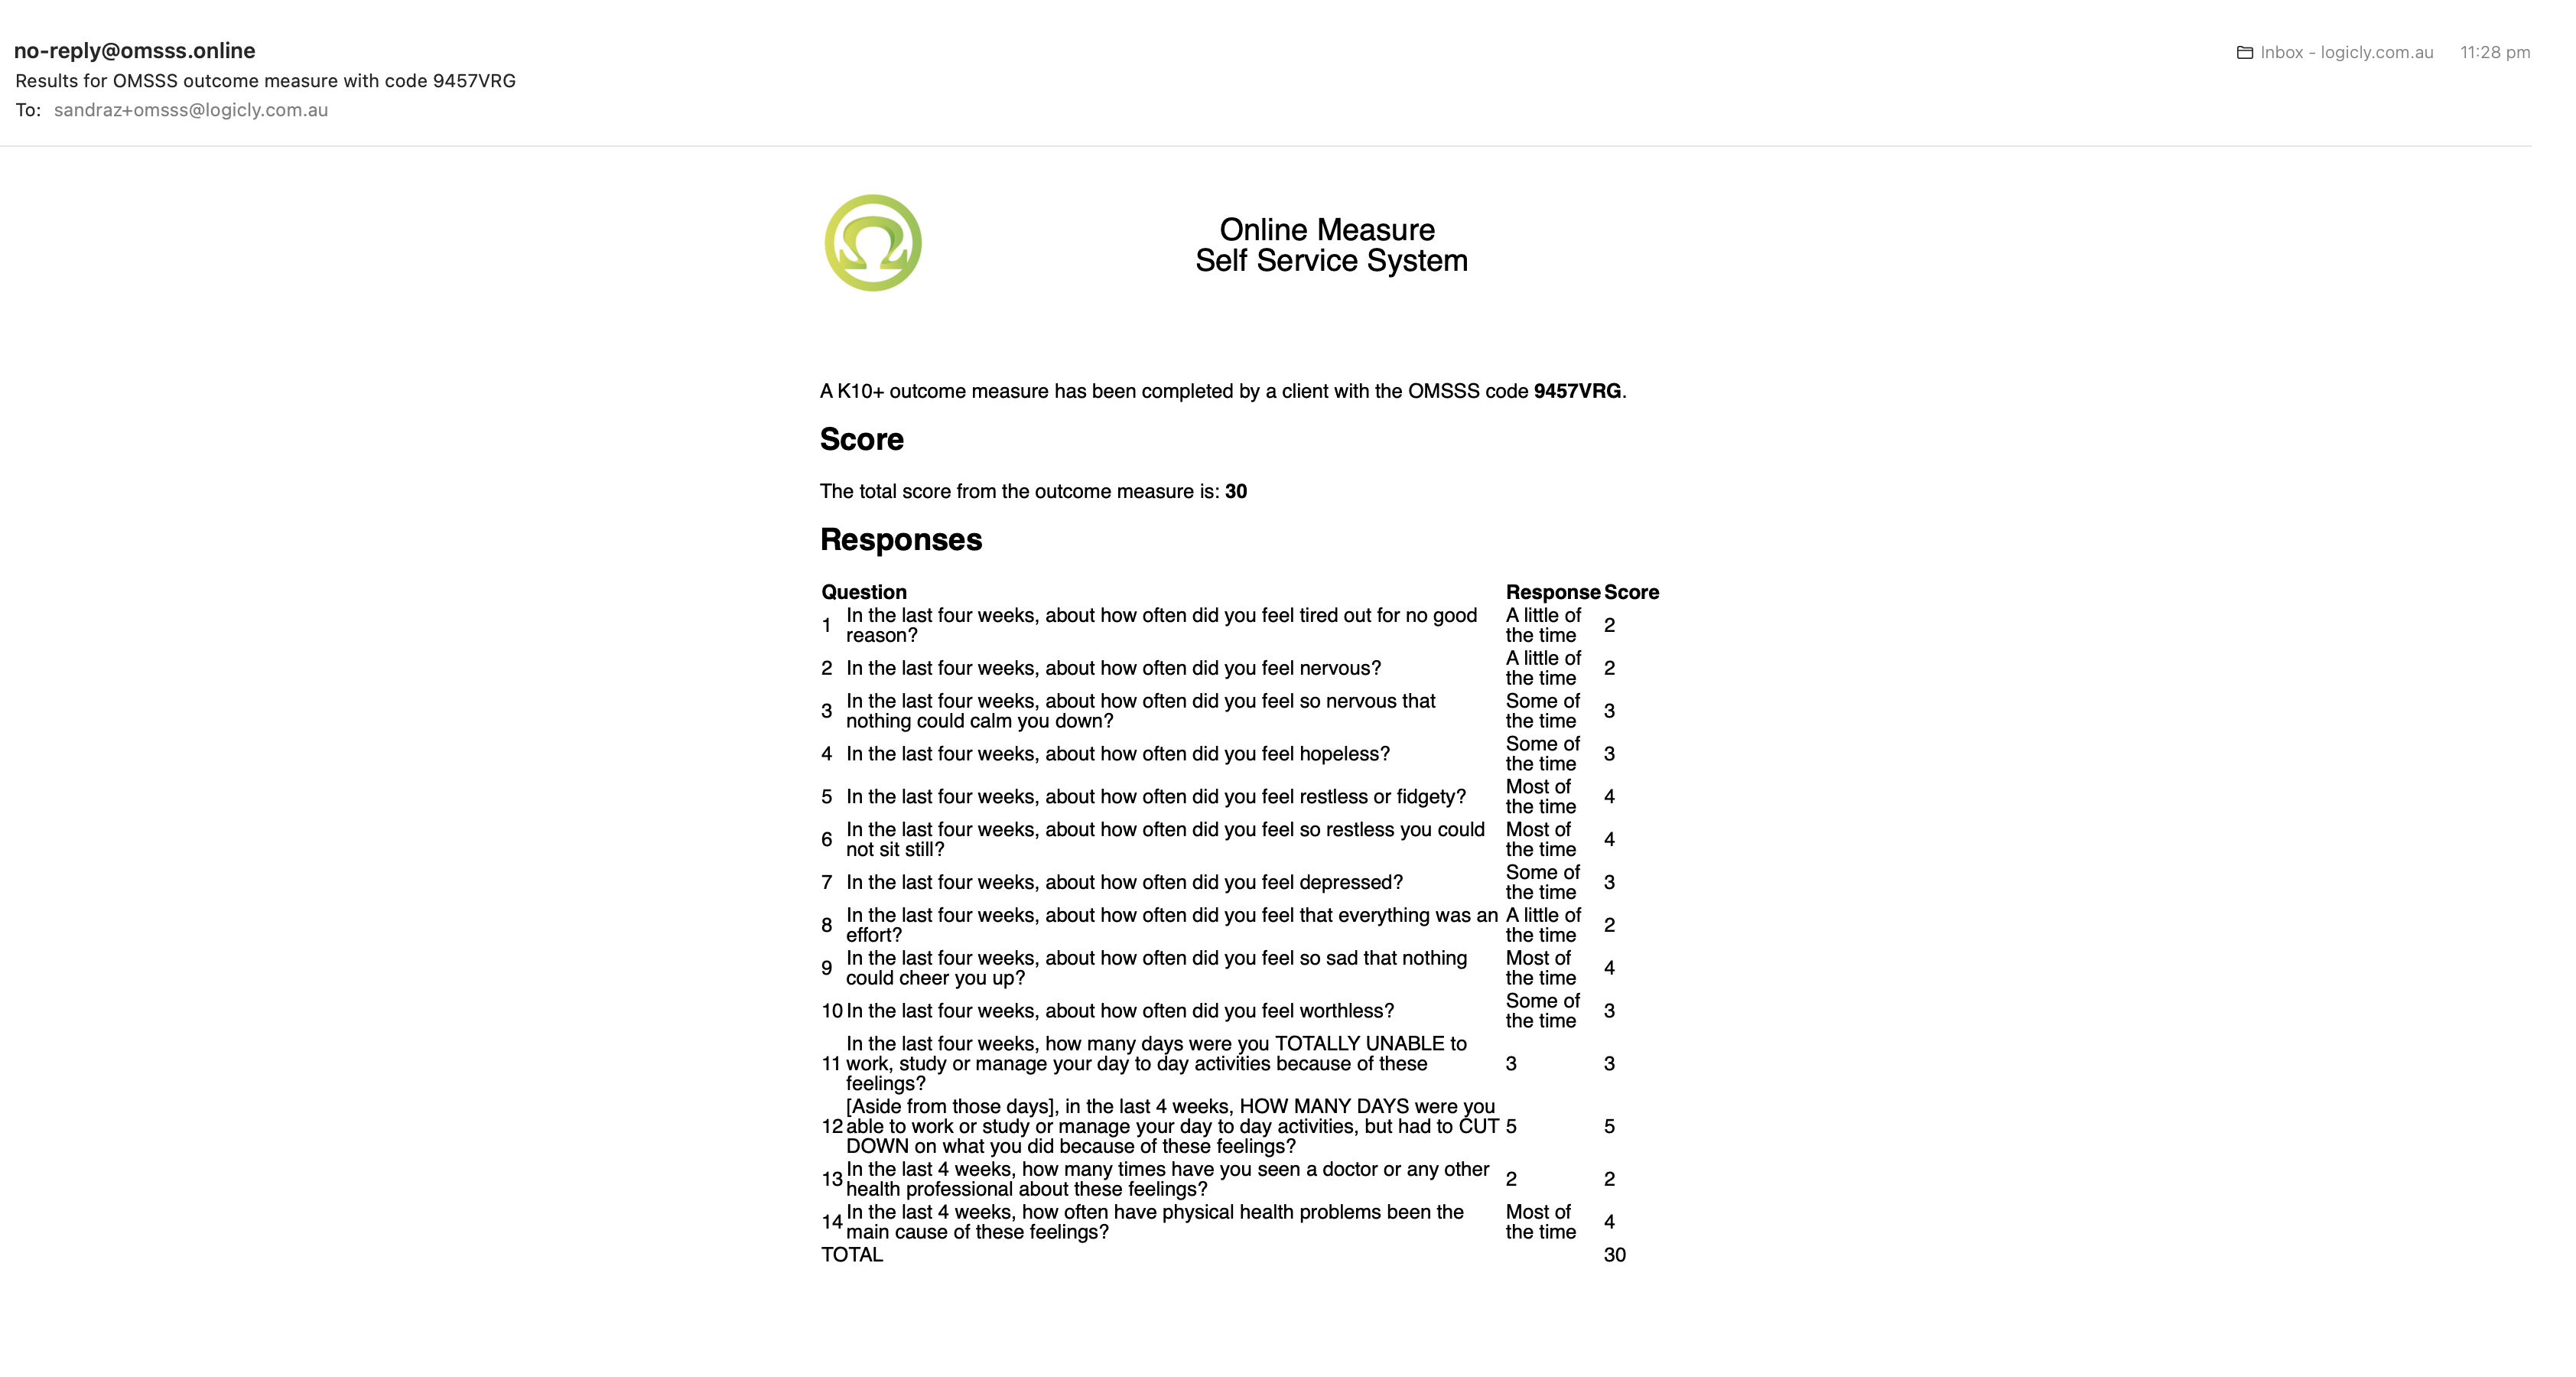
The Online Measures Self Service System (OMSSS) is a service funded by
the Australian Government Department of Health, Disability and Aging (DoHDA) as part of the Primary Mental
Health Care Minimum Data Set (PMHC MDS). It allows clients of mental health
services commissioned by Primary Health Networks (PHNs) to complete the
standardised outcome measures mandated in the PMHC MDS and have the results
reported back to their service providers. See more at http://docs.omsss.online/.
Please note: Data can not be recovered for deleted collection occasions
Click the blue Confirm button to delete this collection occasion. (or
click the orange Cancel button if you decide not to delete this collection occasion data)
After you click Confirm, you will receive confirmation that the collection occasion has
been deleted, and you will be redirected to the View Collection Occasions where the
collection occasion will no longer be displayed.
Single or multiple measures can be added to a collection occasion. You can add a
Client’s Measure for a Collection Occasion. Multiple through Viewing a Client’s Outcome Collection Occasions for an Episode
available on the Data Entry tab, by following these steps:
Click the blue Save button. (If you decide not to add this client’s measure, you can simply navigate away from this screen)
You will receive confirmation that the Client’s Measure details have been added,
and it will now be displaying these new details in the View Measure tab.
If you receive an error message, the data will need to be corrected before the
record is saved and added to the PMHC MDS.
See Validation Rules -
K10+K5SDQSIDASUA-PlanUA-NI
Update the Client’s Measure details. Mandatory fields are marked with an * .
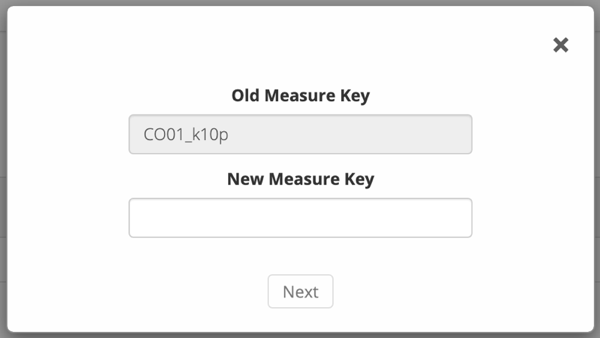
Please note: You can edit the Measure Key from this screen. SeeEditing a Measure Key.
Click the blue Save button. (If you decide not to save changes, you can simply navigate away from this screen)
You will receive confirmation that the Client’s Collection Occasions details have been saved,
and it will now be displaying these new details in the View Collection Occasion Details tab.
If you receive an error message, the data will need to be corrected before the
record is saved and added to the PMHC MDS.
See Validation Rules -
K10+K5SDQSIDASUA-PlanUA-NI
From the Edit Measure details tab, click the Edit Key button.
Type in the new measure key and click ‘Next’.
Double check the new key is correct and click save. (If it is incorrect, click back to re-enter the key or click the ‘cross’ in the top right to cancel this key change request)
You will receive confirmation that the Measure’s key has been saved, and the screen
will now be displaying the updated measure key details in the View Measure details tab.
You will be displayed a ‘Confirm Deletion’ screen.
Please note: Once the measure is deleted, you will not be able to recover this measure data.
Click the blue Confirm button to delete this measure. (or click the orange Cancel button if you decide not to delete this measure data)
After you click ‘Confirm’, you will receive confirmation that the measure has
been deleted, and you will be redirected to the View Measures where the
measure will no longer be displayed.
Click the blue Save button. (If you decide not to save changes, you can navigate away from this screen)
You will receive confirmation that the practitioner’s details have been added,
and it will now be displaying these new details in the View Practitioner Details tab.
If you receive an error message, the data will need to be corrected before the
record is saved and added to the PMHC MDS.
See Validation Rules - Practitioner.
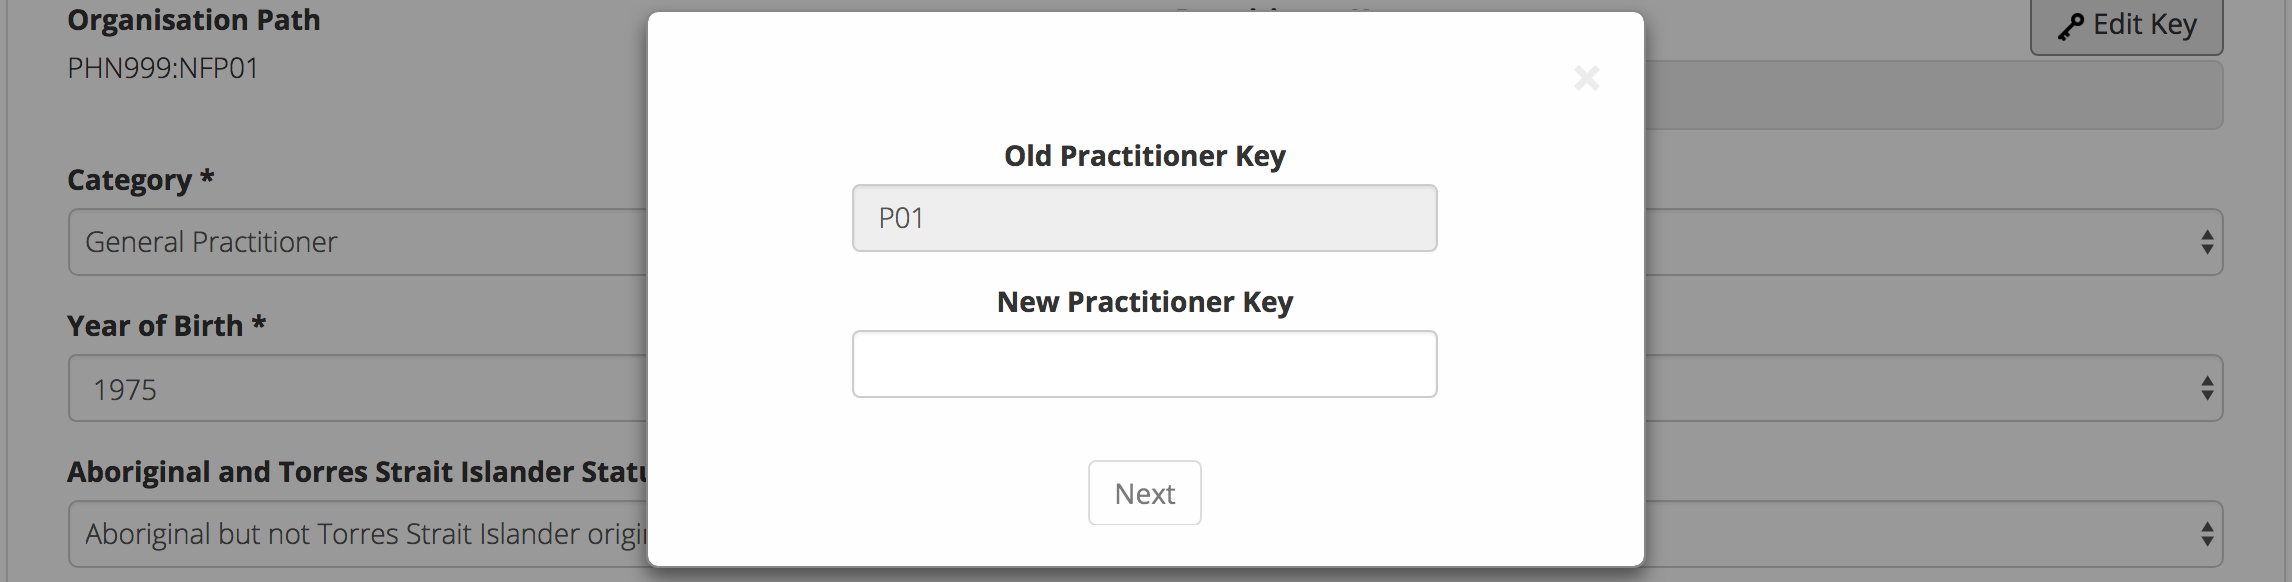
From the Practitioner Edit Details tab, click the Edit Key button
Type in the new practitioner key and click Next
Ensure the new key is correct and click Save. If it is incorrect, click
back to re-enter the key or click the ‘cross’ in the top right to cancel this key change request.
You will receive confirmation that the Practitioners Key has been saved, and the screen
will now be displaying the updated practitioner key details in the Practitioner View Details tab.
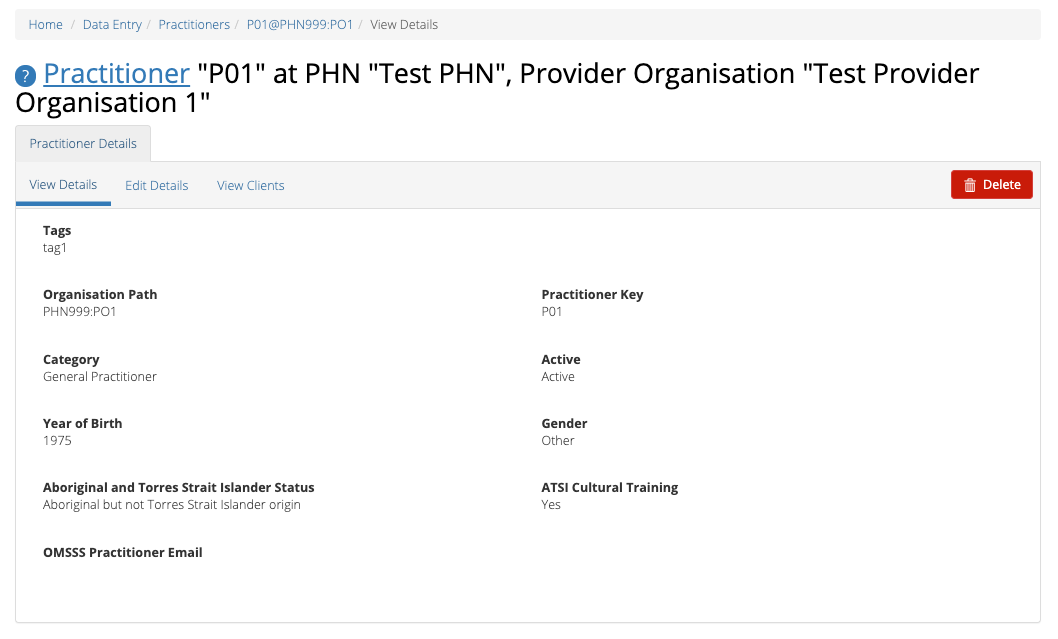
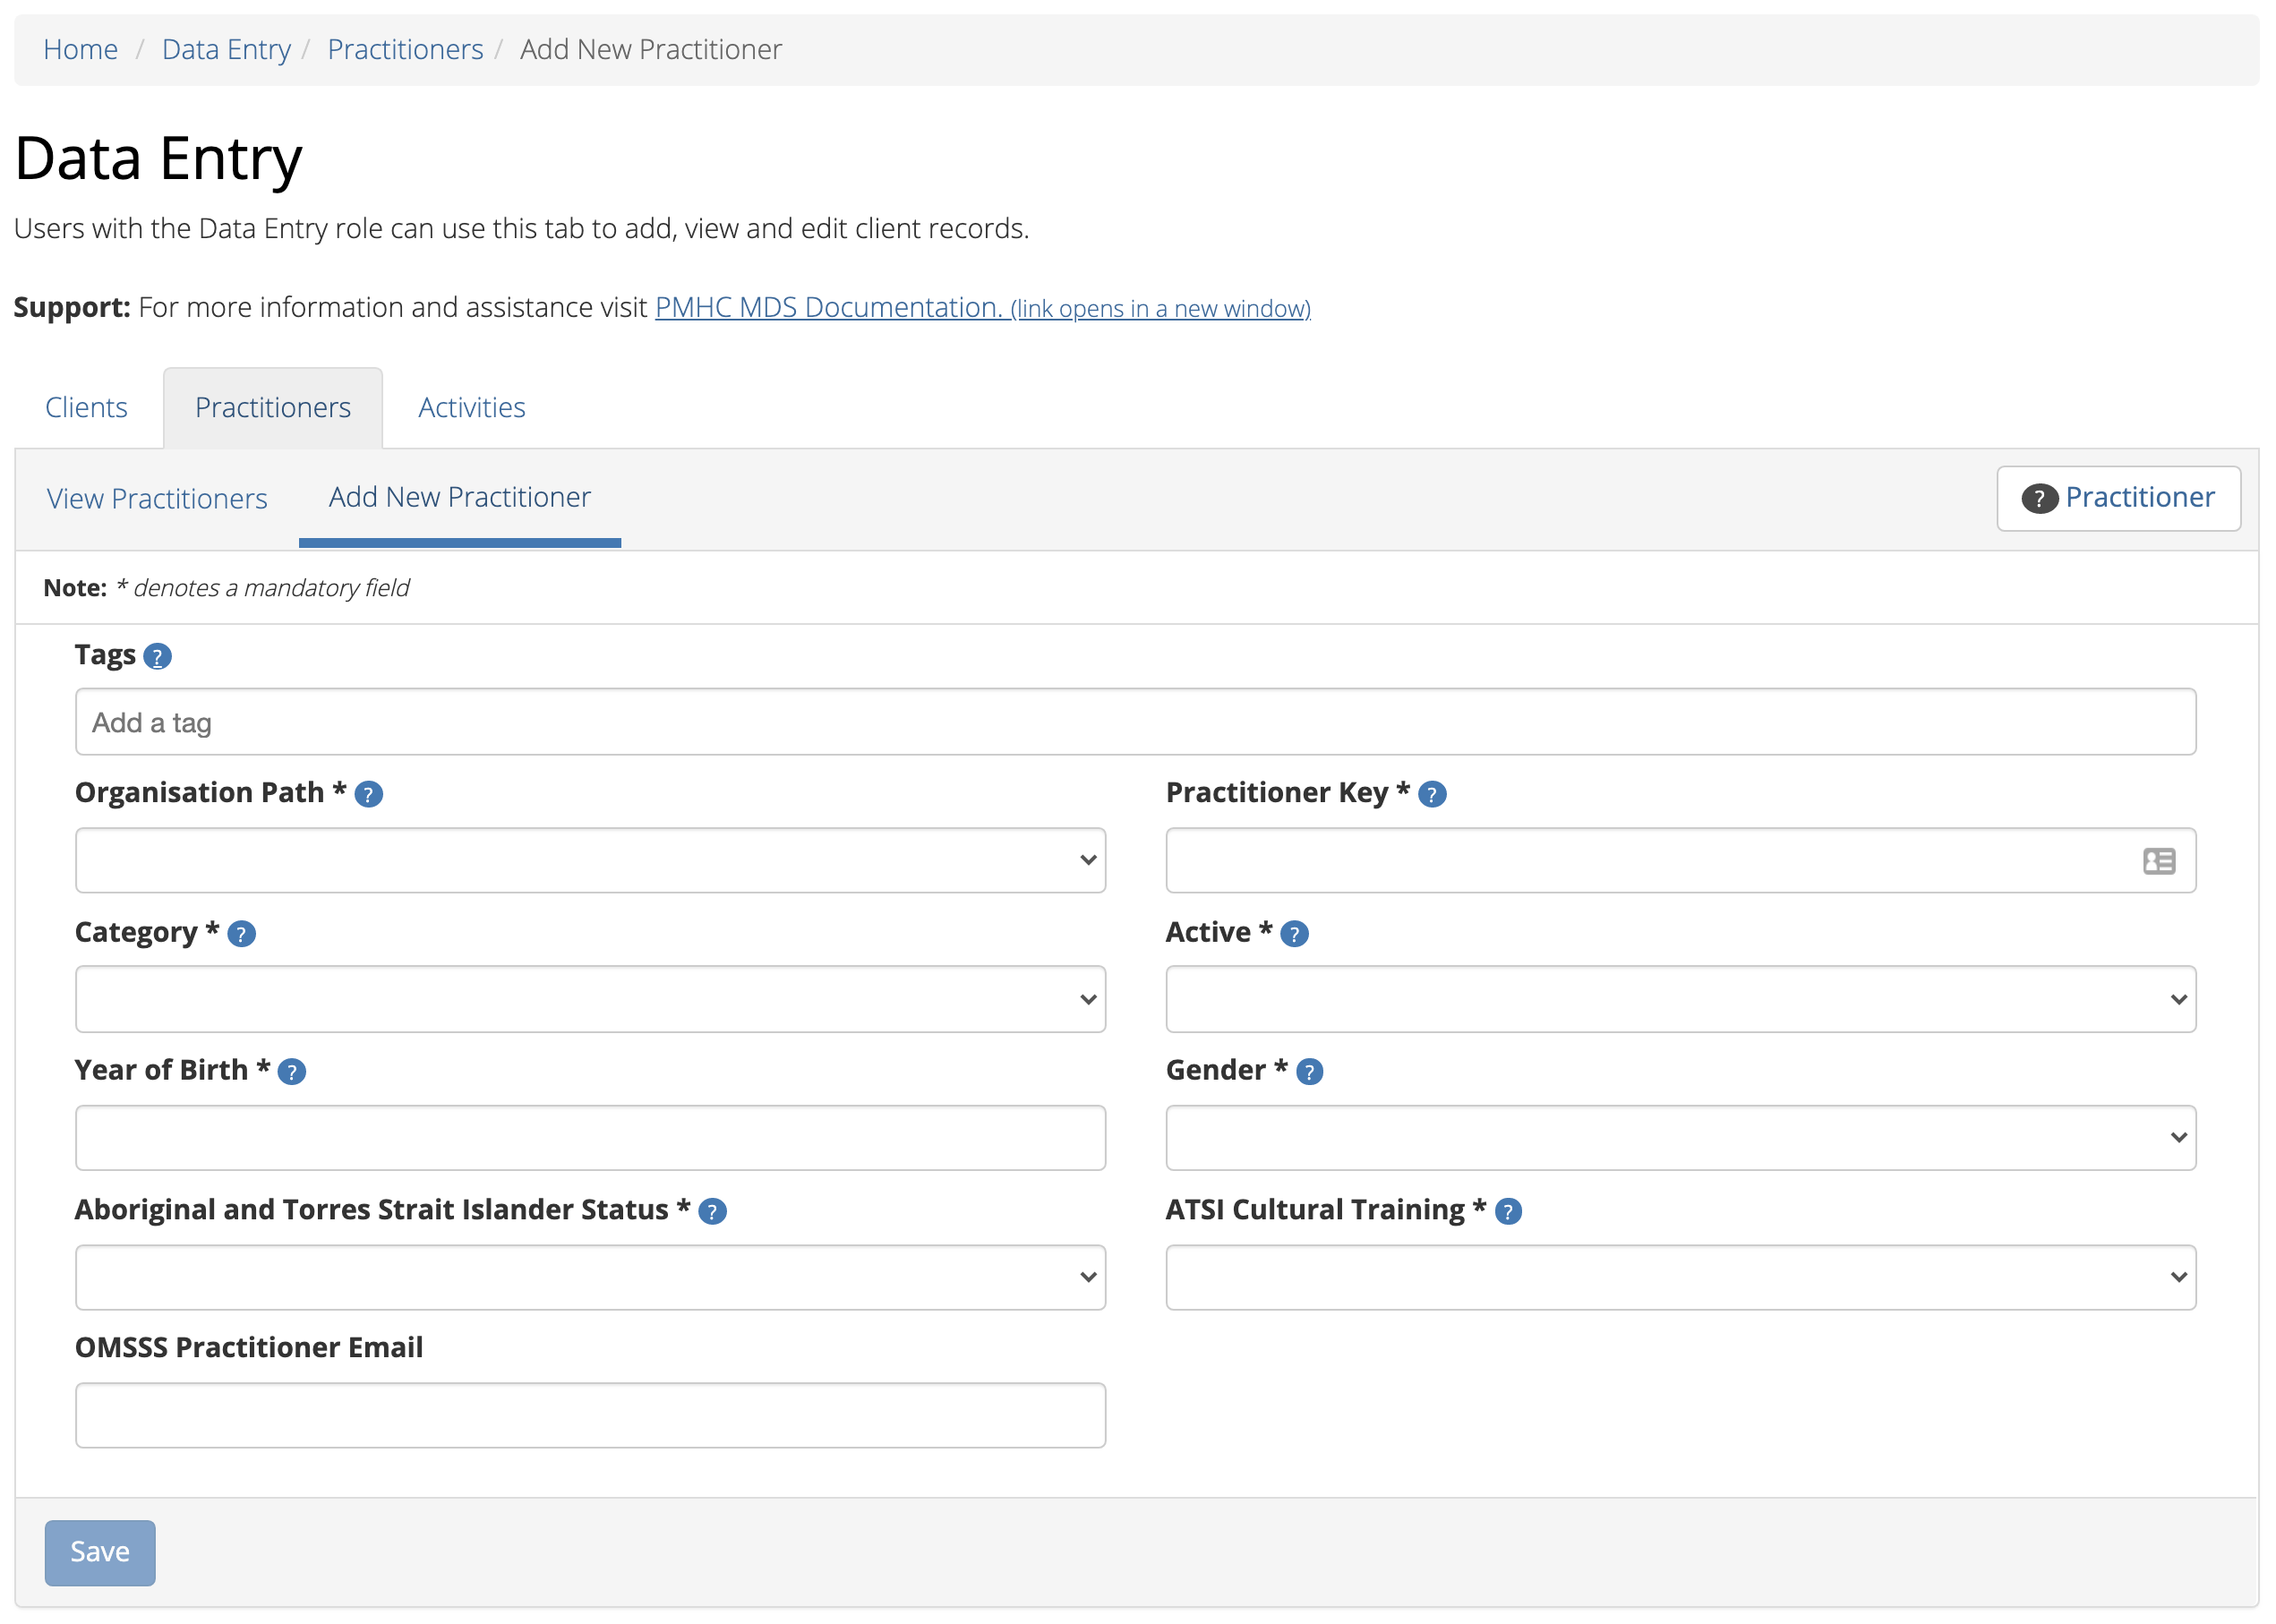
Enter the practitioner’s details. Mandatory fields are marked with an *
Click the blue Save button. (If you decide not to save changes, you can
navigate away from this screen)
You will receive confirmation that the practitioner’s details have been added,
and it will now display these new details in the View Practitioner Details tab.
If you receive an error message, the data will need to be corrected before the
record is saved and added to the PMHC MDS.
See Validation Rules - Practitioner.
You can add a practitioners individually through the data entry interface or
alternatively, practitioner records can be uploaded in bulk. See Upload.
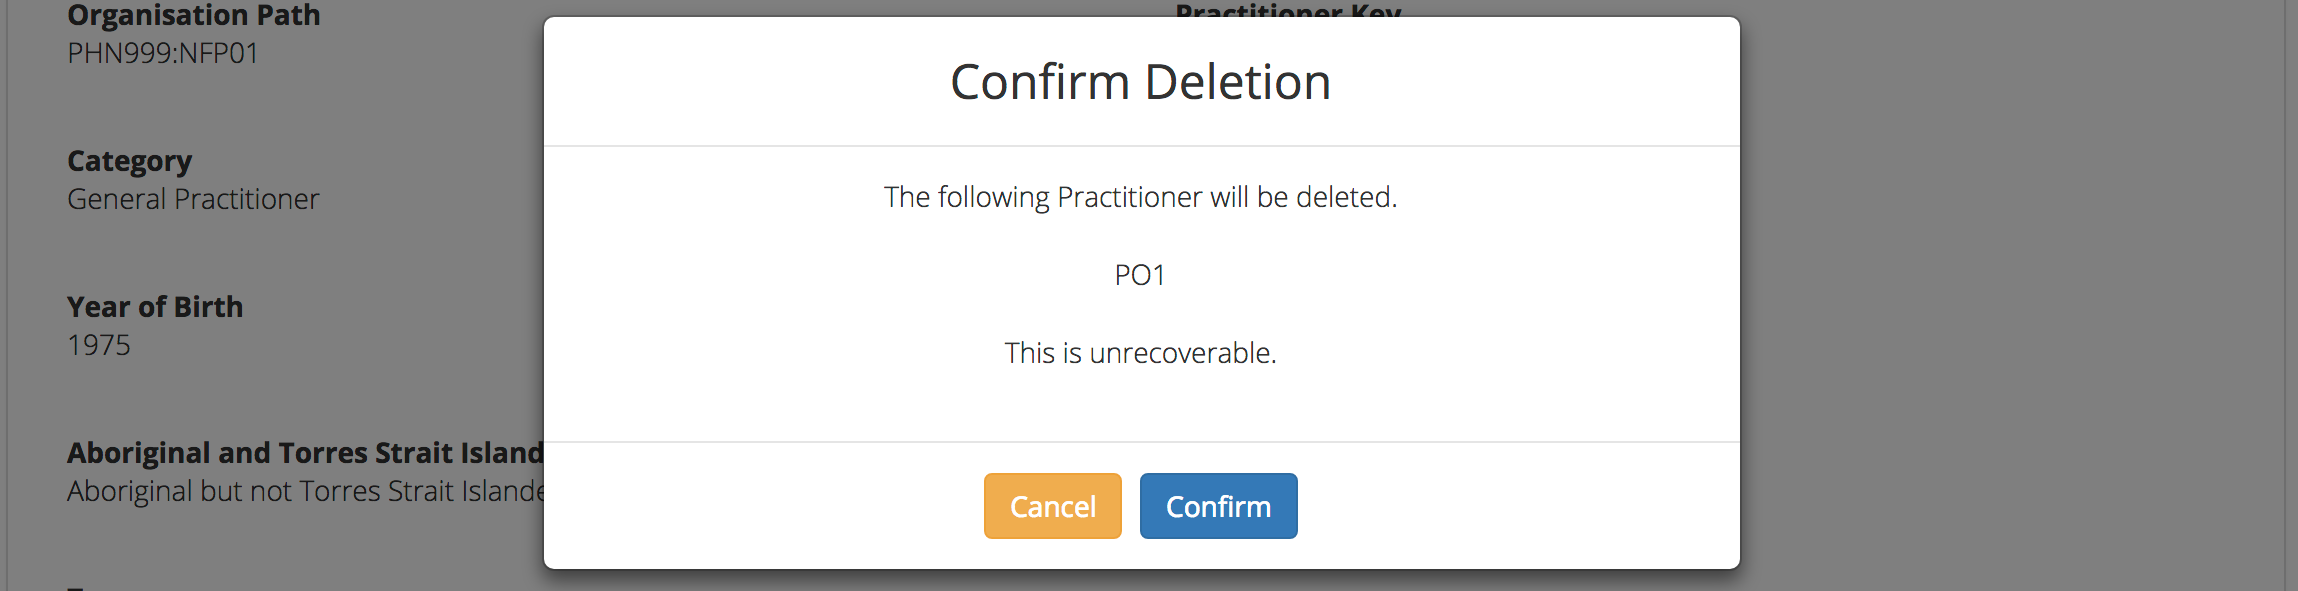
Please note: Data from deleted practitioners can not be recovered.
Click the blue Confirm button to delete this practitioner.
(or click the orange Cancel button to cancel the deletion)
After you click Confirm, you will receive confirmation that the practitioner has
been deleted, and you will be redirected to the View Practitioners where the
practitioner will no longer be displayed.
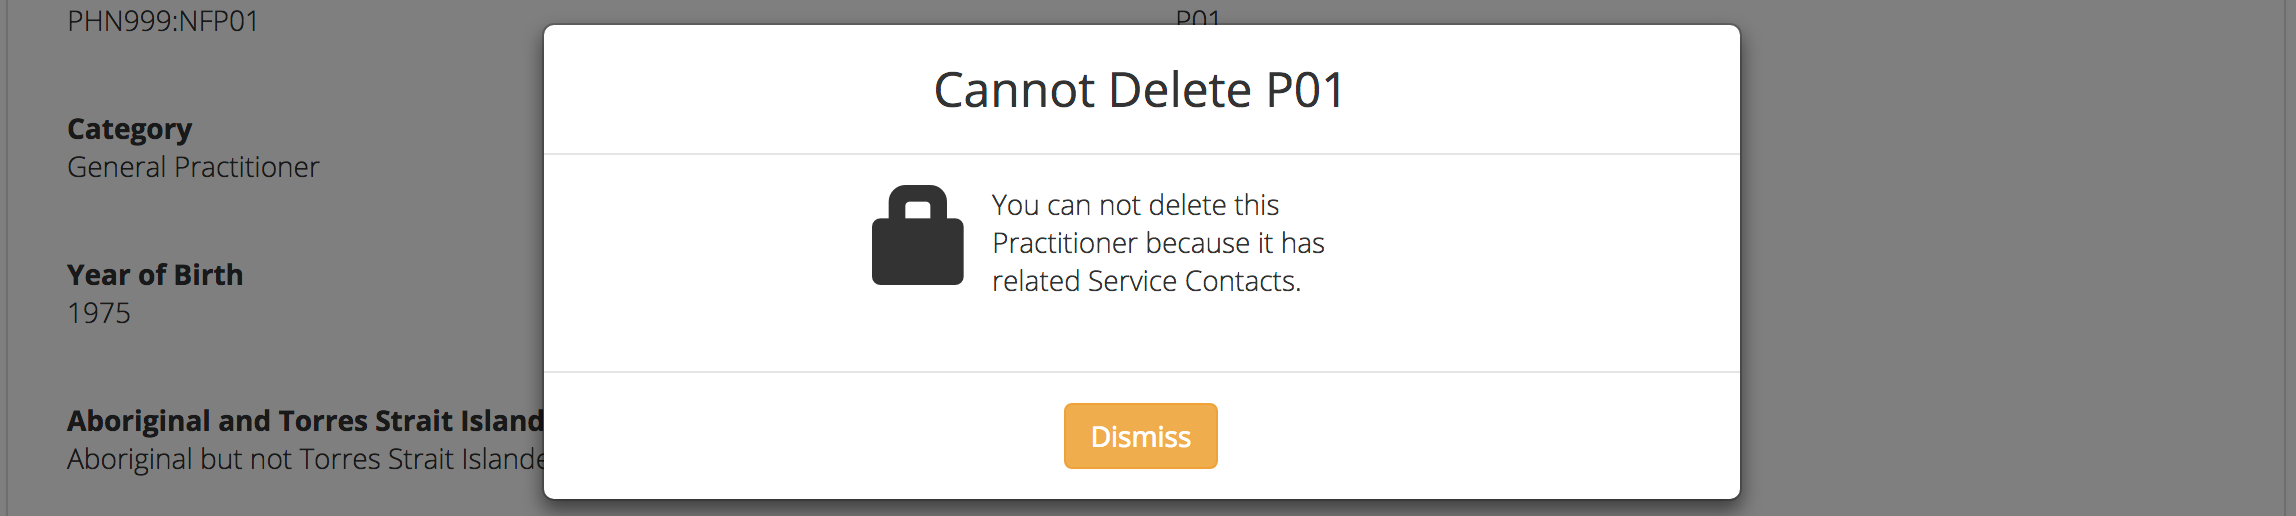
If the practitioner you are trying to delete has any dependant records, you will not
be able to proceed with deleting this practitioner until all the related records have
been edited or deleted.
Currently a practitioner can not be deleted from the PMHC MDS if they have any dependant records.
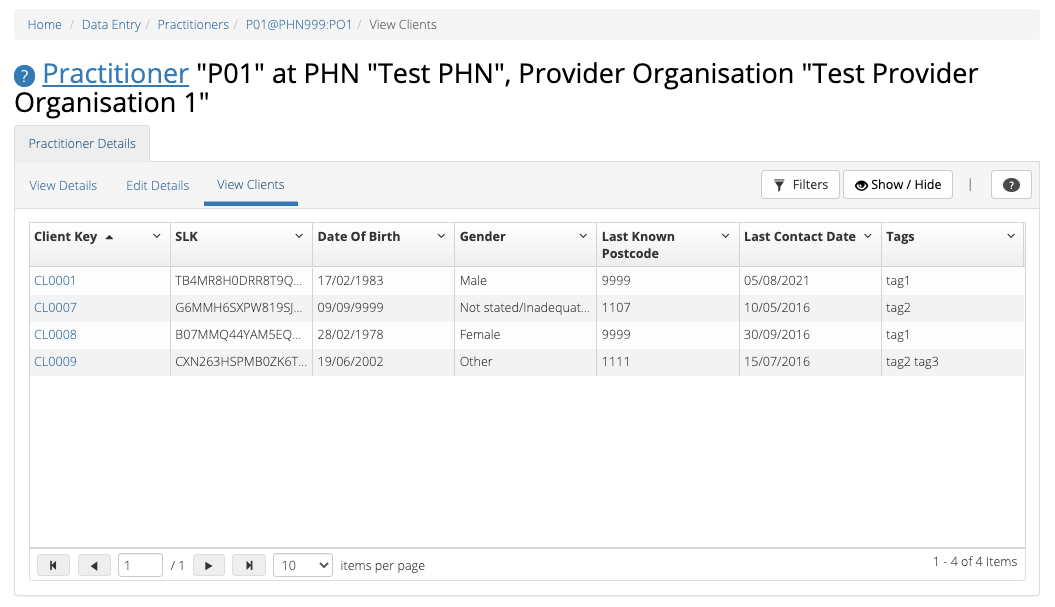
You can change the practitioner from ‘active’ to ‘inactive’ by editing their details.
By doing this, the inactive practitioner keys will no longer be displayed in the
Practitioner Key drop down list displayed on the Service Contact forms.