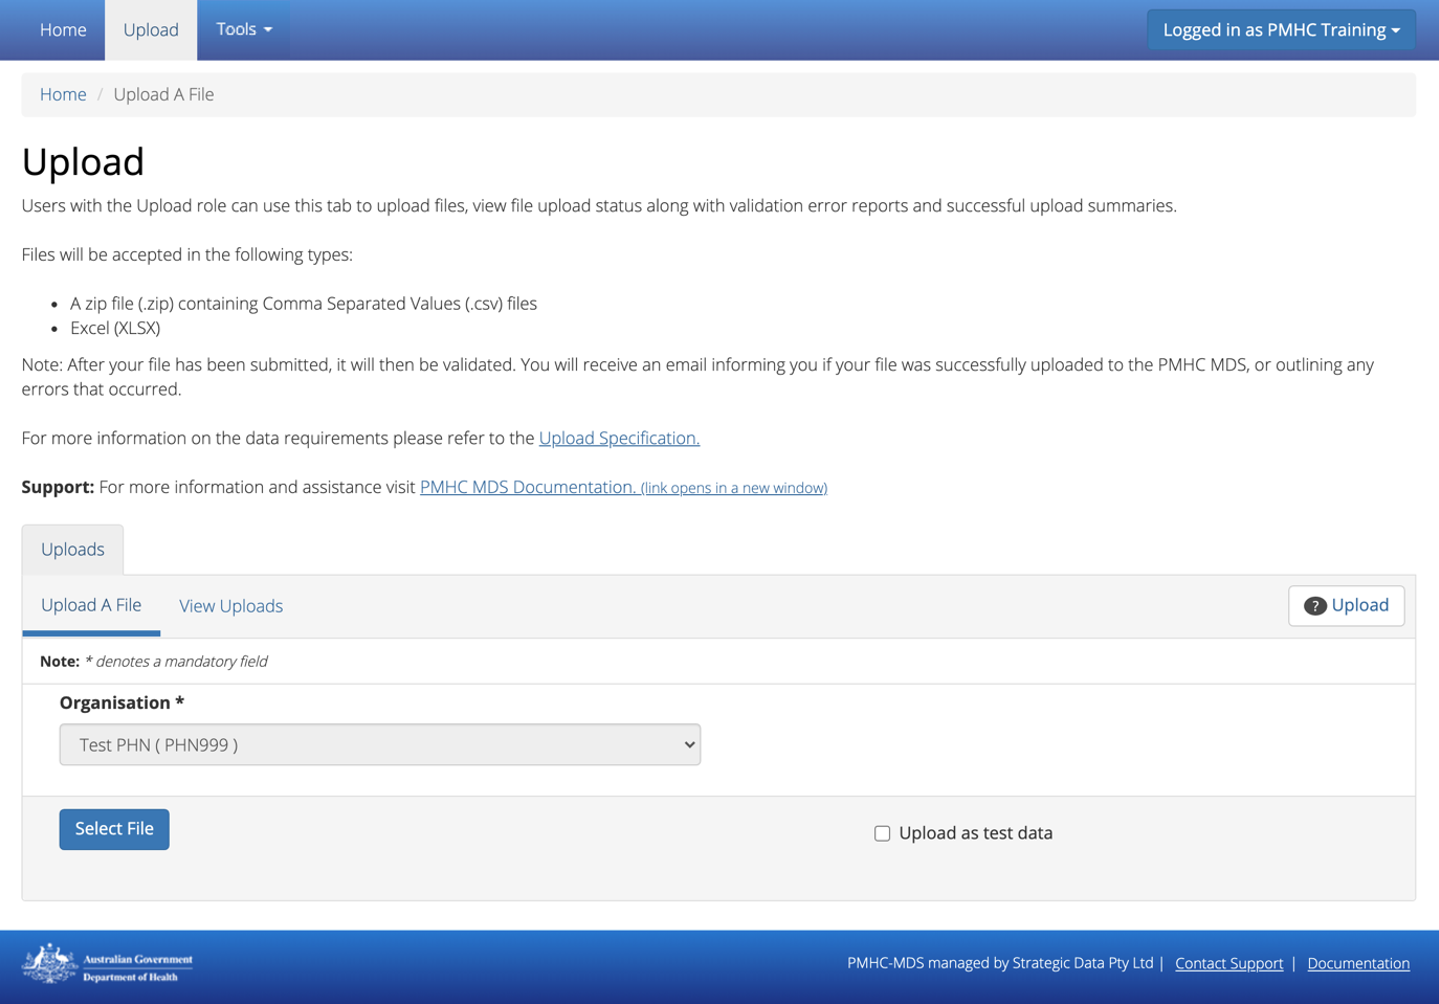
4. Upload
You will only be able to see the Upload tab if you have been assigned the ‘Upload’ role, when logged into the PMHC MDS on https://pmhc-mds.net.
If you don’t have access to the Upload tab and you believe you should, please contact someone in your provider organisation or provider organisation’s PHN who has the ‘User Management’ role.
If you are unsure who has the ‘User Management’ role please email the PMHC helpdesk at support@pmhc-mds.com
After navigating to the Upload tab, you will be presented with a drop down list of the organisations to which you can upload.
4.1. Uploading a file
After navigating to the Upload tab, you will be able to upload data files to organisations for which you have the ‘Upload’ role.
You can upload data files through the upload tab, by following these steps:
Navigate to the Upload tab
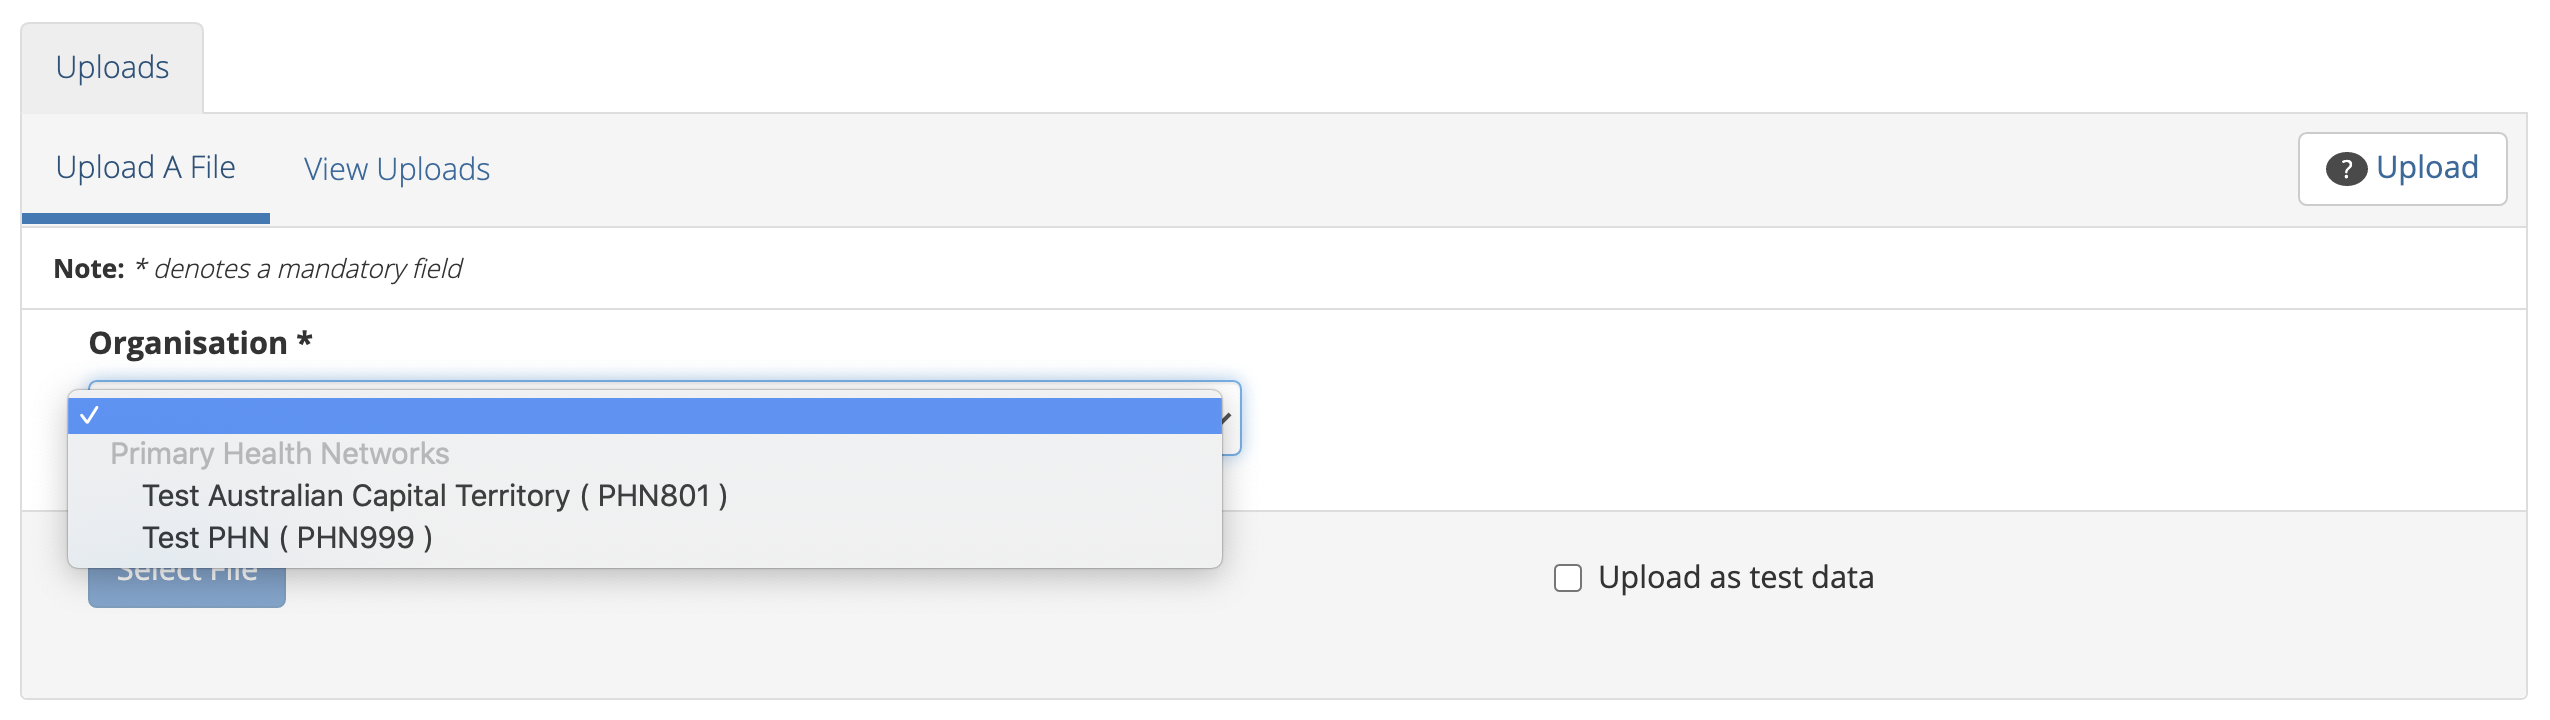
The Primary Health Network (PHN) will be pre-filled in the Organisation field, unless you are allowed to upload to more than one PHN which will allow you to select the PHN whose data you are uploading
Click the blue Select File button
Navigate to where the upload file is saved on your system. Select the file and click the grey Open button
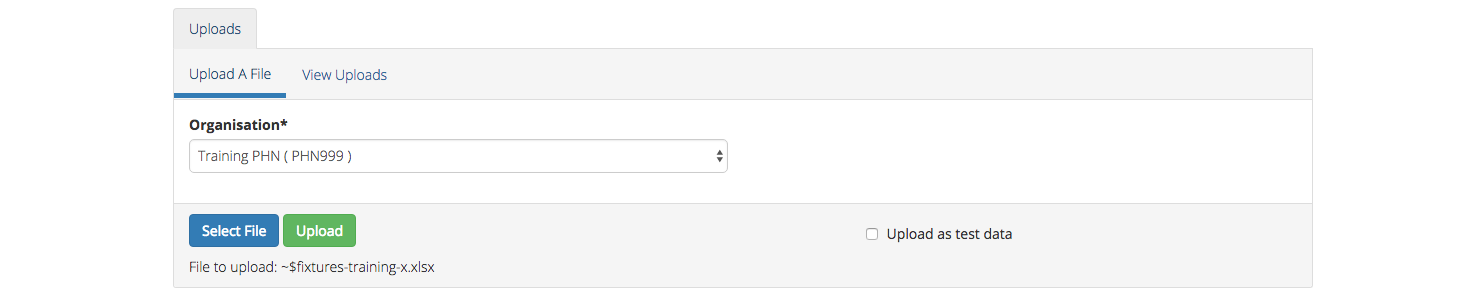
Check to ensure you have selected the correct file by reviewing the file name now displayed below the Select File button
Click the green Upload button
You will receive confirmation that your file has been accepted. The file will now be validated and you will receive a confirmation notification and an email. You can click on the link confirmation notification or open the email to view the upload status, informing you that your file was successfully uploaded to the PMHC MDS, or informing you of any errors that occurred. See Viewing Previous Uploads.
Please email support@pmhc-mds.com if you don’t receive an email within one hour.
Further discussion about the error messages can be found at Error messages.
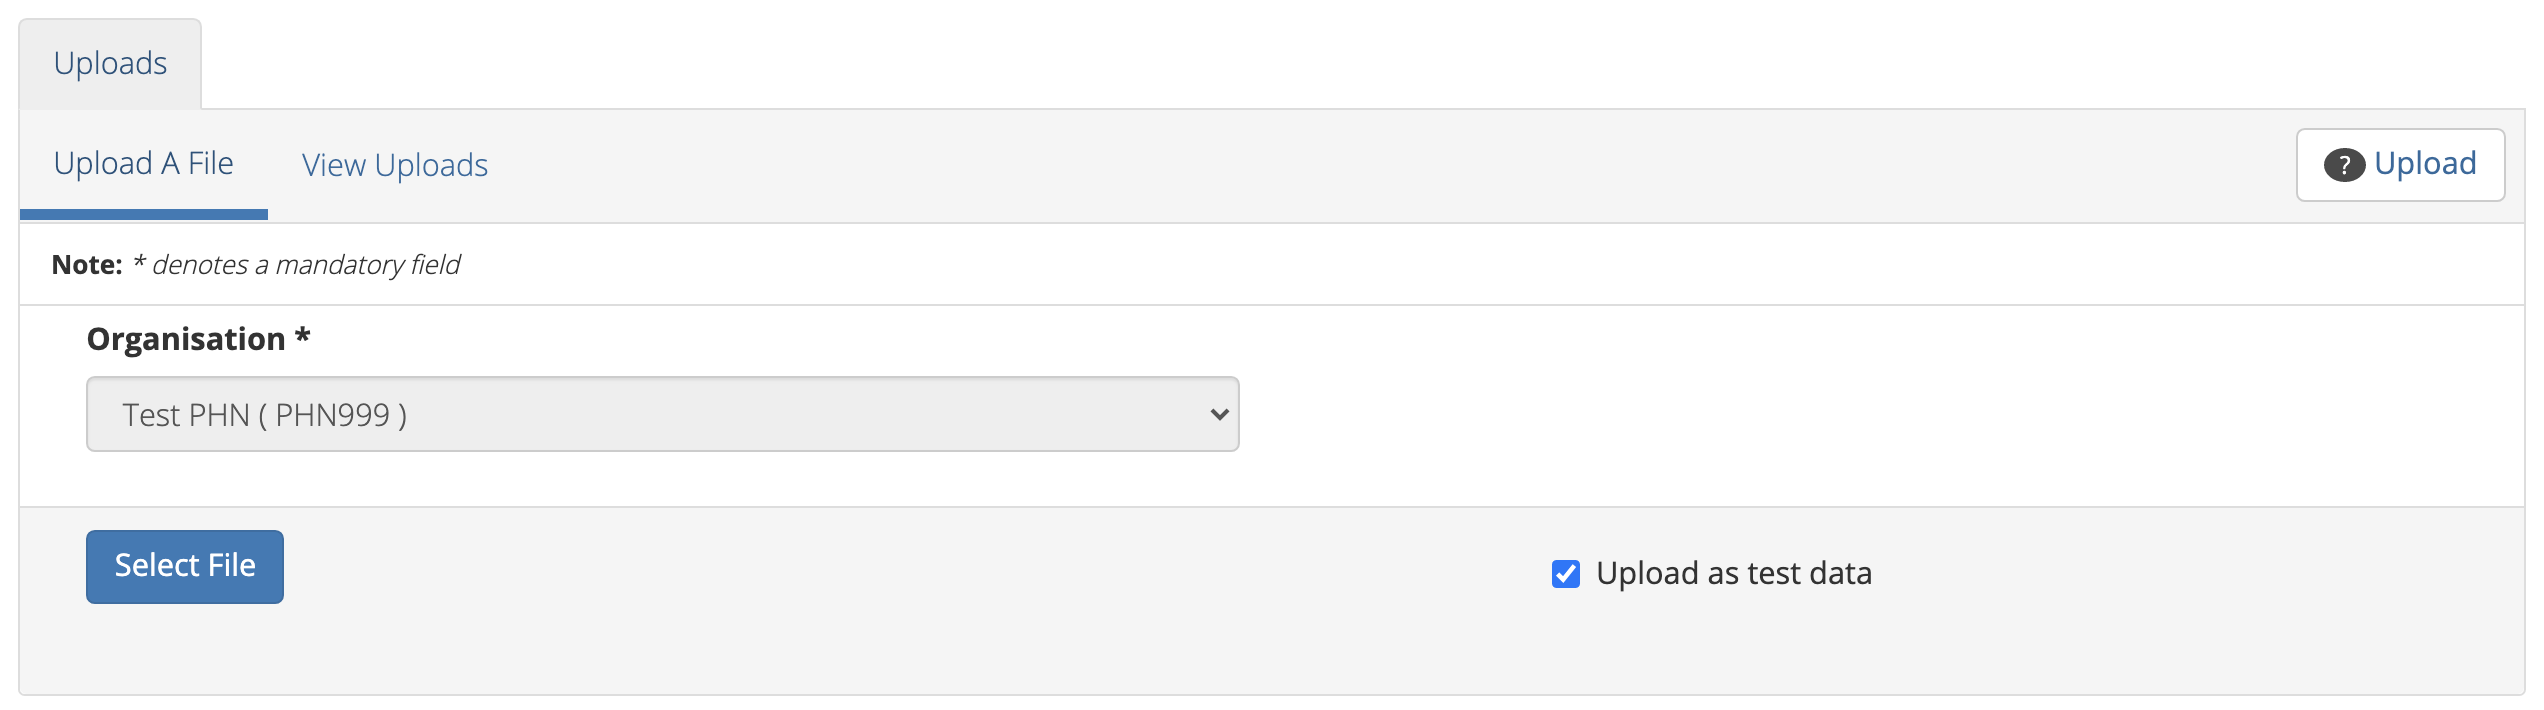
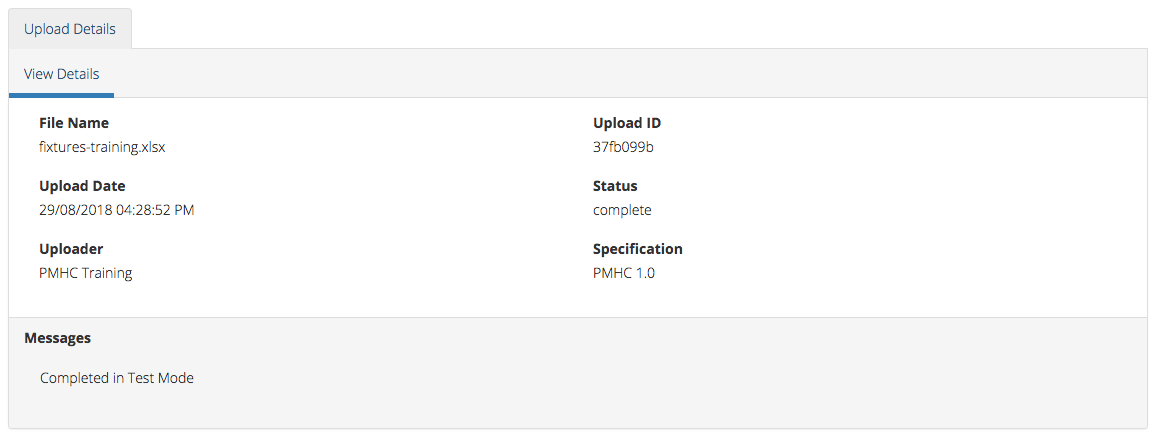
4.2. Uploading a file in Test Mode
A file can be uploaded in Test Mode. When uploading in test mode, the file is validated, however the data is not updated in the PMHC MDS database.
After navigating to the Upload tab, you will be able to upload in Test Mode data files to organisations for which you have the ‘Upload’ role.
You can upload data files in Test Mode through the Upload tab, by following these steps:
Navigate to the Upload tab
If you are allowed to upload to more than one organisation you will be asked to select an organisation name
Select the name of the organisation whose data you are uploading from the drop down list
Click the blue Select File button
Navigate to where the upload file is saved on your system. Select the file and click the grey Open button
Check to ensure you have selected the correct file by reviewing the file name now displayed below the Select File button
Click the Upload as test data checkbox on the right hand side
Click the green Upload button
You will receive confirmation that your file has been accepted. The file will now be validated and you will receive an email informing you if your file was valid, or informing you of any errors that occurred.
Even if your file was valid, the data will not be updated in the PMHC MDS database.
4.3. Viewing Previous Uploads
The PMHC MDS allows you to review previous uploads.
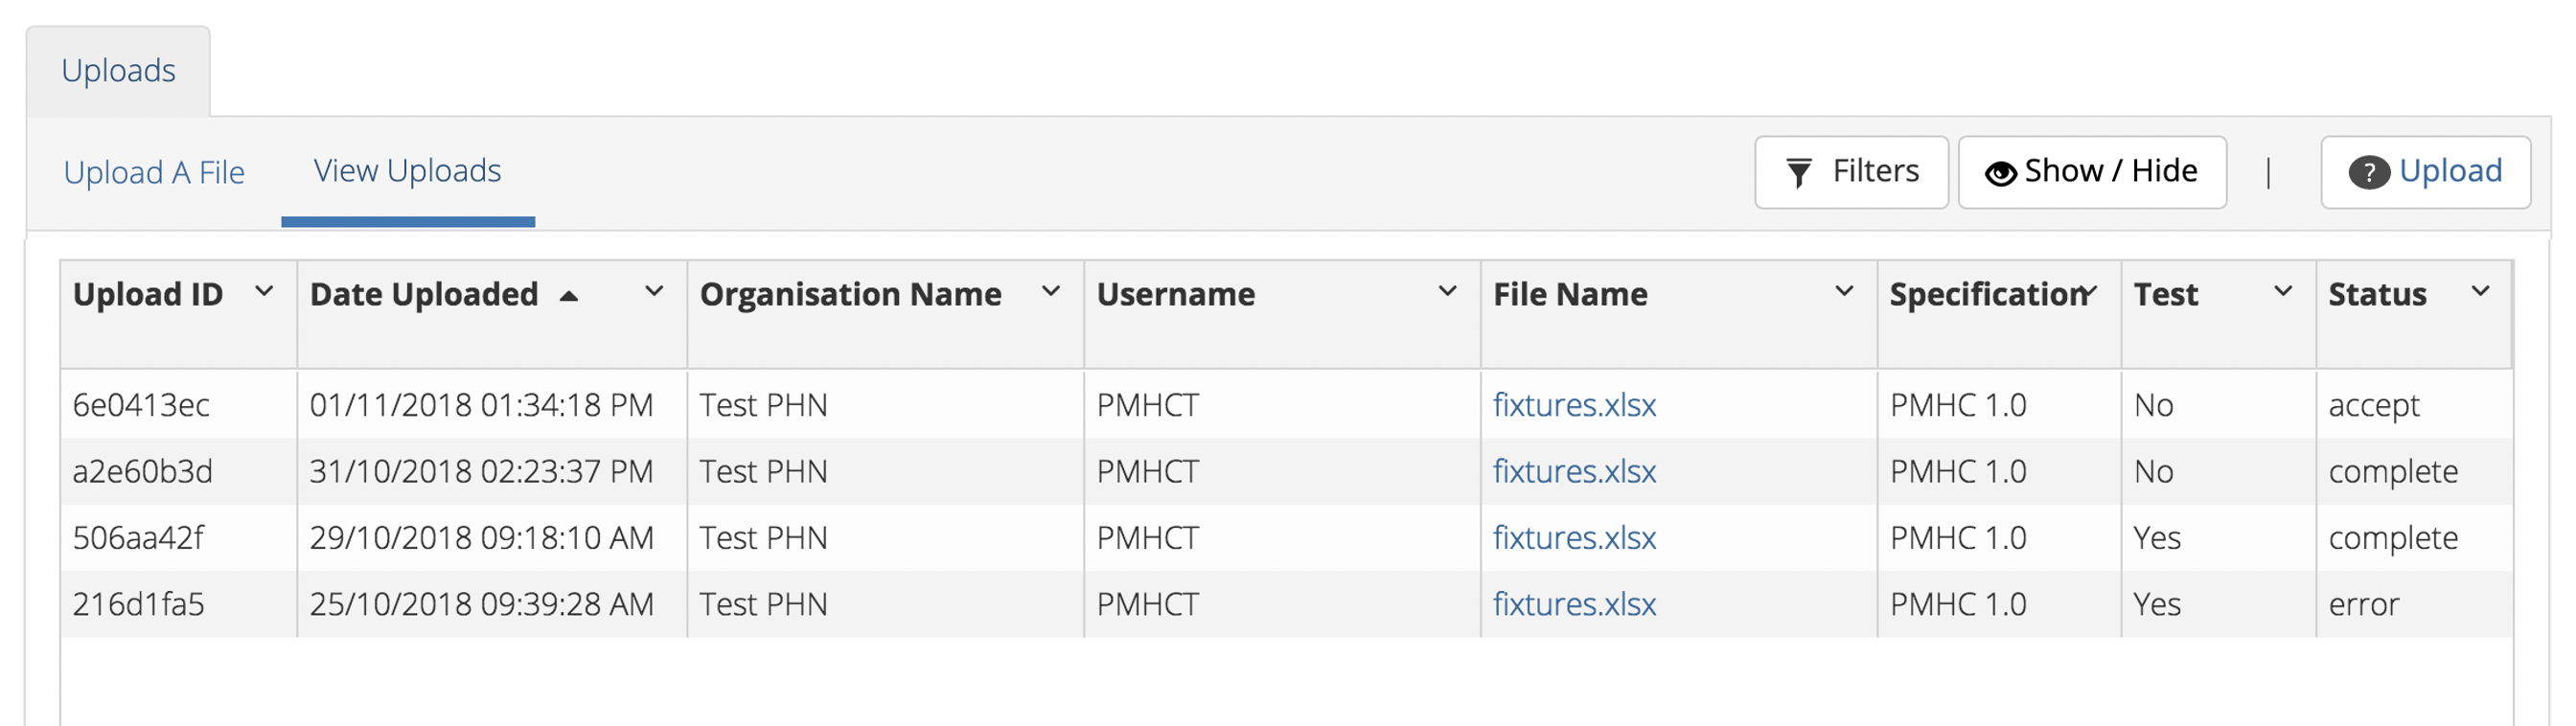
When an upload has been completed, irregardless of whether it validated successfully or not, the upload will be added to the table.
The Status of Previous Uploads table refreshes once files finish the validation process. Types of status results are:
accept - the file is currently going through the validation process
complete - the file has successfully passed the validation process
error - the file has returned errors through the validation process. Please review the error messages and correct the data to upload again
Further discussion about the error messages can be found at Error messages.
4.4. Viewing Upload Details
You can view the results of an upload by following these steps:
Navigate to the Upload tab
Click the Upload Status tab
Locate the date and time of the upload you are interested in
Click on the filename of the relevant upload
You will be shown the Upload Detail page
4.5. Complete uploads
Viewing Upload Details for complete uploads will display data verification information by listing the number of data records present and if those records are added, updated, or deleted, within the MDS records.

4.6. Error messages
If the status of your file shows error, you can view the returned errors through Viewing Previous Uploads.
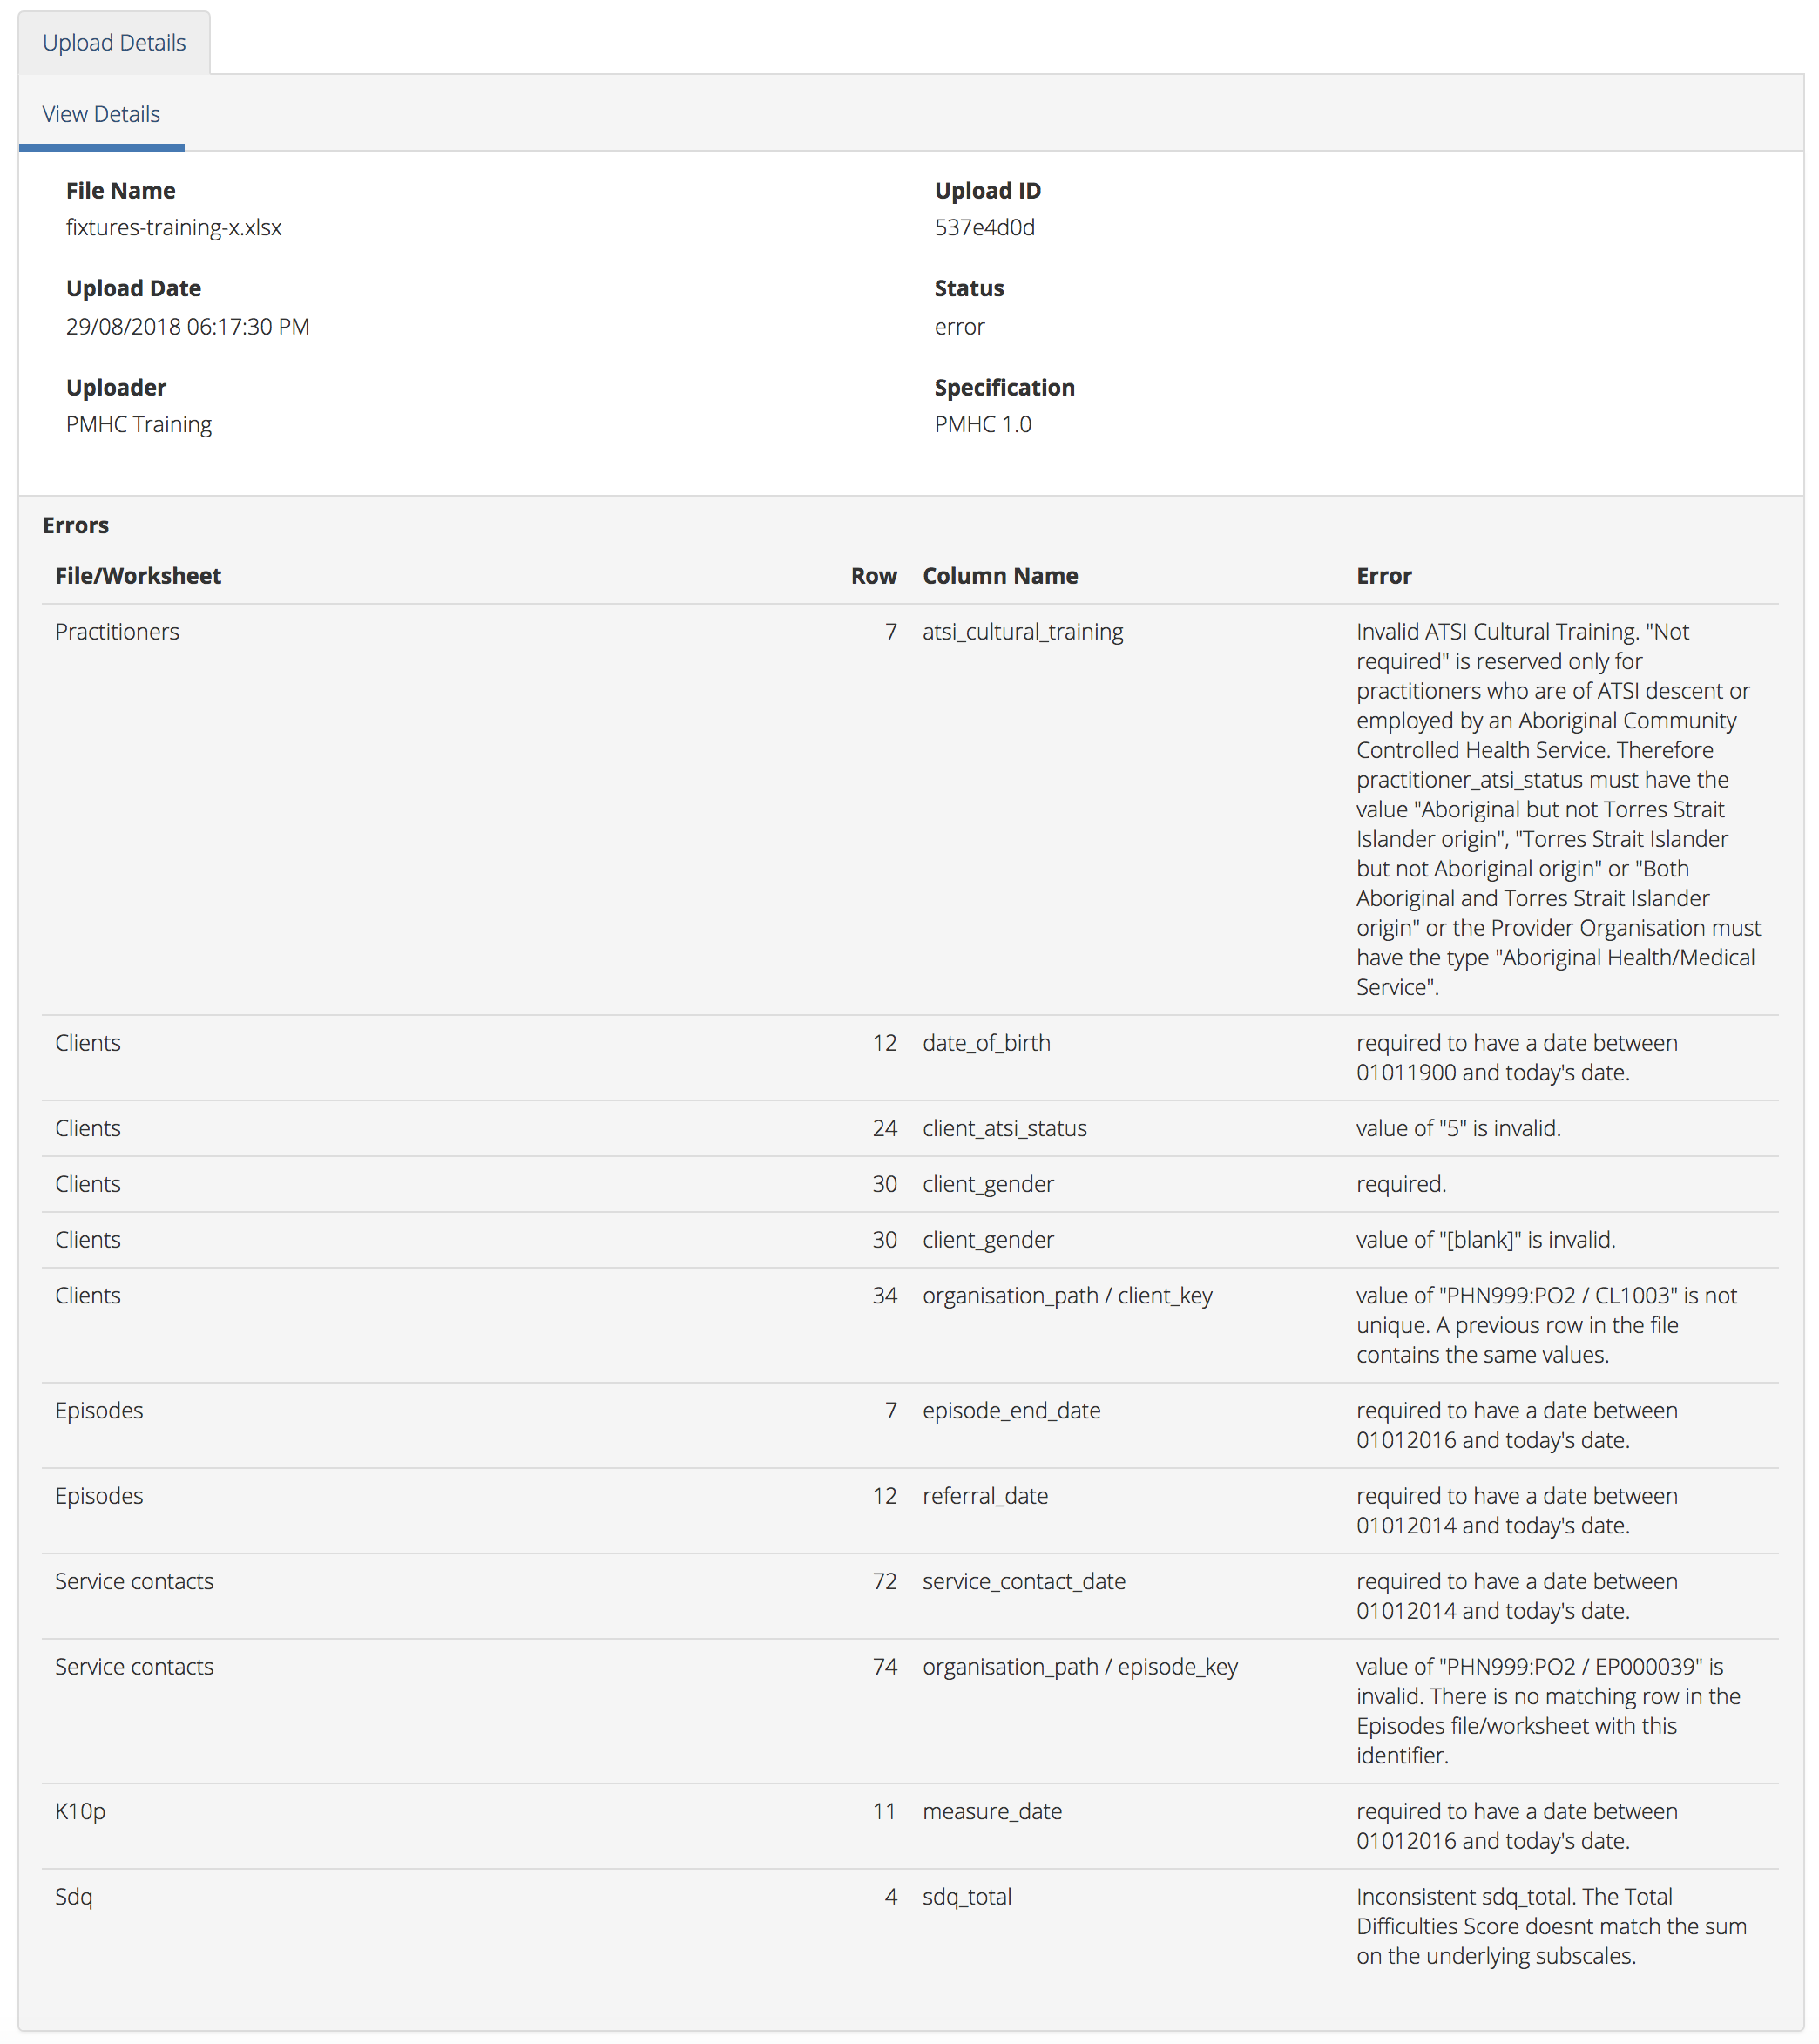
4.7. Correcting upload errors
Any data errors will need to be corrected in your internal system and a new upload file created. Or if you manually record data on the upload file, you can edit the data records directly on the file.
The definition of each data item has associated notes that will provide guidance on why an error is returned. By visiting the data specifications documentation and clicking on the Record formats field name this will take you to the field definition which outlines the associated notes.
In the Frequently Asked Questions guide there are questions about some of the common and unusual upload error messages. These answers contain information on what you can do to fix the error. See - Uploading Data FAQs.
If you require assistance in understanding an error message, please email support@pmhc-mds.com.
4.8. Deletion of data via an upload file
All data except for Organisation records can be deleted through an upload file. Further details on how to create a deletion file is available in the online specifications. See: Delete upload file format.