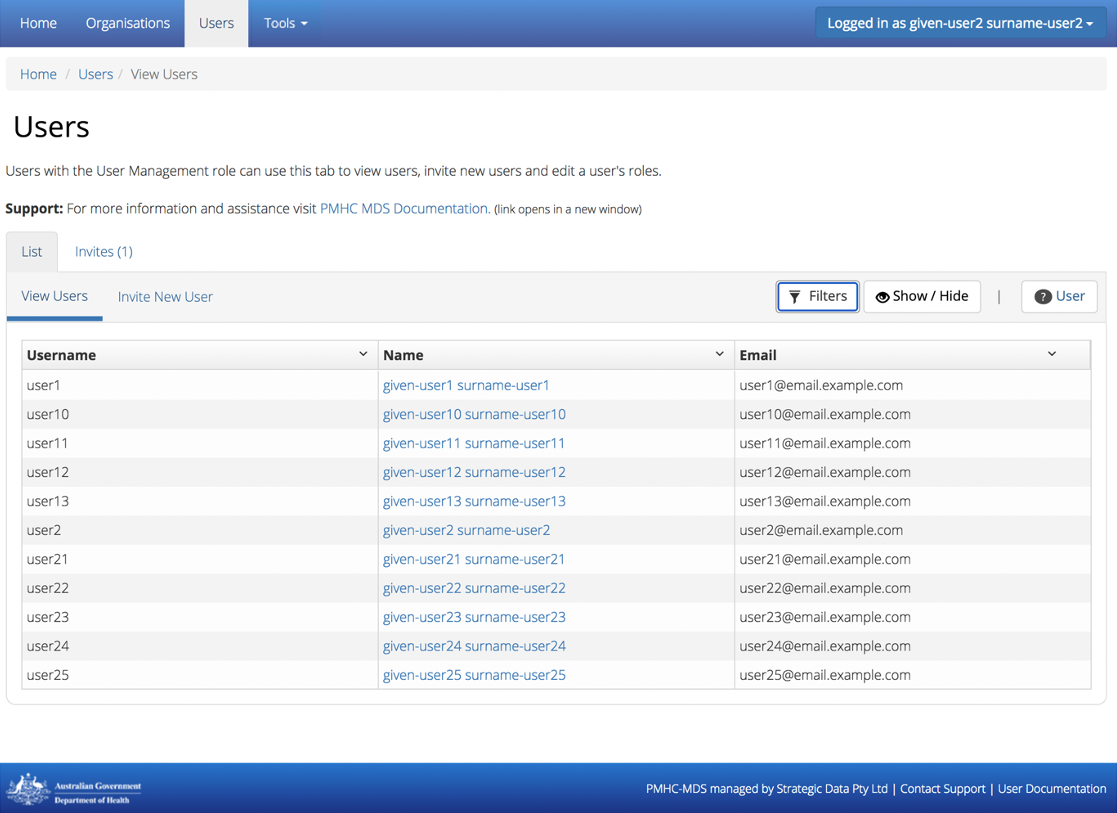
You will only be able to see the Users tab if you have been assigned
the ‘User Management’ role, when logged into the PMHC MDS on https://pmhc-mds.net.
If you don’t have access to the Users tab and you believe you should, please
contact someone in your provider organisation or provider organisation’s PHN
who has the ‘User Management’ role.
If you are unsure who has the ‘User Management’ role please email the
PMHC Helpdesk at support@pmhc-mds.com
After navigating to the Users tab, you will be presented with a list of the
users that are assigned to the organisations for which you have the
‘User Management’ role.
Access to the PMHC MDS is based around roles. The following table provides a summary of each of
the roles that currently exist within the PMHC MDS:
Role
Tasks allowed
Organisation Management
A user with the Organisation Management role for a PHN can manage provider organisations for that PHN.
User Management
A user with the User Management role for an organisation can manage user accounts for that associated organisation.
Upload
A user with the Upload role can upload data to the associated organisation.
Reporting
A user with the Reporting role can run reports and also download data from the associated organisation.
Aggregate Reporting
A user with the Aggregate Reporting role can run reports from the associated organisation.
Data Entry
A user with the Data Entry role can enter client data and practitioners from the associated organisation.
Service Feedback
A user with the Service Feedback role can run completed episodes report and generate invitations for YES-PHN survey.
Each role allows a user to perform specific tasks. A user can have more than one role.
Each role is granted for a user against an organisation. An organisation can
either be a Primary Health Network or a provider organisation. If a user is granted
a role for a Primary Health Network (PHN) they will also have this role for any
provider organisations of that PHN. A user can be invited to have a role at more
than one organisations. There is no limit to the number of users per organisation.
What users see after they have logged in will depend upon the roles that have been
assigned. The table below lists the tabs that will be shown for each role:
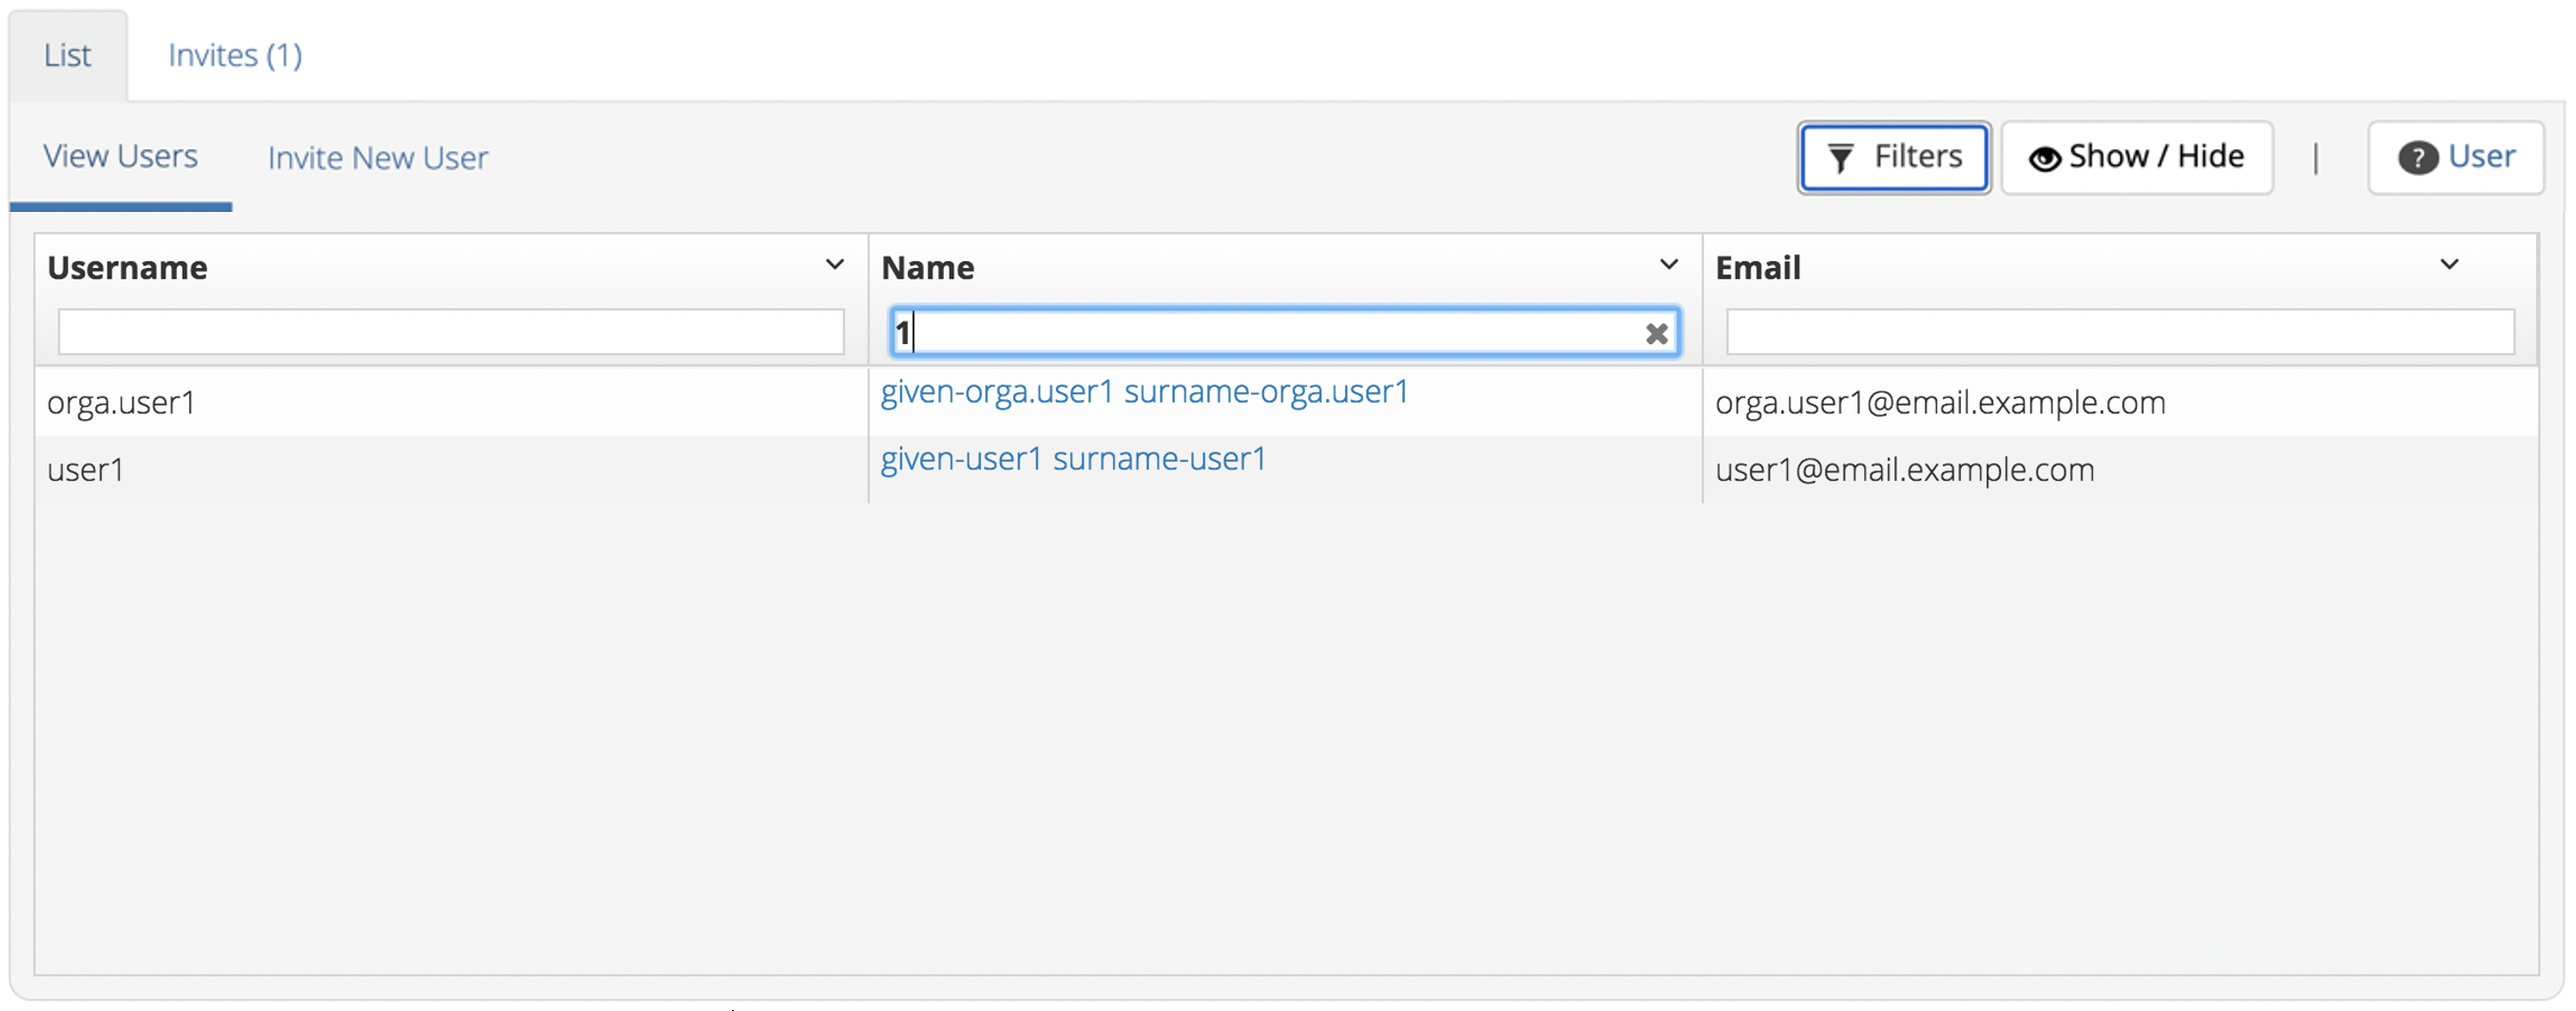
You can sort and filter the listed users through the Users tab.
Please note: Newly invited users will not be visible until they have successfully
accepted their invitation.
Sort the listed users by simply clicking on the column header. Alternately
you can click on the arrow beside a column header for more sort options, as follows:
Sort Ascending
Sort Descending
Remove Sort
Hide Column
To filter the listed users:
Click the grey Filters button
Start typing in an edit box now displayed under the column headers
To remove the filter, click the grey cross within the edit box beside any
entered text
Note: PHNs can devolve ‘user management’ authority to one or more users in a
provider organisation so that the provider organisation can manage their own
logins, or a PHN can choose to keep user management authority at the level of
the PHN requiring each provider organisation to contact the PHN when they need
a new user added.
Each individual staff member should be set up with their own unique login access.
Generic login accounts are not encouraged to be set up and used within the PMHC MDS,
and usernames / passwords should not be shared with other individuals. This process
ensures that when a staff member leaves, their access can be easily disabled and
it doesn’t affect other users or the security of the organisation’s data. A user’s
account, should not be passed from one staff member to the next.
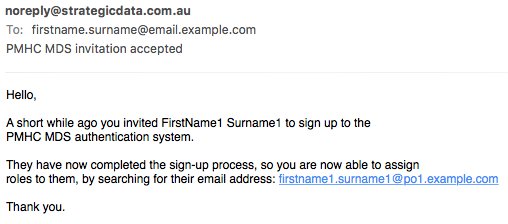
You will receive confirmation that the user has been sent an email to invite
them to the PMHC MDS. The user will need to follow the instructions in the
email before they can gain access to the system. See Accepting an invitation to become a PMHC MDS User
This invitation will be valid for 7 days. Invitations are listed in the View Invitations table.
When the user has accepted the invitation you will be sent an email to let you know.
This user will then be listed in the View Users table
Please note: An invitation for a new user is valid for **7 days*. If you receive an error that a previous invitation already exists for a user, you can either reissue or revoke the invitation. See Viewing a user’s invitation details.
Before adding an existing user please ensure you have the same email as their
current PMHC MDS Profile. By ensuring these are identical, the system will
automatically pick up if a user already exists in the PMHC MDS.
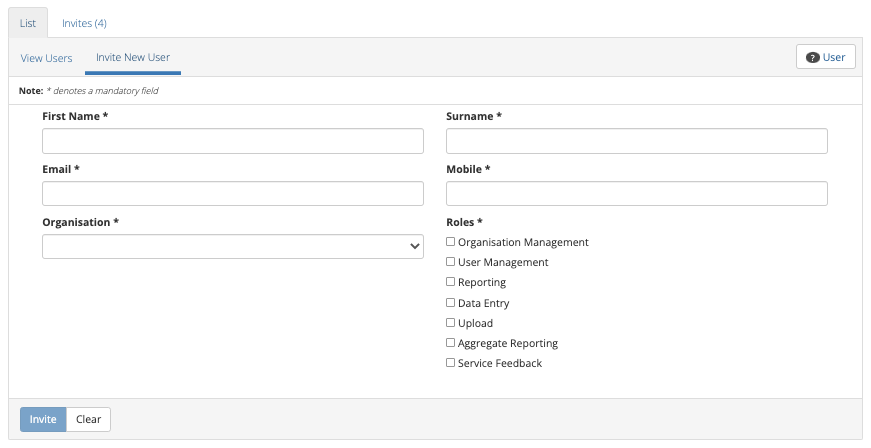
You can invite an existing user through the Users tab, by following these steps:
Navigate to the Users tab
Click the Invite New User tab
Complete all the mandatory fields marked with an * in the Invite User form, ensuring these are the same details as their existing PMHC MDS Profile
Select an organisation and assign their Users Roles
Click the blue Invite button
You will receive confirmation that the roles have been added to the existing user
Please note: The user will receive notification that they have been granted these additional roles at the relevant organisation.
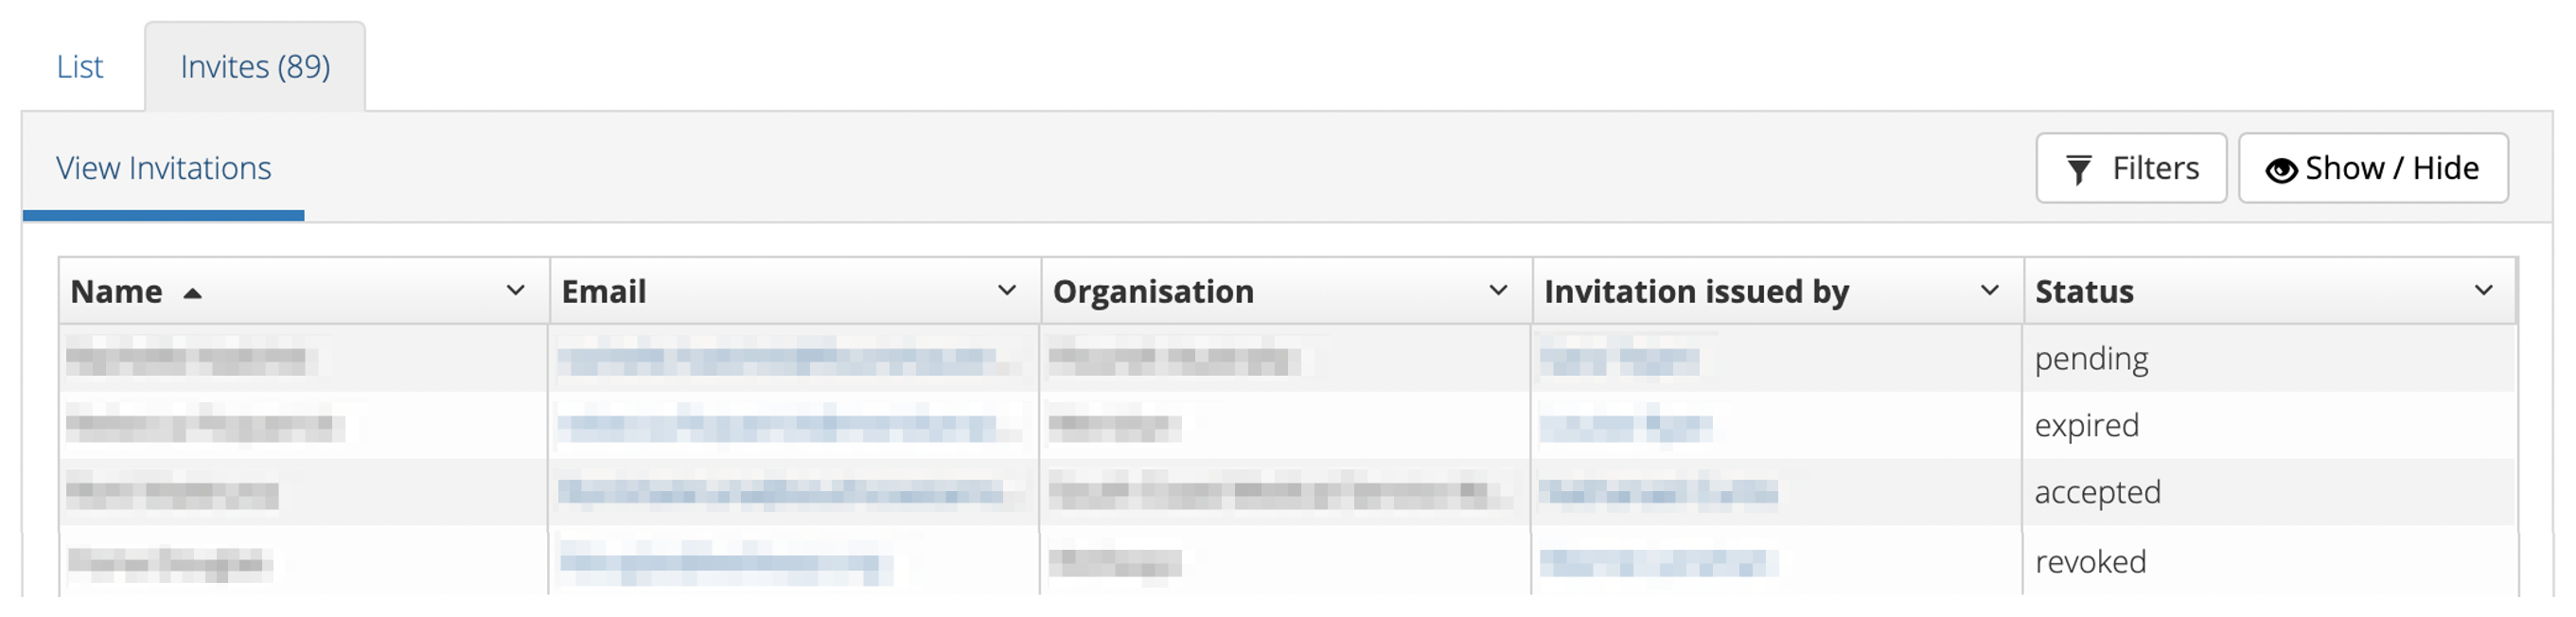
You can view user invitation details through the Users tab, by following these steps:
Navigate to the Users tab
Click on the Invites tab
A table will display a list of users that have been sent a recent invitation. These are either:
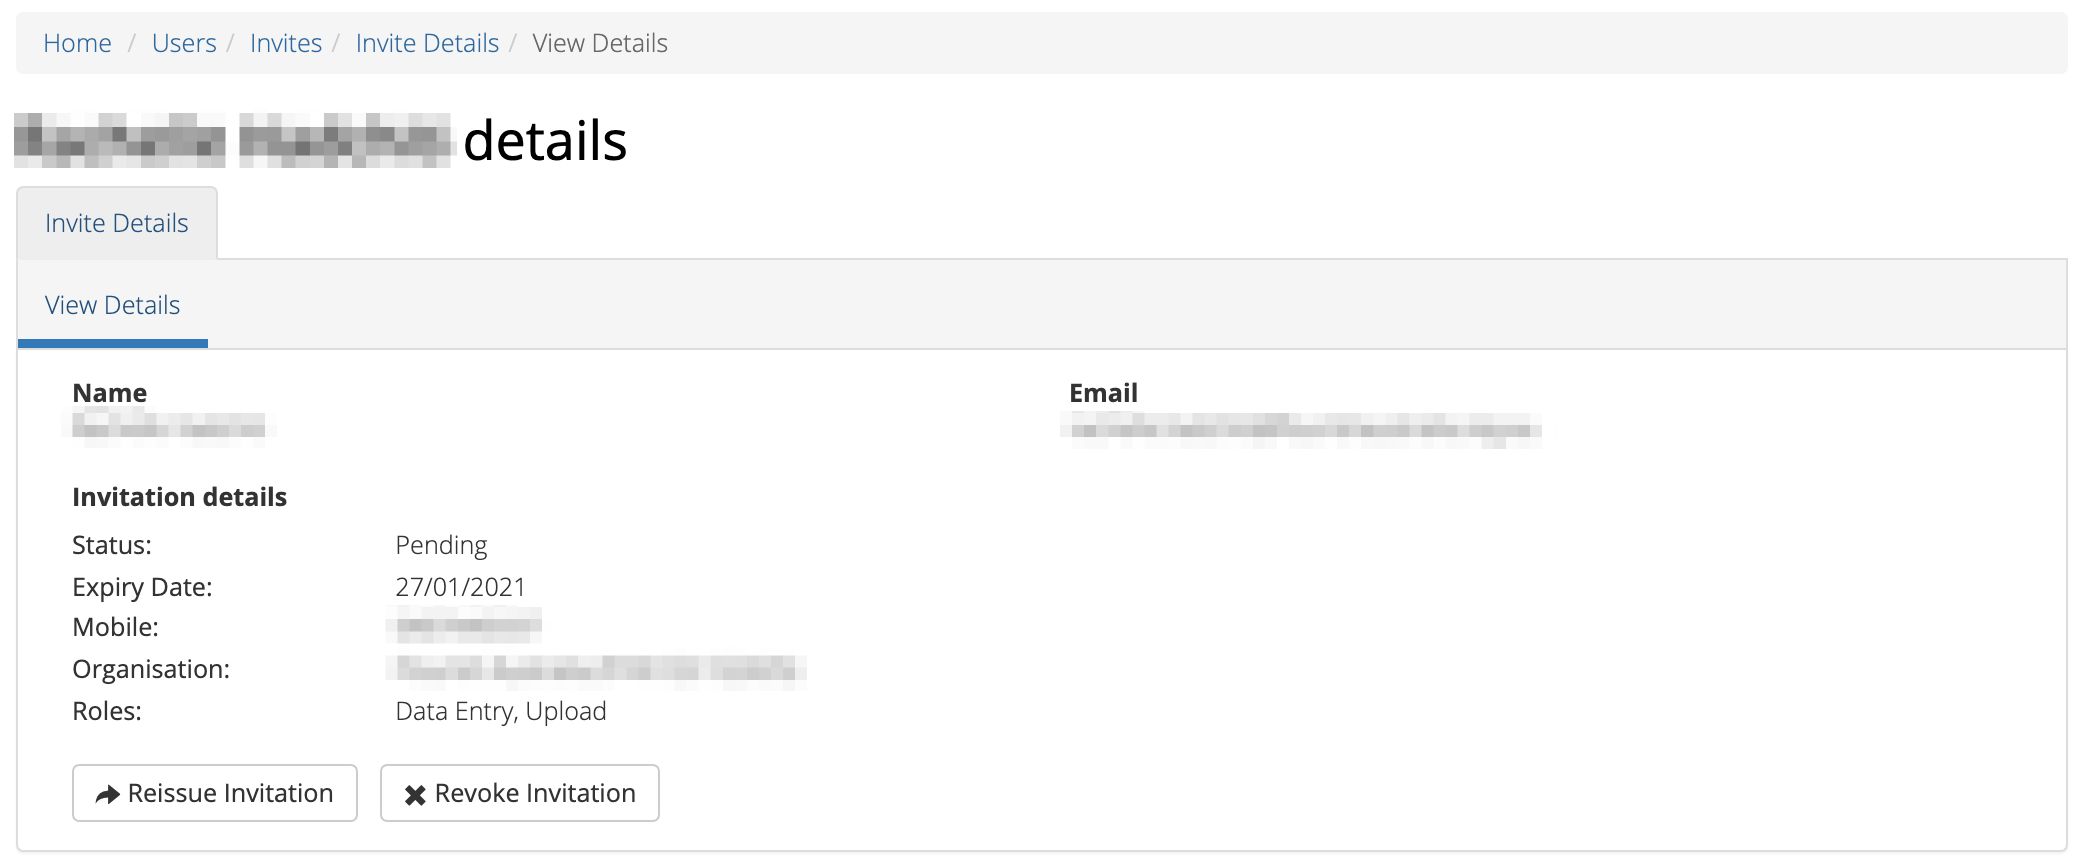
Pending - these are active invitations which have not been accepted yet
Revoked - these were active invitations which were revoked
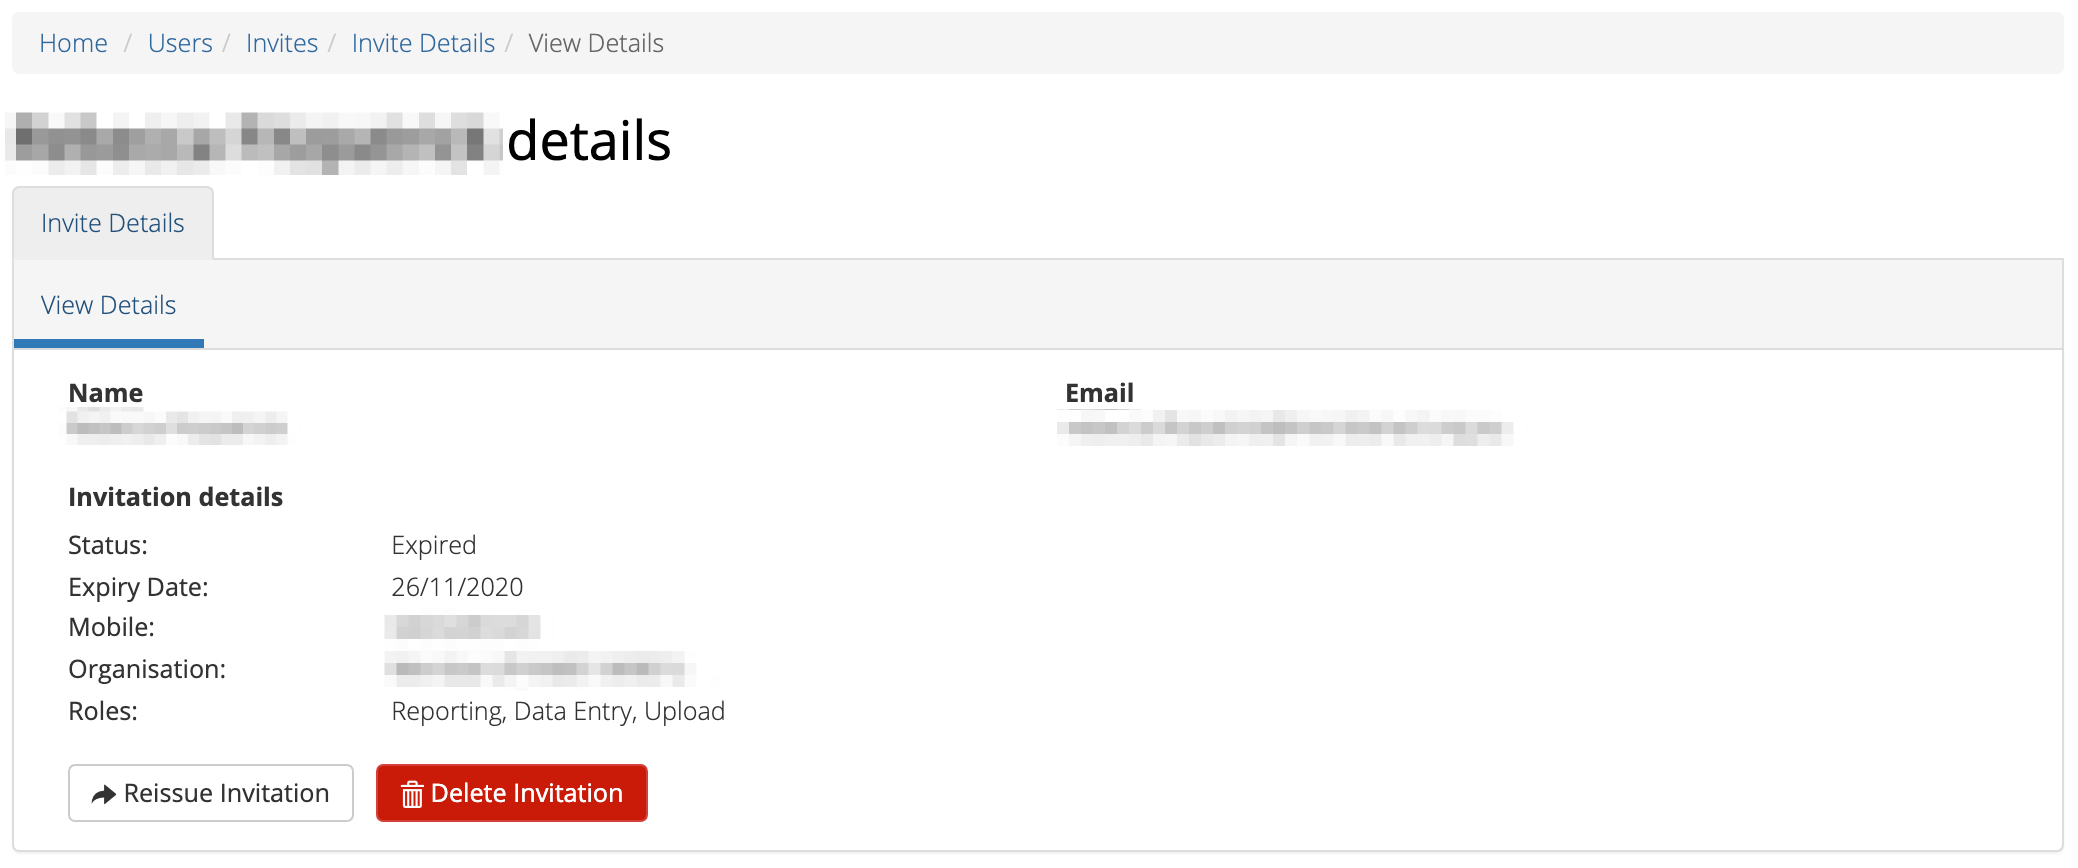
Expired - these are inactive invitations which were not accepted within 7 days
Accepted - these are invitations that have been successfully accepted and the user will be listed in the Users tab
Please note: Deleted invitations will not be display the in the View Invitations tab.Please note: Invitations sent prior to this feature launch on 29 April 2020 will not display the Organisation and Inviters details.
You can reissue a pending or expired invitation through the Users tab, by following these steps:
Navigate to the Users tab
Click on the Invites tab
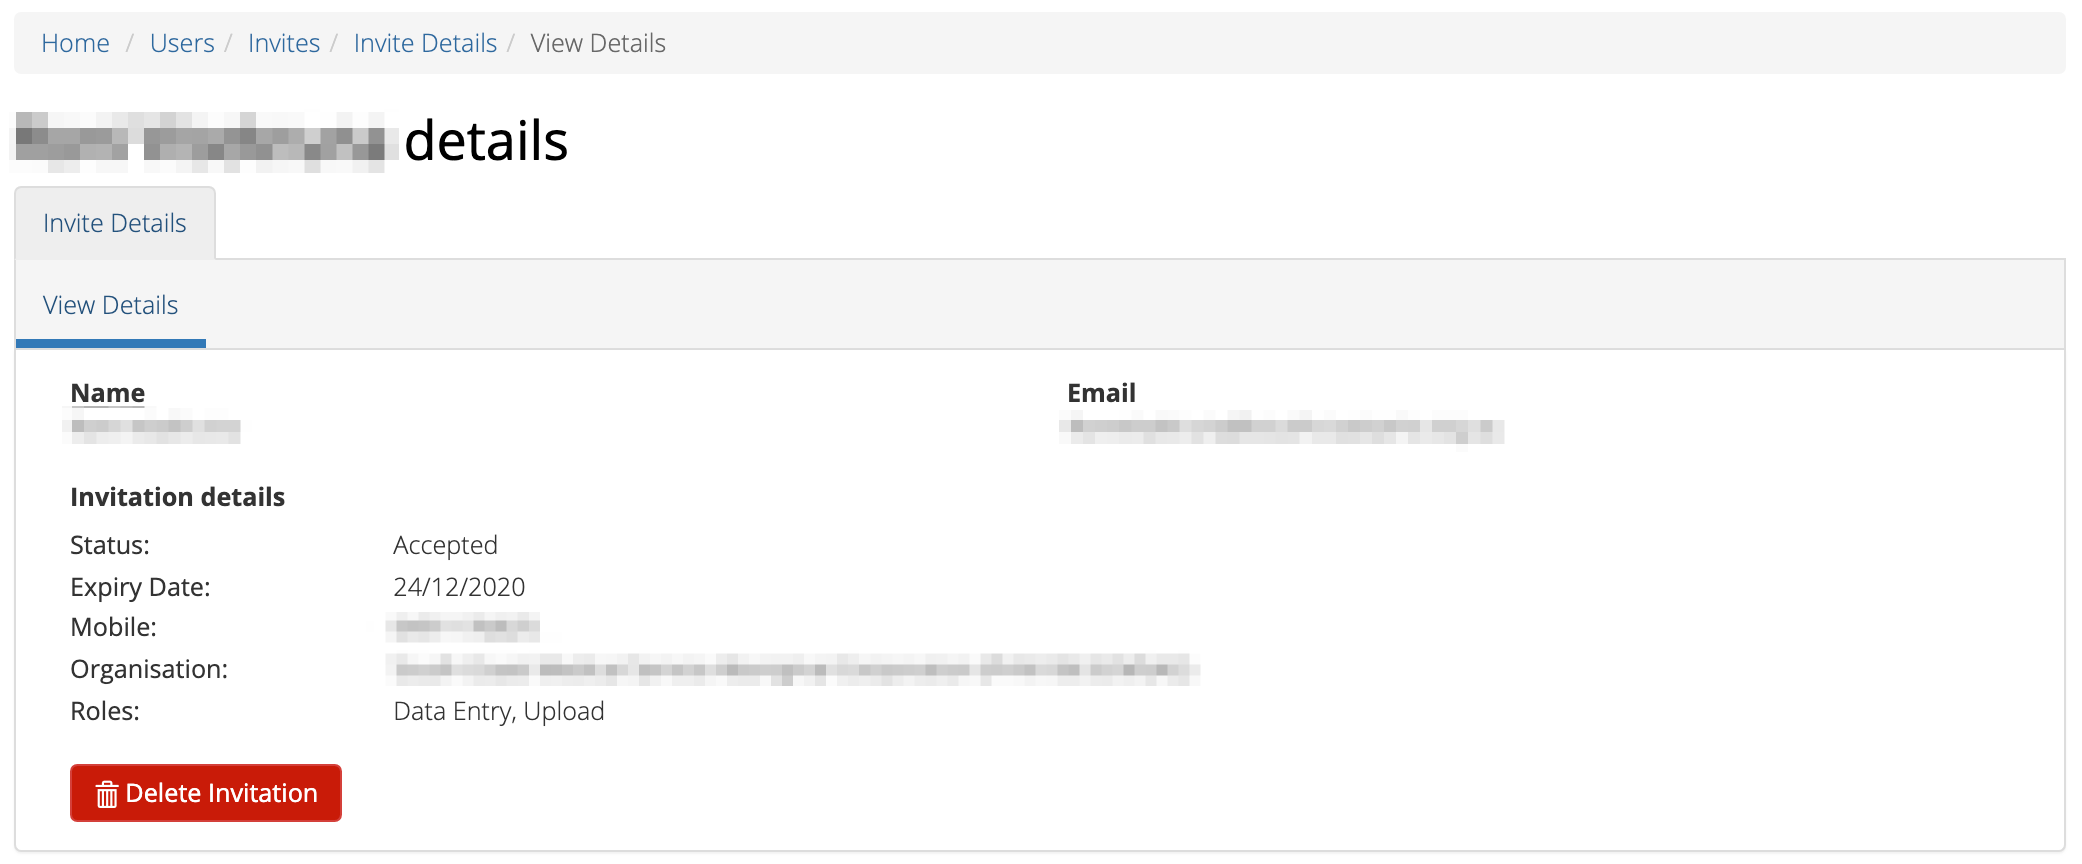
Click on the user’s email in blue displayed within the table
Review all details are correct
Click the ‘Reissue Invitation’ button to resend the invitation using the same details
Click the Reissue’ button to resend the email invitation details. (or click the ‘Cancel’ button if you decide not to reissue this invite)
Please note: If any of the details are incorrect on the previous invite,
you will need to remove the invitation before being able to send a new invite. See: Revoke a pending invitation.
A pending invitation is an active invitation which has not been accepted yet.
The user has seven days to accept an invitation.
When a pending invitation is revoked, this will inactivate the invite so that
the user will no longer be able to accept the invite. You may need to inactivate
an invitation if the invitee’s details have been incorrectly entered, or if the
user should no longer be granted access.
You can revoke a user’s invitation through the Users tab, by following these steps:
Navigate to the Users tab
Click on the Invites tab
Click on the user’s email in blue displayed within the table
Click Revoke Invitation to inactivate the pending invite.
Click ‘Revoke’ to confirm that you are sure. (or click the ‘Cancel’ button
if you decide not to revoke this invite)
Please note: Once a previous pending invitation has been revoked, you will
then be able to send a new invitation to the user.
An expired invitation is an inactive invitation which was not accepted within
seven days of being issued. If you don’t intend to reissue the expired
invitation, you can delete an expired invitation to remove this invitation from the list.
Accepted invitations will also be shown in the ‘invitation’ tab. You can also
delete an accepted invitation to manually remove the accepted invite from this list.
You can delete a user’s invitation through the Users tab, by following these steps:
Navigate to the Users tab
Click on the Invites tab
Click on the user’s email in blue displayed within the table
Click Delete Invitation to inactivate the pending invite.
Click ‘Revoke’ to confirm that you are sure. (or click the ‘Cancel’ button if you decide not to revoke this invite)
A user can have more than one role. Each role is granted for a user against the
appropriate organisation.
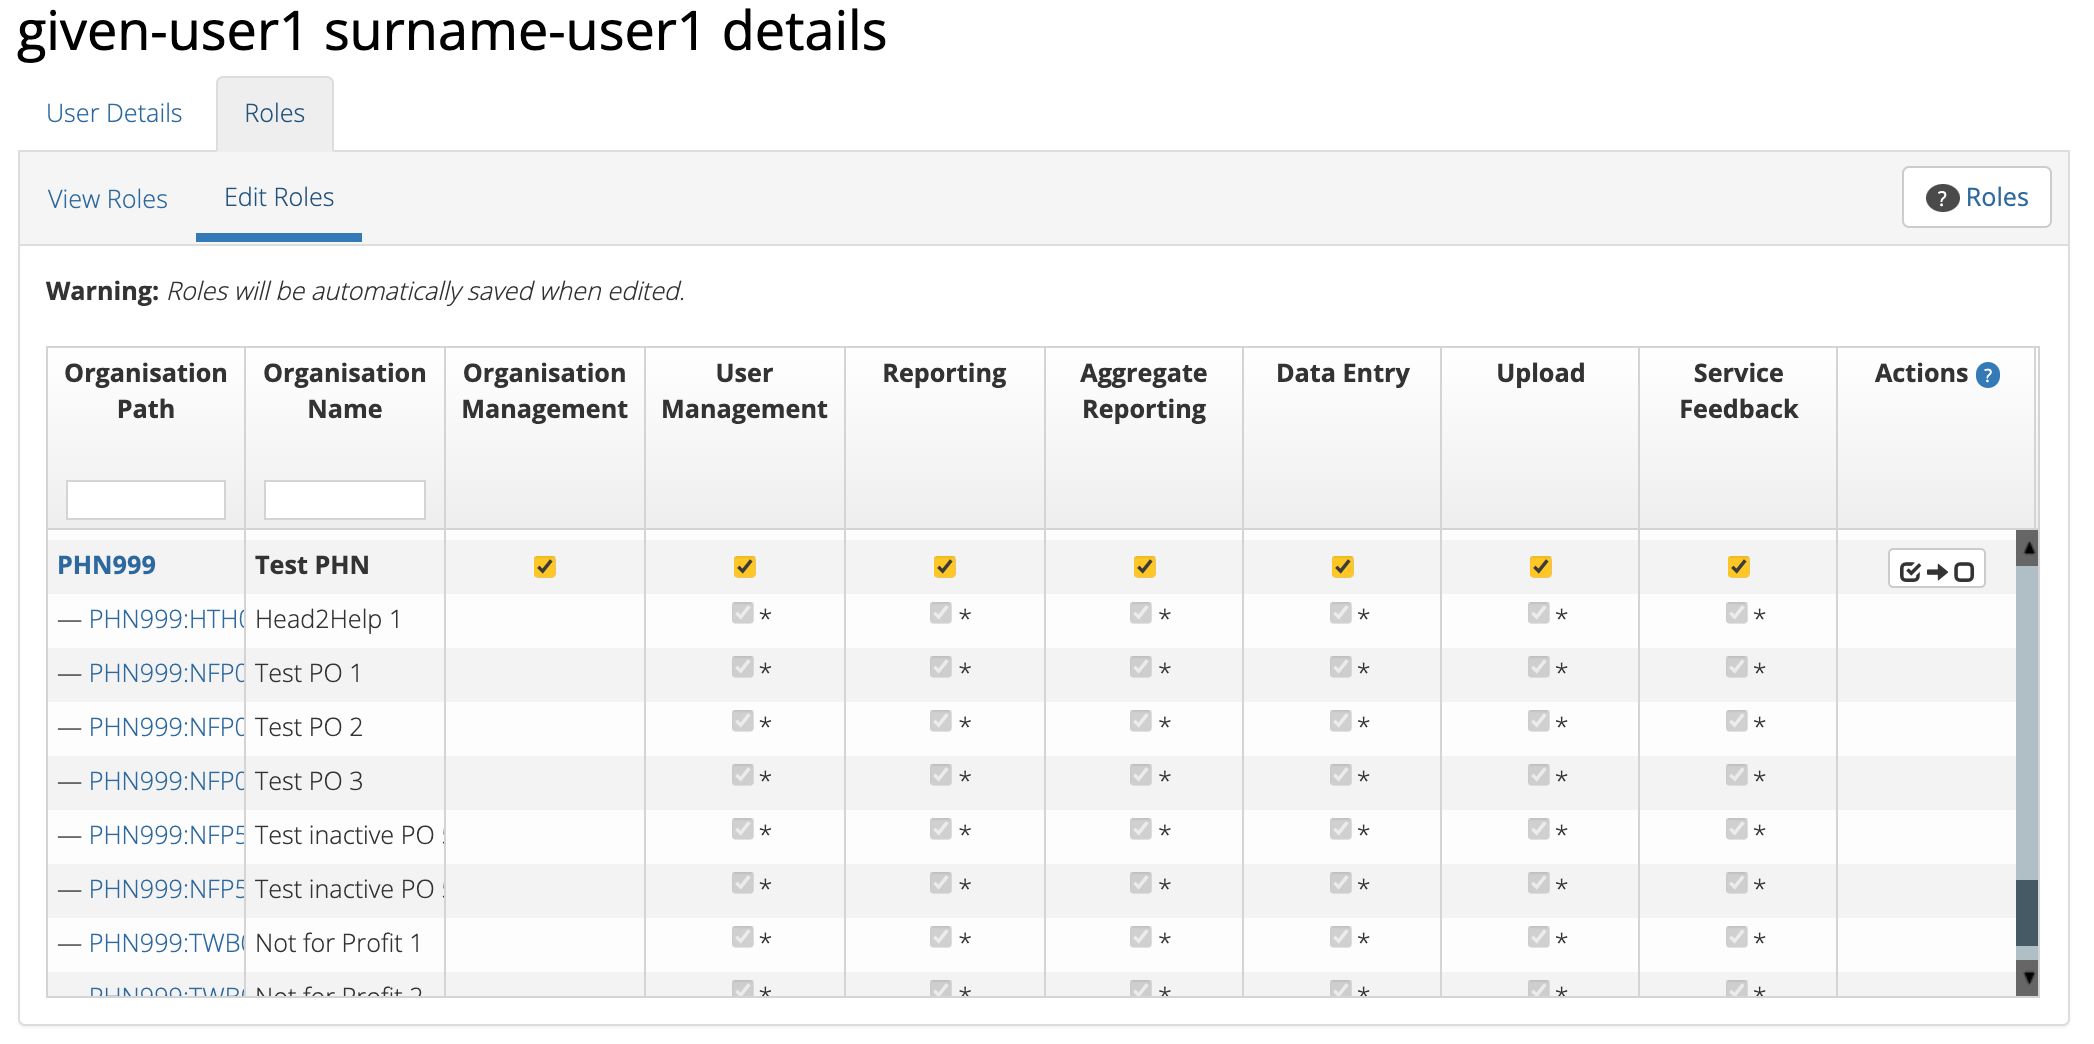
You can edit and assign extra roles to an existing user by following these steps:
Navigate to the Users tab
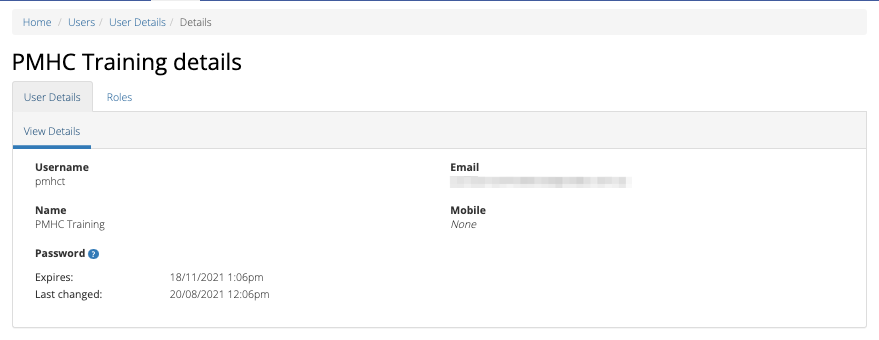
Click the user’s name in blue displayed within the table
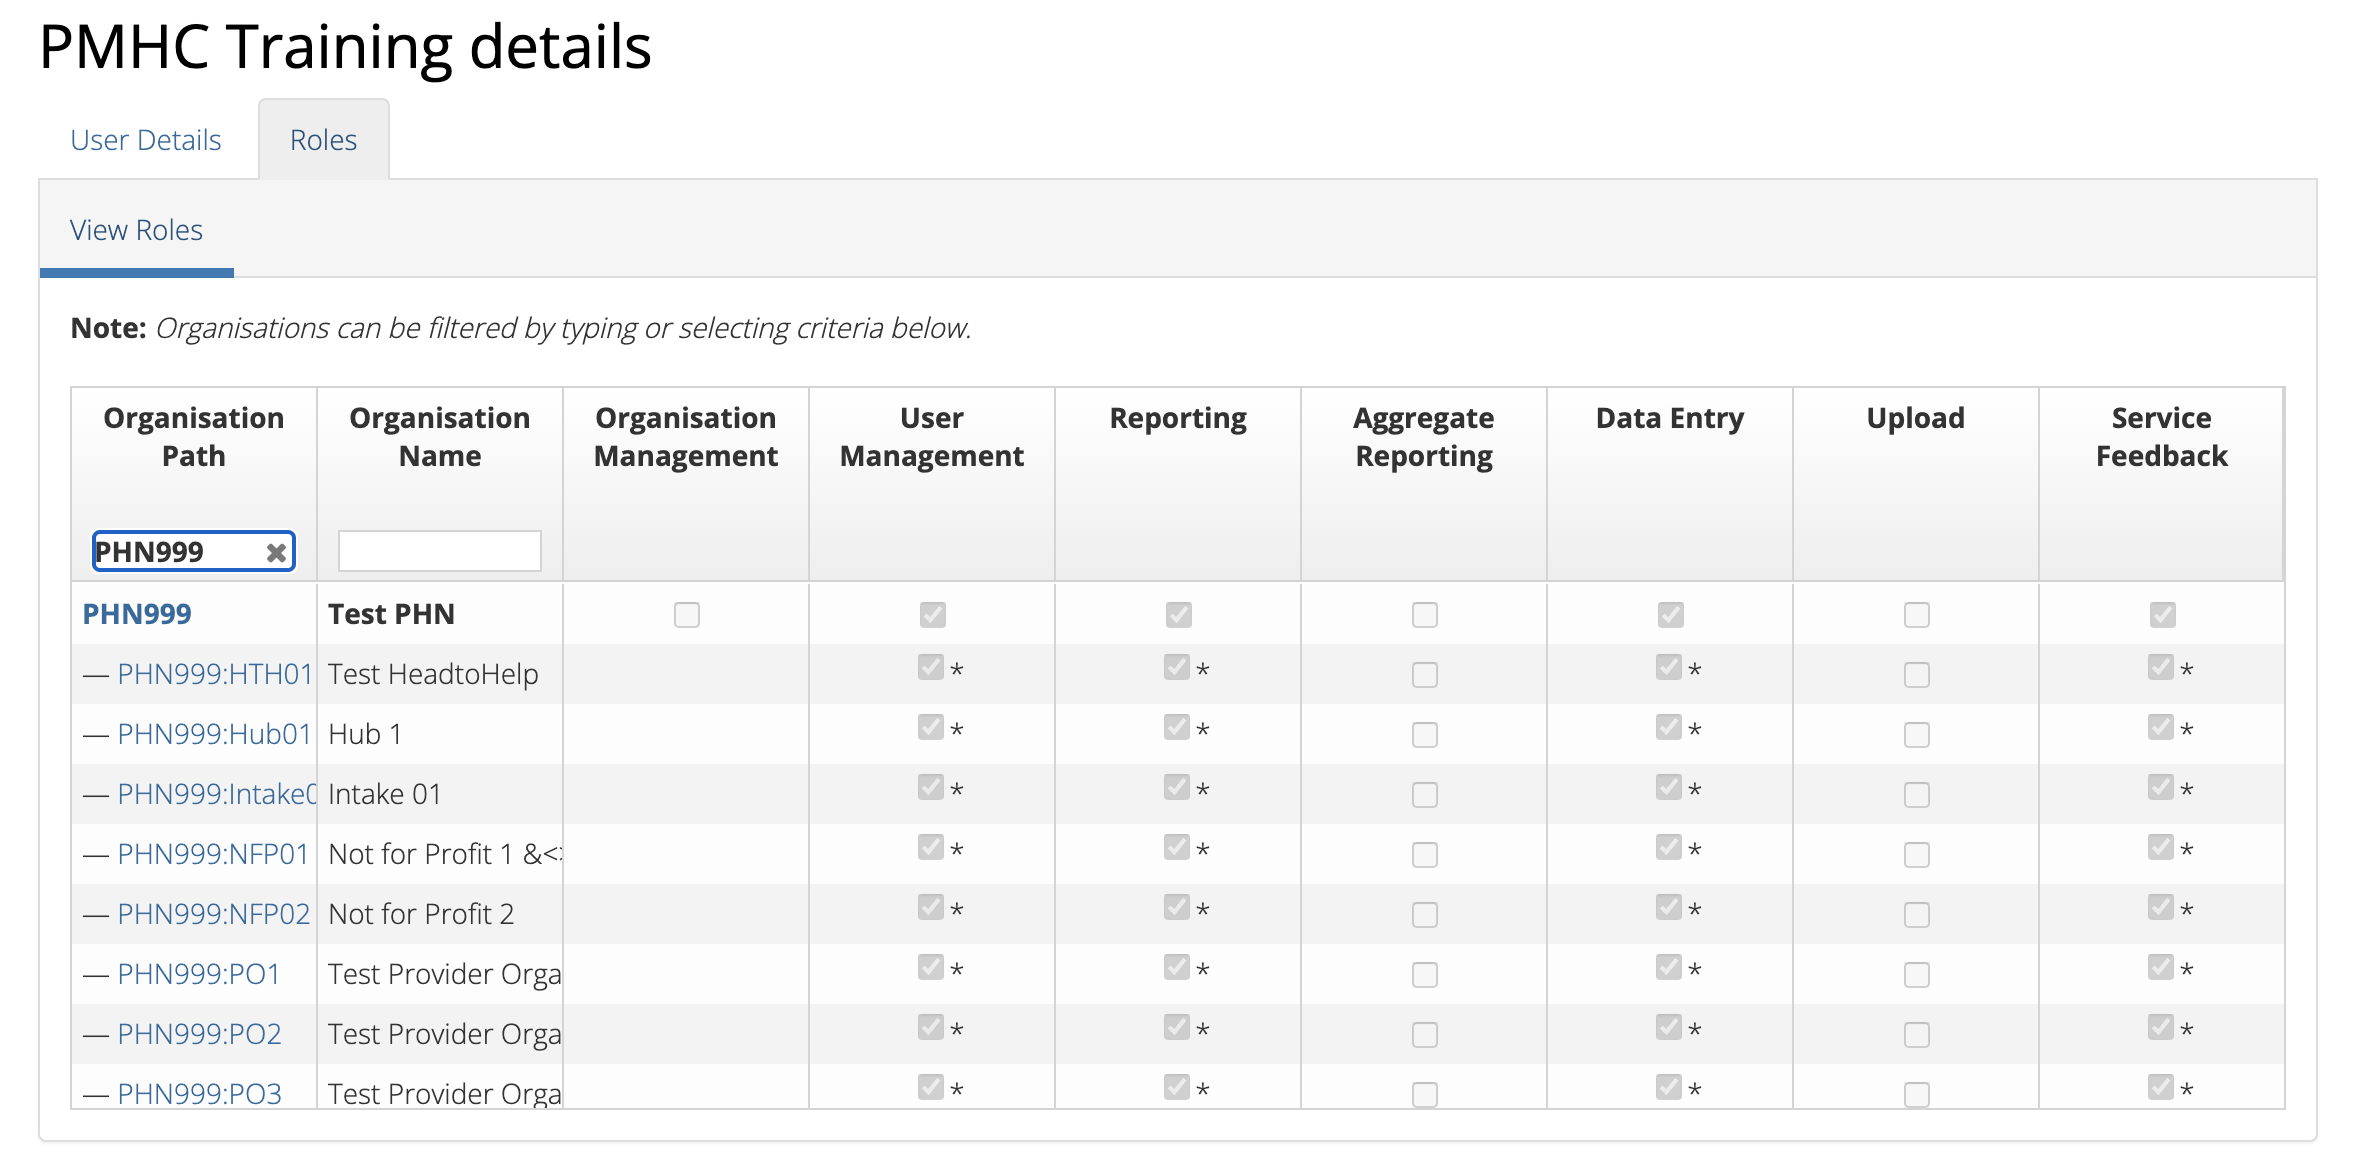
Click the Roles tab
Click the Edit Roles tab
Please note: a user can not edit their roles. The ‘Edit Roles’ tab will not be displayed when viewing your own profile.
A tick indicates the user currently has this role assigned at the relevant organisation.
Multiple roles can be assigned and these roles are shown as blue ticks
Add a role by clicking the empty checkbox
Remove a role by clicking the selected checkbox
In the Actions column, clicking the button will remove all the user’s
roles at that organisation. If the user then has no roles left for any
organisation they will be prevented from logging into the PMHC MDS system.
All changes are automatically saved
The system will automatically notify the user overnight of any role changes.
Please note: you will still see users in your list that have had all their roles removed unless you use the ‘Actions’ feature.
A user can be deleted from an organisation by using the button under
the edit roles tab, which will remove all the roles a user has at that organisation.
Once completed, if the user does not have any remaining roles within the PMHC MDS, the
user will no longer be displayed in the view users table.
The User Auditing Tool allows users with the User Management role to
review users who have not recently logged in to the PMHC MDS. User managers
should periodically check this table and remove all roles from any user who no
longer requires access.
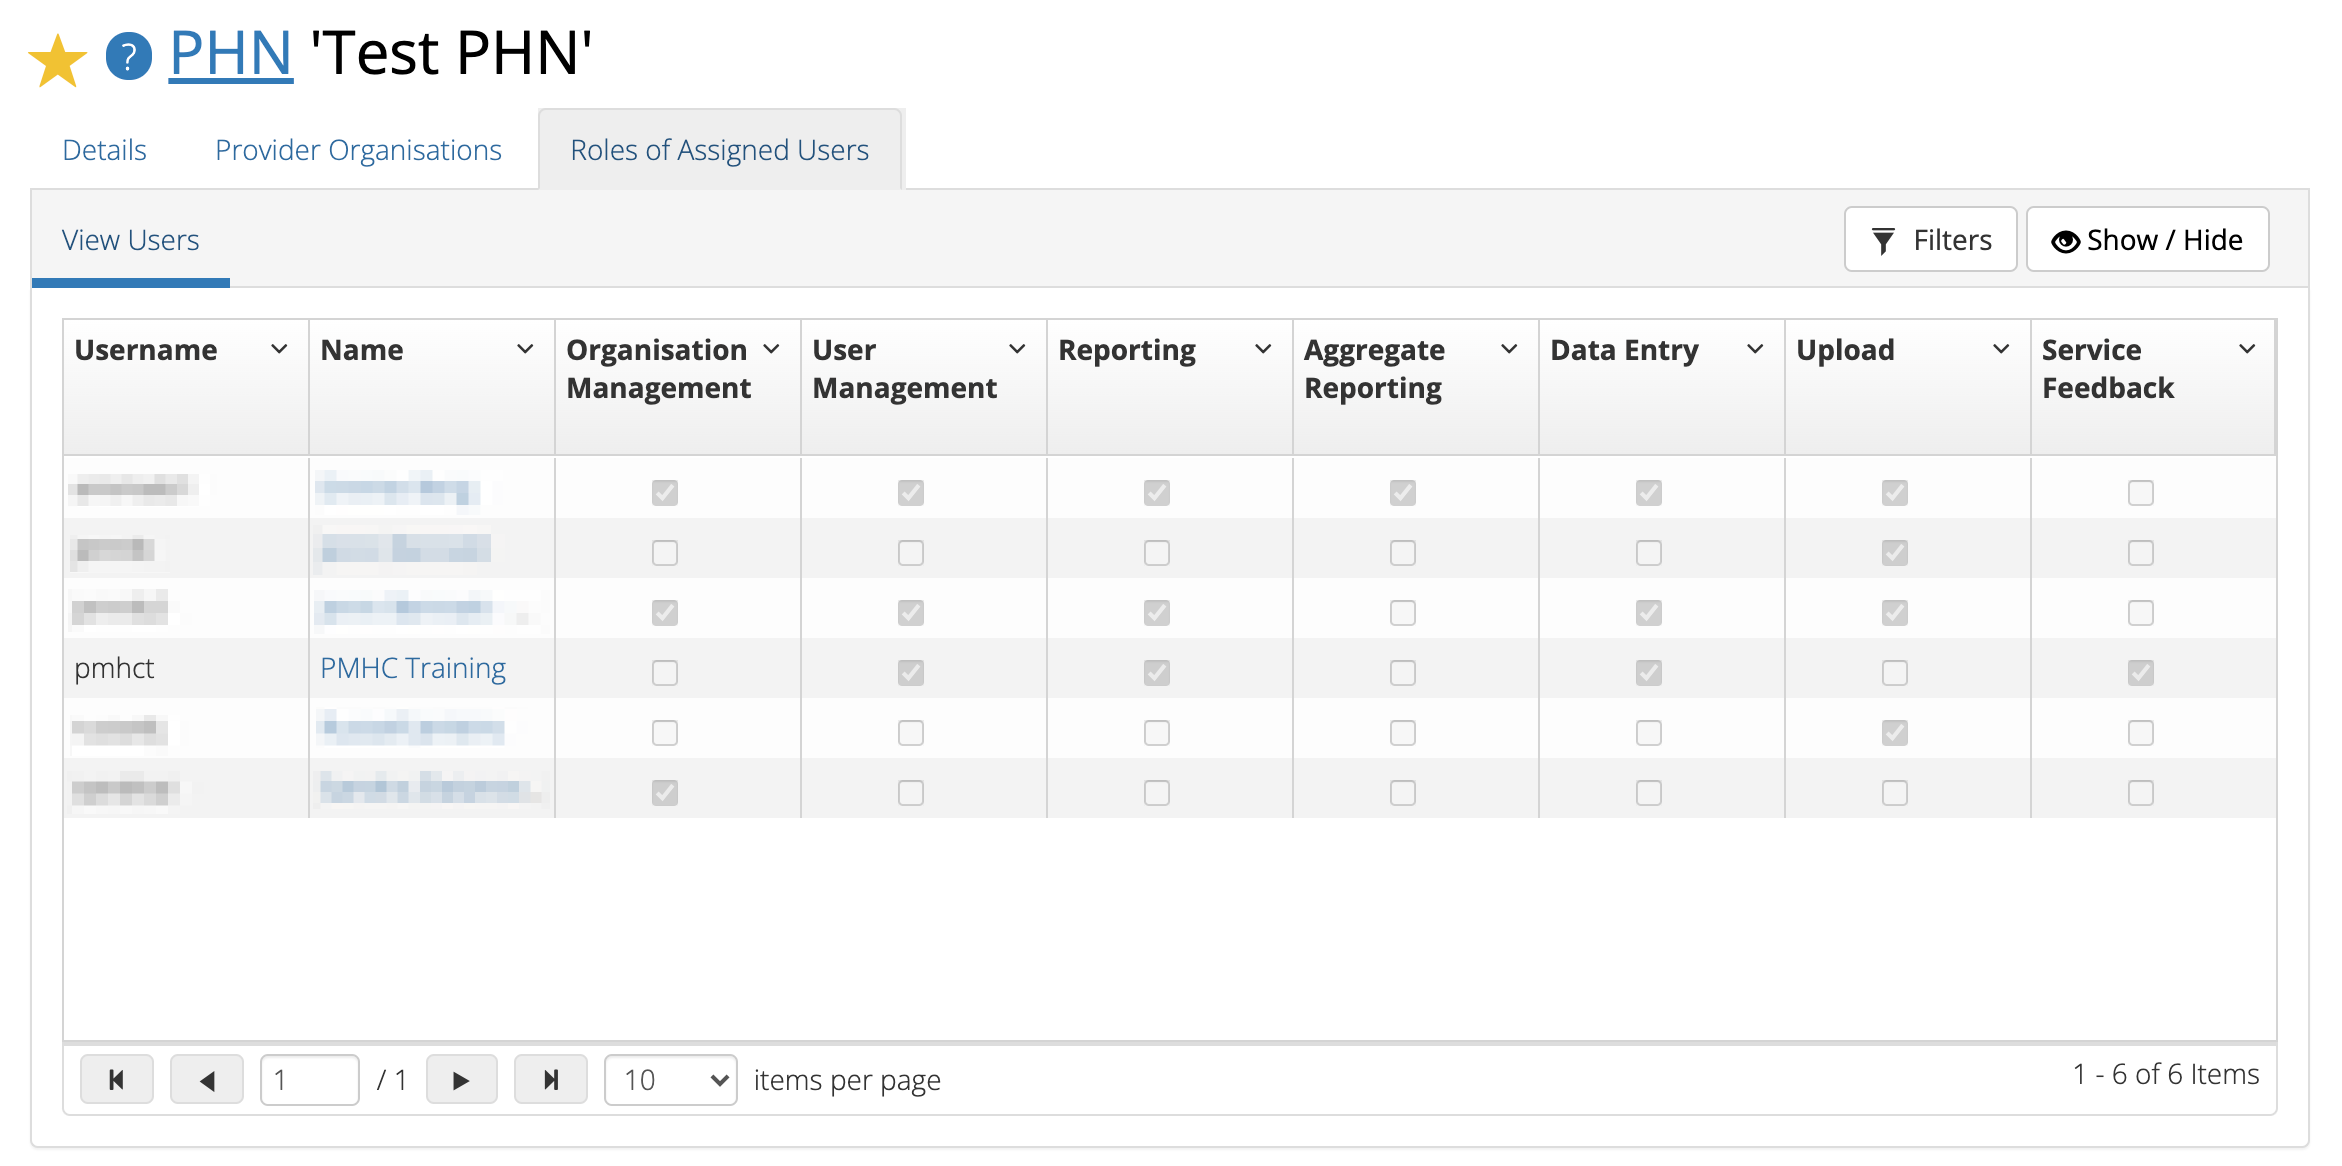
You can view users assigned to an organisation through the organisation tab, by following these steps:
Navigate to the tab showing either the PHNs details or the provider organisations details
Click on the PHNs or provider organisations name in blue displayed within the table list.
If you are unsure how to view the details see Viewing a PHN or Viewing a Provider Organisation
Under the Users tab, you can view a table list of the
organisation’s users
You can filter the users within this table list,
click the grey Filters button and start typing in an edit box now
displayed under the column headers. To remove the filter, click the grey
cross within the edit box beside any entered text

 button will remove all the user’s
roles at that organisation. If the user then has no roles left for any
organisation they will be prevented from logging into the PMHC MDS system.
button will remove all the user’s
roles at that organisation. If the user then has no roles left for any
organisation they will be prevented from logging into the PMHC MDS system.